Quickbooks
Information on the Quickbooks Financial Interfaces available in RMS.
Quickbooks is an accounting software package available as a self-hosted or cloud-based application suitable for both Accrual & Cash Accounting properties using RMS.
-
Information
-
Quickbooks Desktop
-
Quickbooks Online
- Add Button
Information
Quickbooks is available as a self-hosted 'Desktop' version as well as the cloud-based 'Online' version. The product being used at the property will determine the setup and features available.
The Financial Interface to Quickbooks Desktop and Quickbooks Online are available for both Accrual & Cash Accounting properties using RMS.
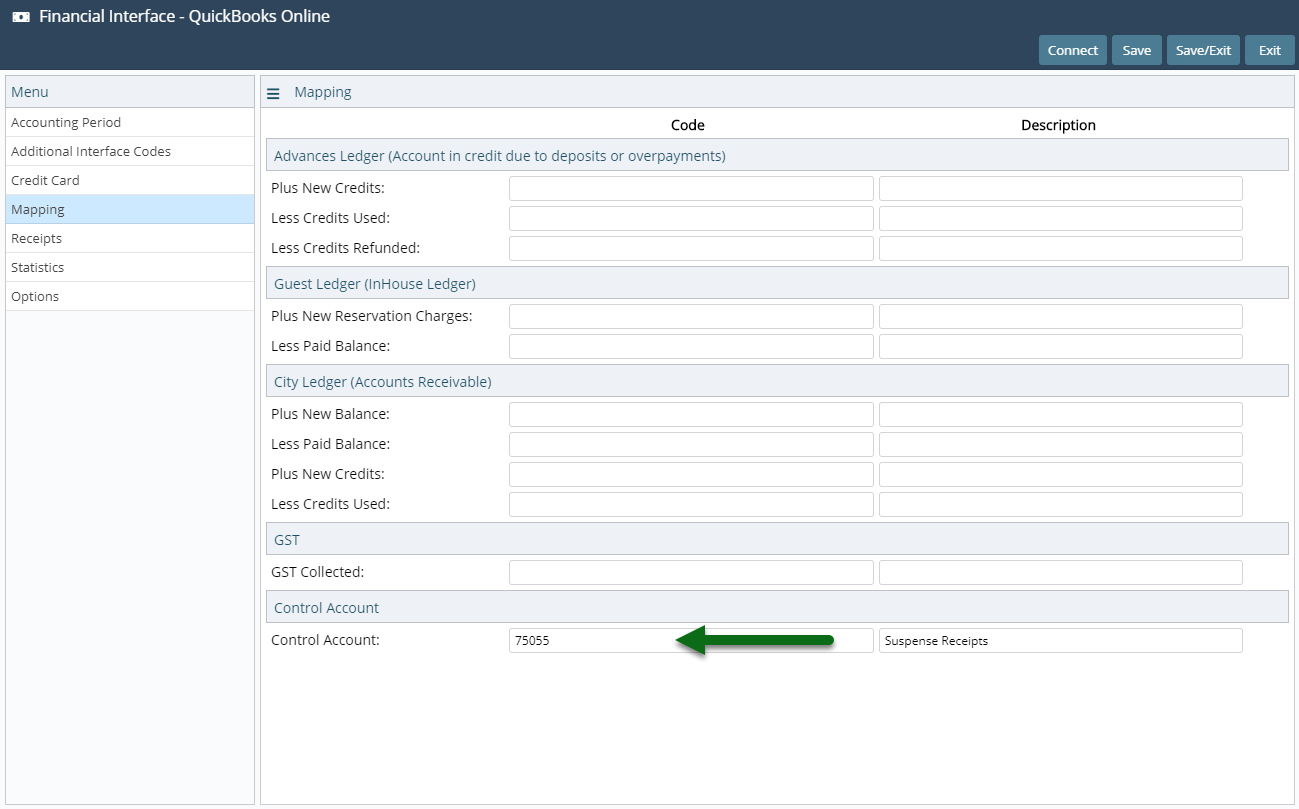
The Control Account is used in the financial export to offset Suspense Receipts for Cash Accounting and as an offset for Accrual Accounting when generated for a date range.
General Ledger Account Codes should be setup in RMS to match the naming conventions used in Quickbooks.

Connecting to Quickbooks in RMS requires the Financial Interfaces module.

Users will require Security Profile access to use this feature.
-
Quickbooks Desktop
-
Quickbooks Online
- Add Button
Quickbooks Desktop
Quickbooks Desktop is the self-hosted Quickbooks application available for interface with RMS.
Quickbooks offers optional Class Tracking to segment and track account balances by department, business office or location which can be setup in RMS to be included in the generated financial exports.
-
Setup
-
Use
- Add Button
Setup
Have your System Administrator complete the following.
- Log a Service Request for the financial interface to be set to 'Quickbooks Desktop'.
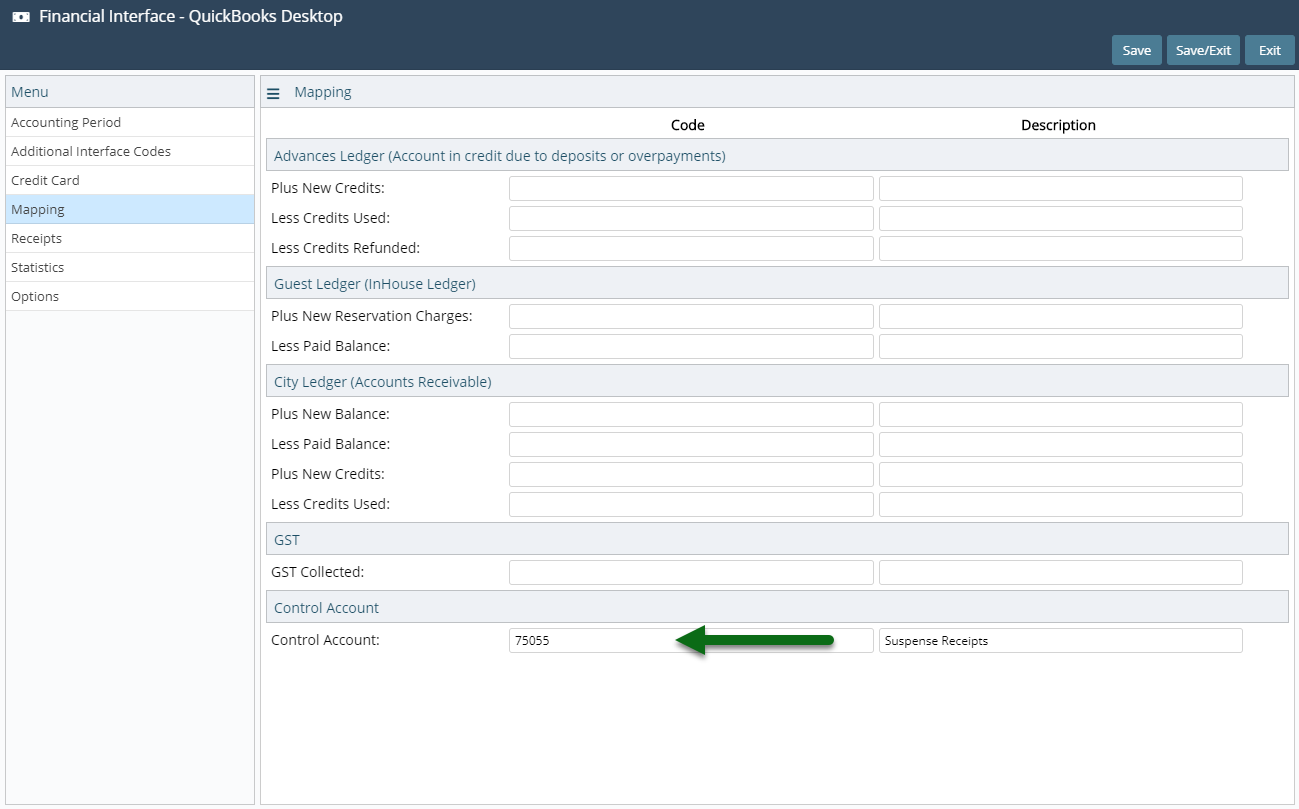
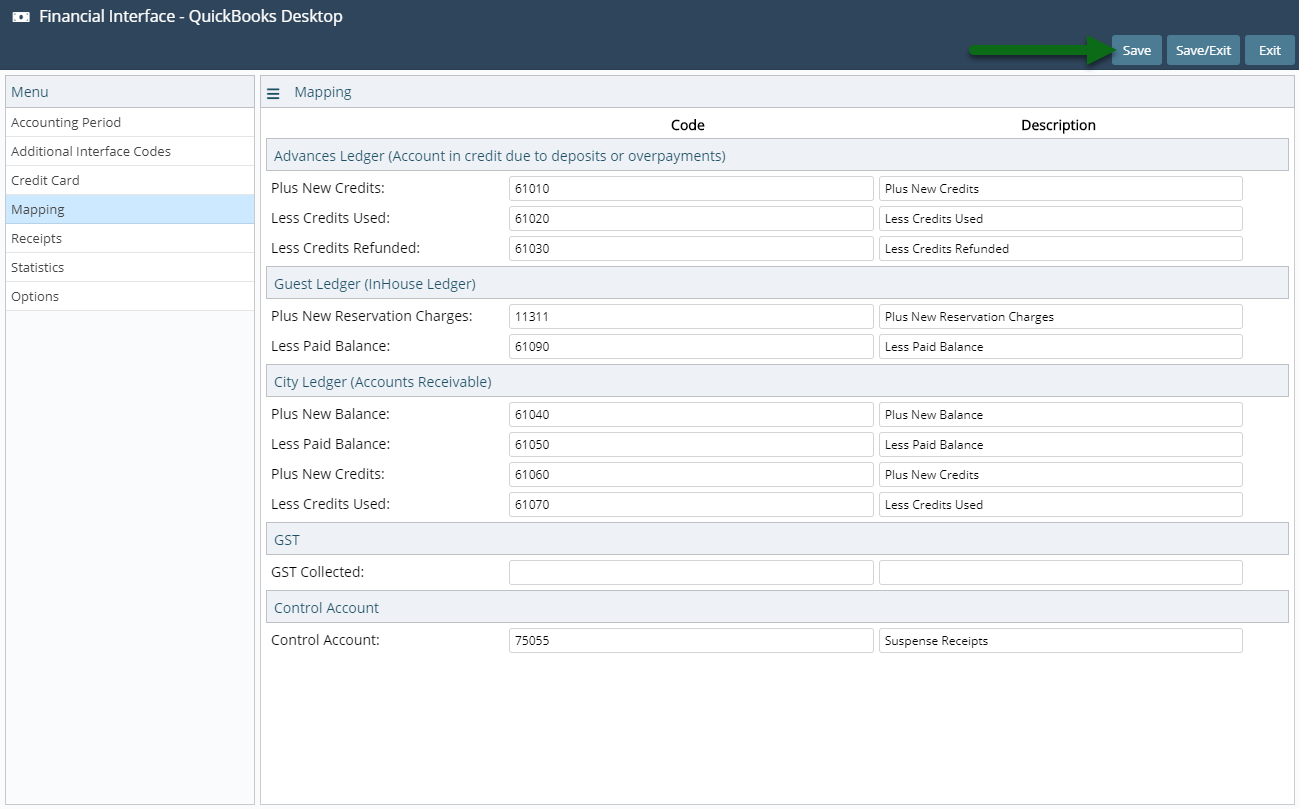
- Go to Setup > Accounting > Financial Interface in RMS.
- Navigate to the 'Mapping' tab.
- Enter the Offset GL Account Code in the 'Control Account' section.
-
Accrual Accounting Only:
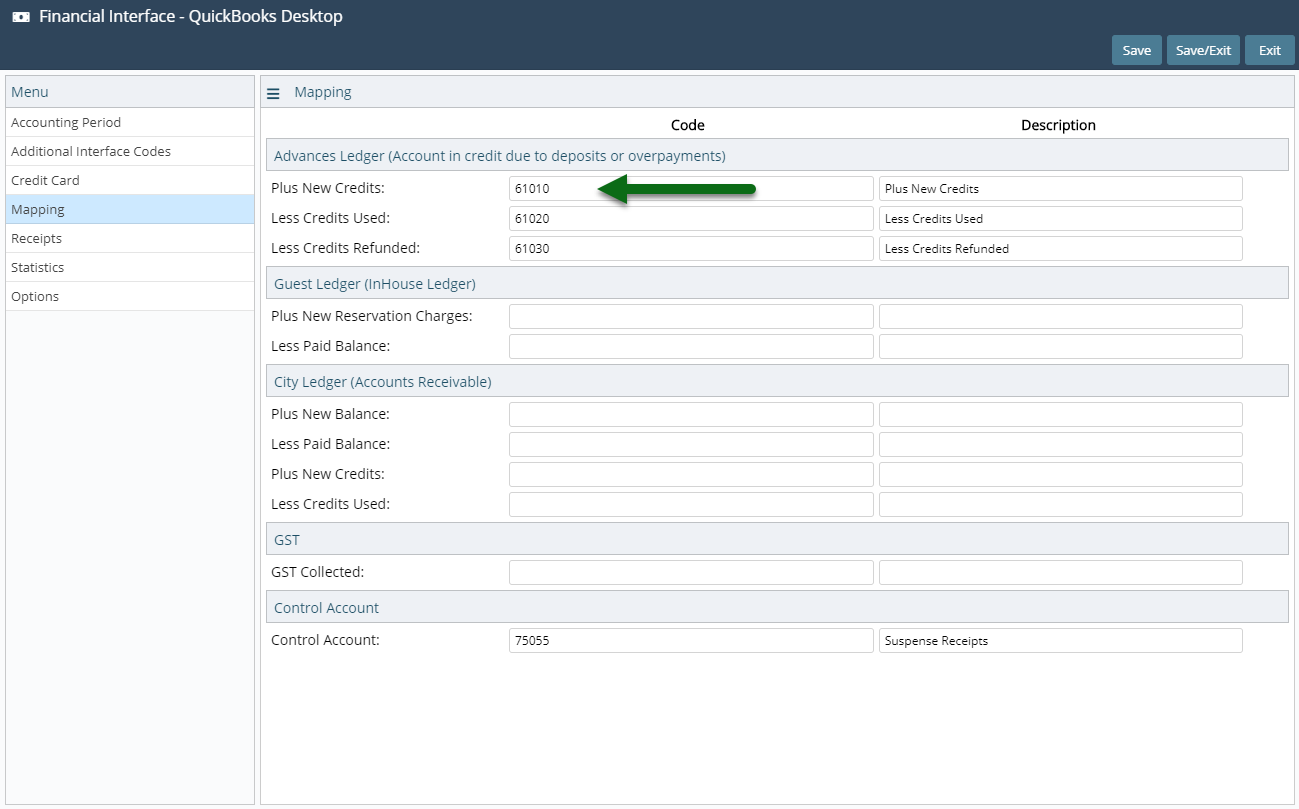
- Enter the GL Account Codes & Descriptions in the Advances Ledger section.
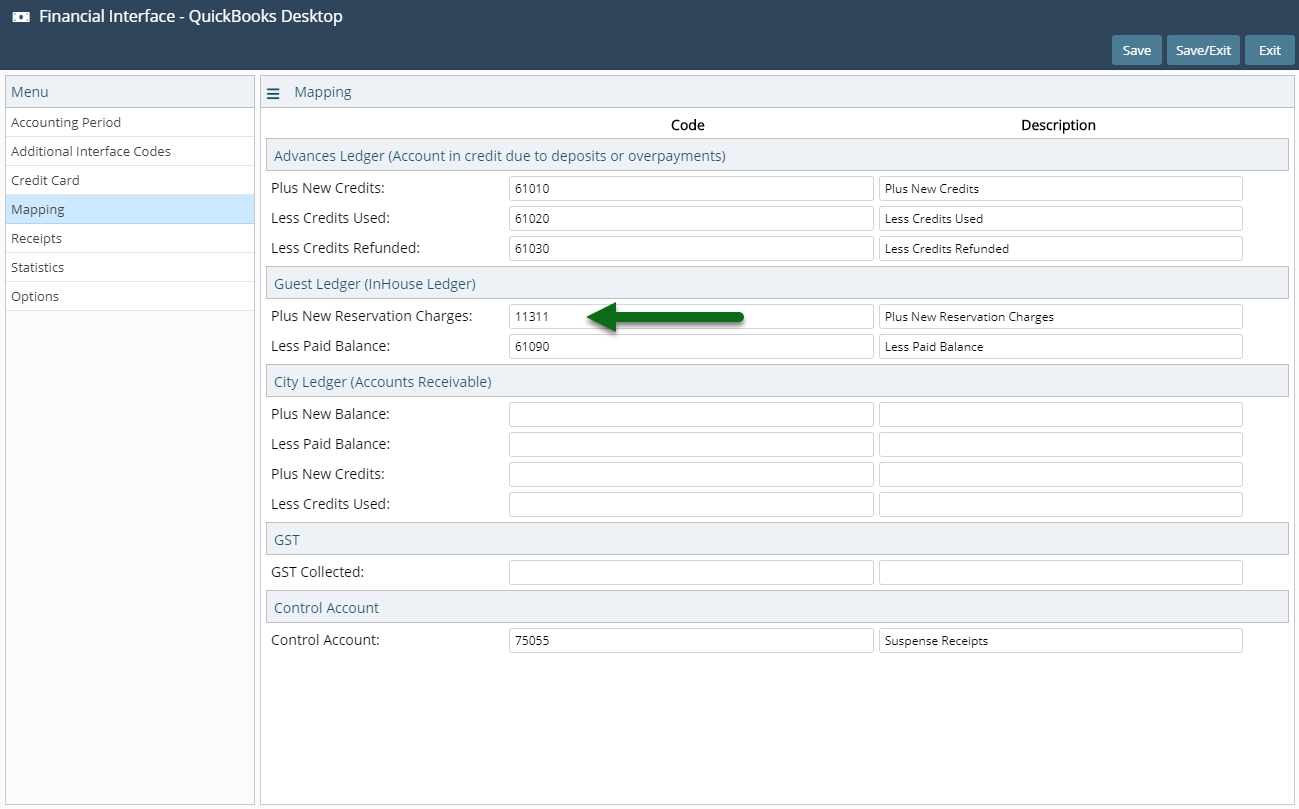
- Enter the GL Account Codes & Descriptions in the Guest Ledger section.
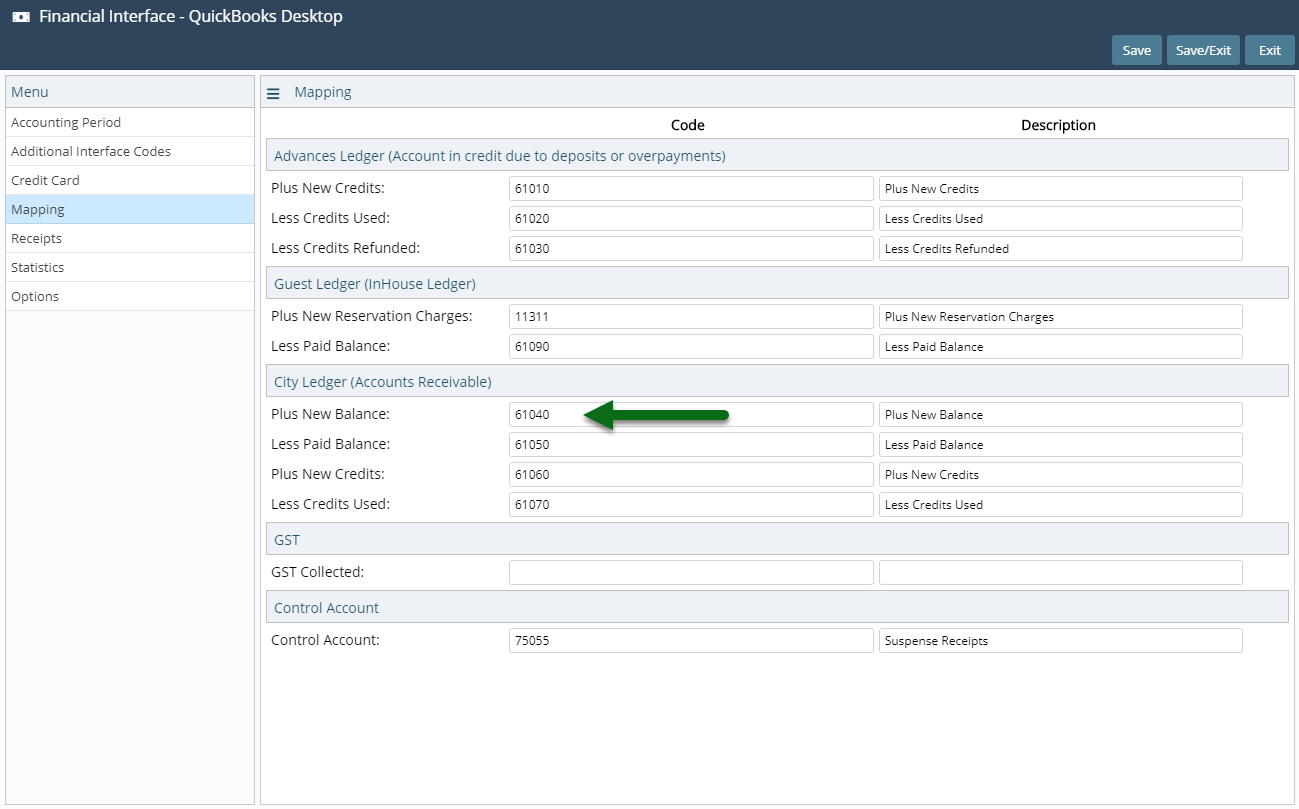
- Enter the GL Account Codes & Descriptions in the City Ledger section.
-
Accrual Accounting Only:
- Select 'Save' and navigate to the 'Receipts' tab.
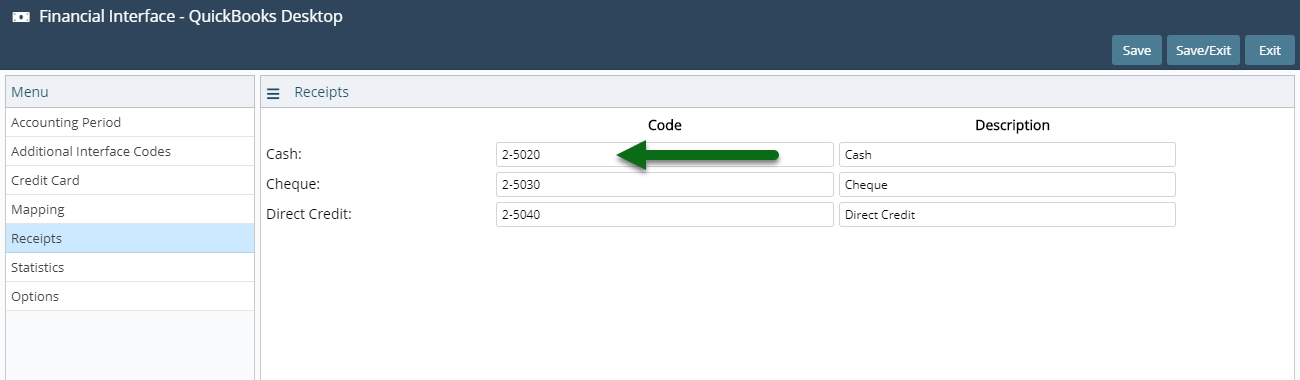
- Enter the GL Account Codes & Descriptions for the Receipt Types.
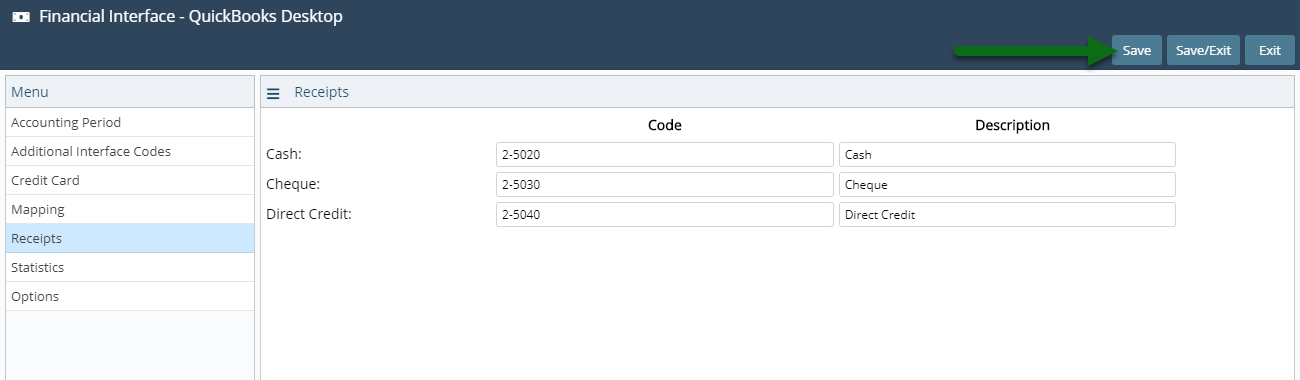
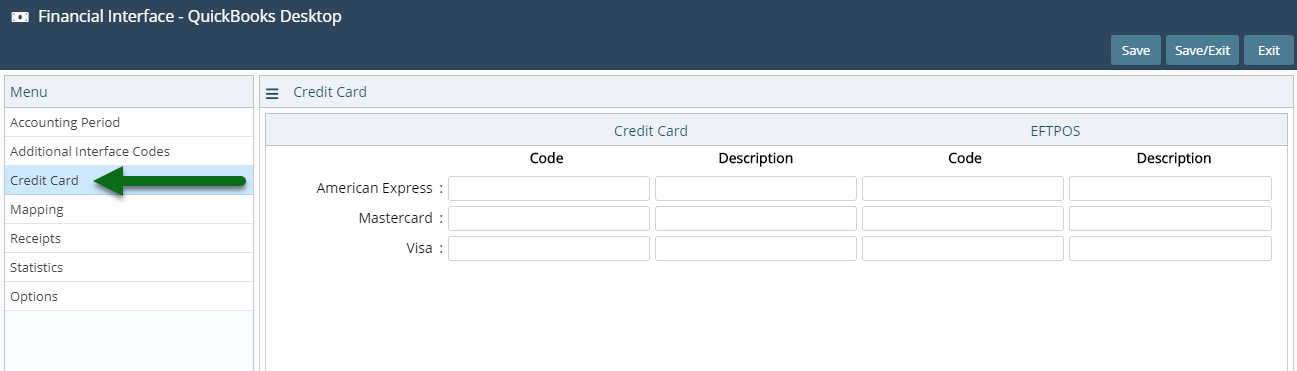
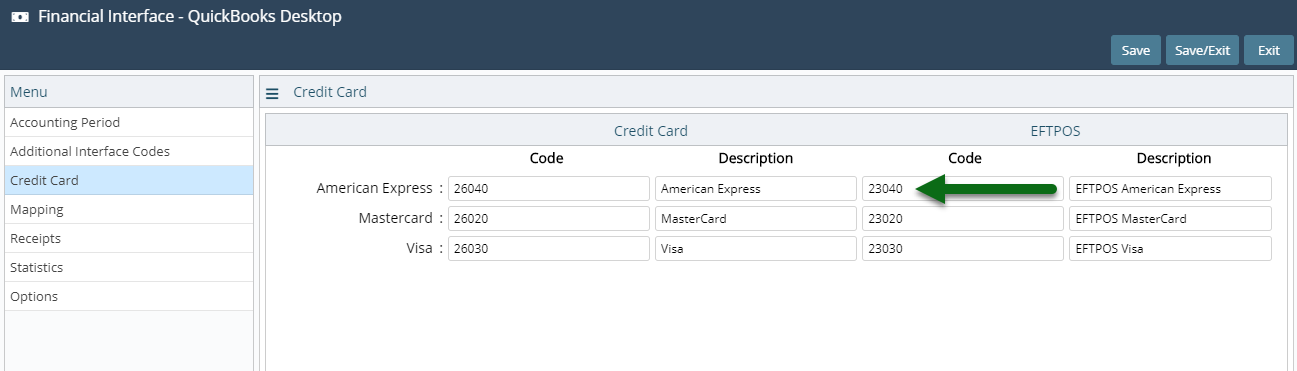
- Select 'Save' and navigate to the 'Credit Cards' tab.
- Enter the GL Account Codes & Descriptions for the Card Types.
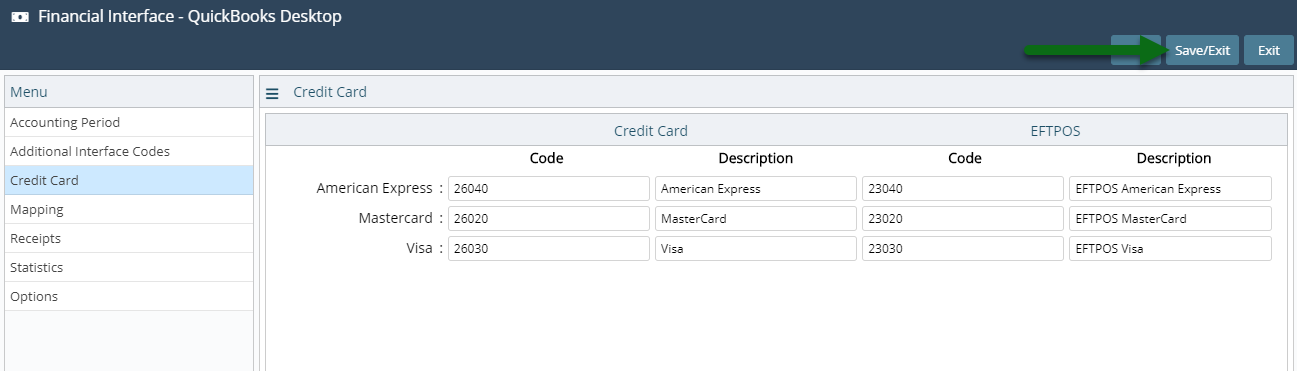
- Save/Exit.
- Optional: Setup Quickbooks Class Tracking.
-
Guide
-
Use
- Add Button
Guide
Log a Service Request for the financial interface to be set to 'Quickbooks Desktop'.
Go to Setup > Accounting > Financial Interface in RMS.

Navigate to the 'Mapping' tab.

Enter the Offset GL Account Code in the 'Control Account' section.
Accrual Accounting Only: Enter the GL Account Codes & Descriptions in the Advances Ledger section.
Accrual Accounting Only: Enter the GL Account Codes & Descriptions in the Guest Ledger section.
Accrual Accounting Only: Enter the GL Account Codes & Descriptions in the City Ledger section.
Select 'Save' and navigate to the 'Receipts' tab.
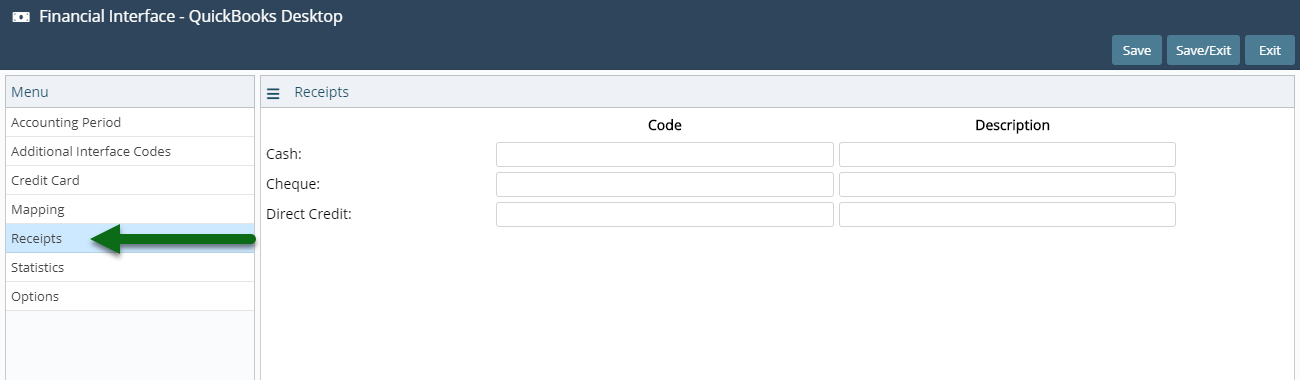
Enter the GL Account Codes & Descriptions for the Receipt Types.
Select 'Save' and navigate to the 'Credit Cards' tab.
Enter the GL Account Codes & Descriptions for the Card Types.
Select 'Save/Exit' to store the changes made.
Optional: Setup Quickbooks Class Tracking.
-
Use
- Add Button
Use
- Go to Utilities > Financial Interface in RMS.
- Select the Export Option.
- Select the Date.
- Build.
-
Guide
- Add Button
Guide
Go to Utilities > Financial Interface in RMS.
Select the Export Option.

Select the Date.
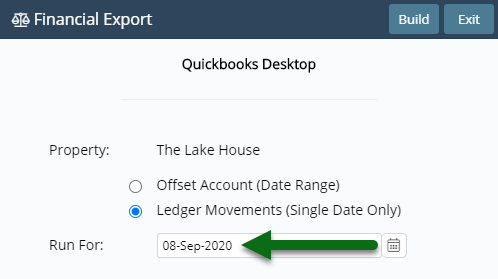
Select 'Build' to generate the financial export file using the selected option.
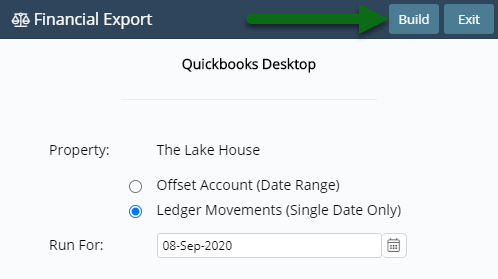
RMS will generate the financial export file that can be imported into the Quickbooks Desktop application.
Use
- Go to Utilities > Financial Interface in RMS.
- Select the Export Option.
- Select the Date.
- Build.
-
Guide
- Add Button
Guide
Go to Utilities > Financial Interface in RMS.
Select the Export Option.
Select the Date.
Select 'Build' to generate the financial export file using the selected option.
RMS will generate the financial export file that can be imported into the Quickbooks Desktop application.
Quickbooks Online
Quickbooks Online is the cloud-based application available for interface with RMS.
Quickbooks Online Plus offers optional Class Tracking to segment and track account balances by department, business office or location which can be setup in RMS to be included in the generated financial exports.
-
Setup
-
Use
- Add Button
Setup
Have your System Administrator complete the following.
- Log a Service Request for the financial interface to be set to 'Quickbooks Online'.
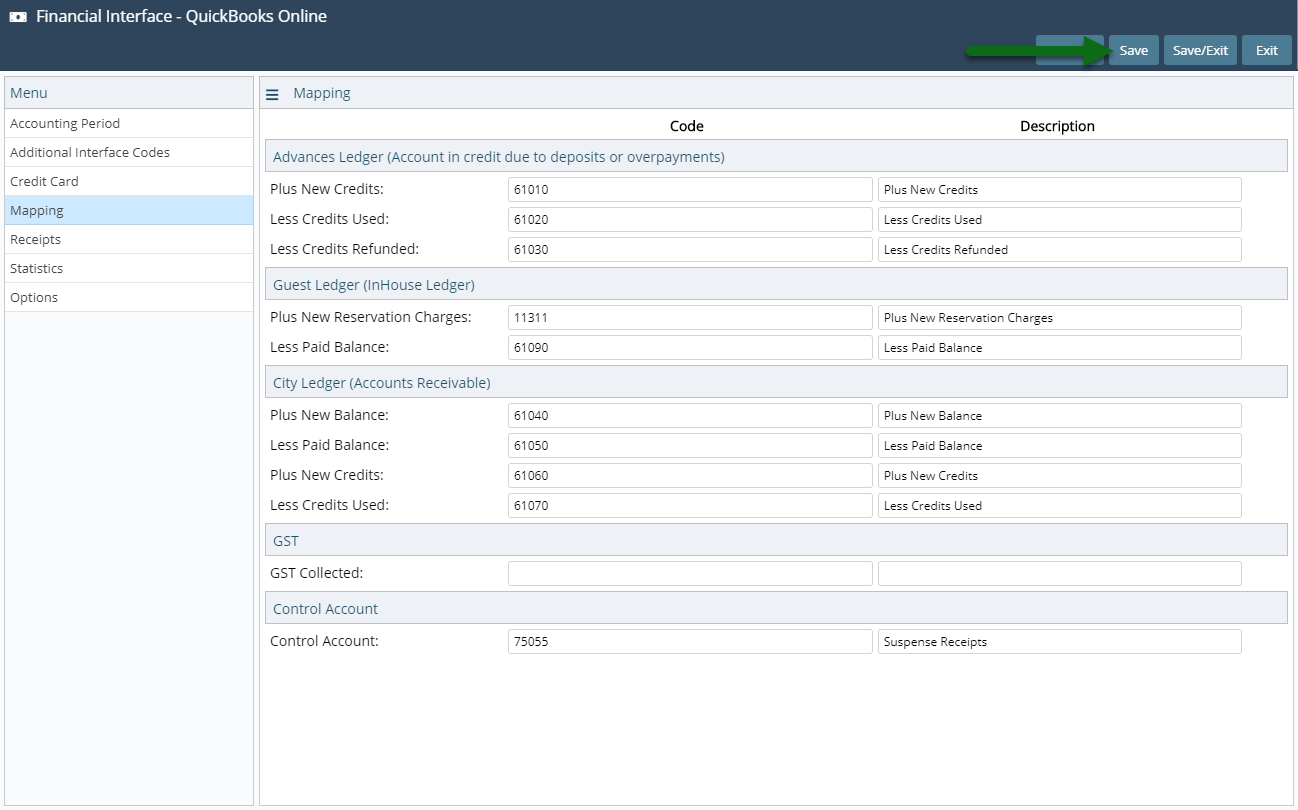
- Go to Setup > Accounting > Financial Interface in RMS.
- Navigate to the 'Mapping' tab.
- Enter the Offset GL Account Code in the 'Control Account' section.
-
Accrual Accounting Only:
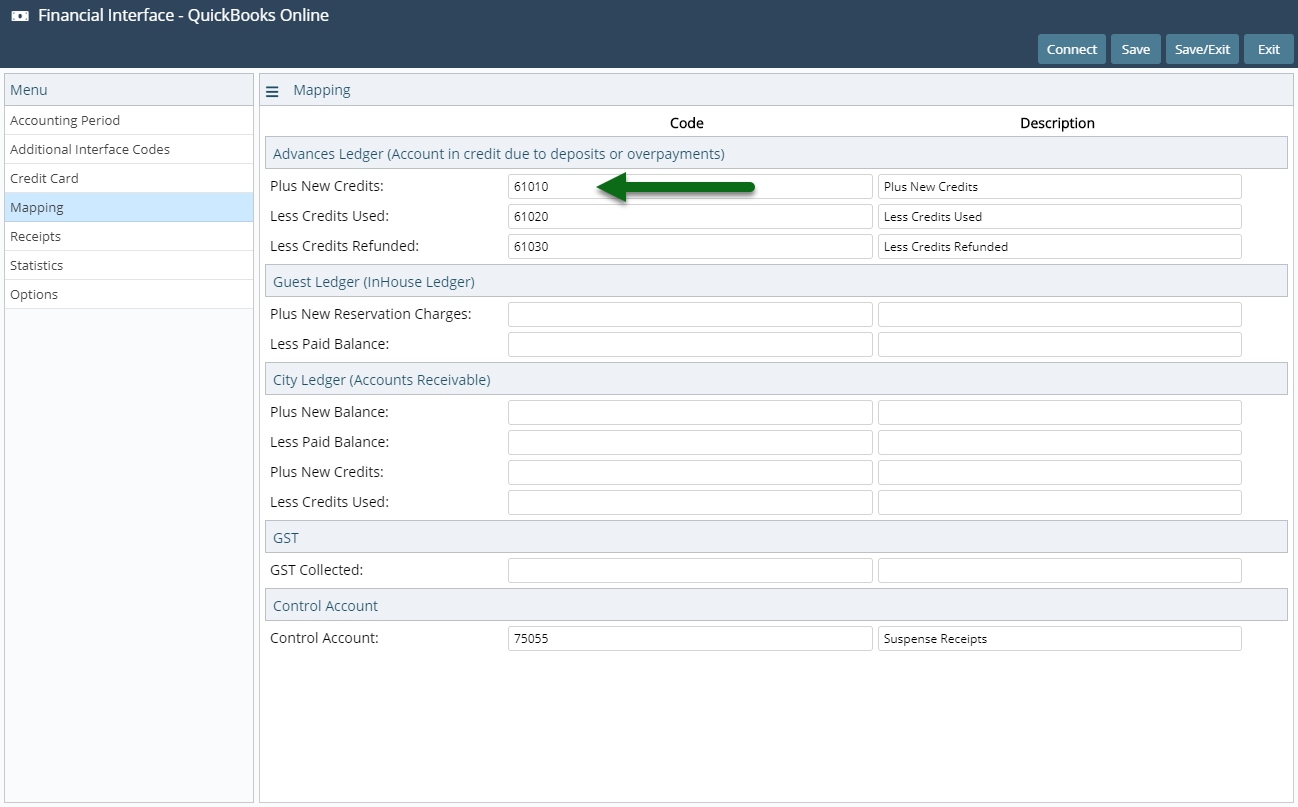
- Enter the GL Account Codes & Descriptions in the Advances Ledger section.
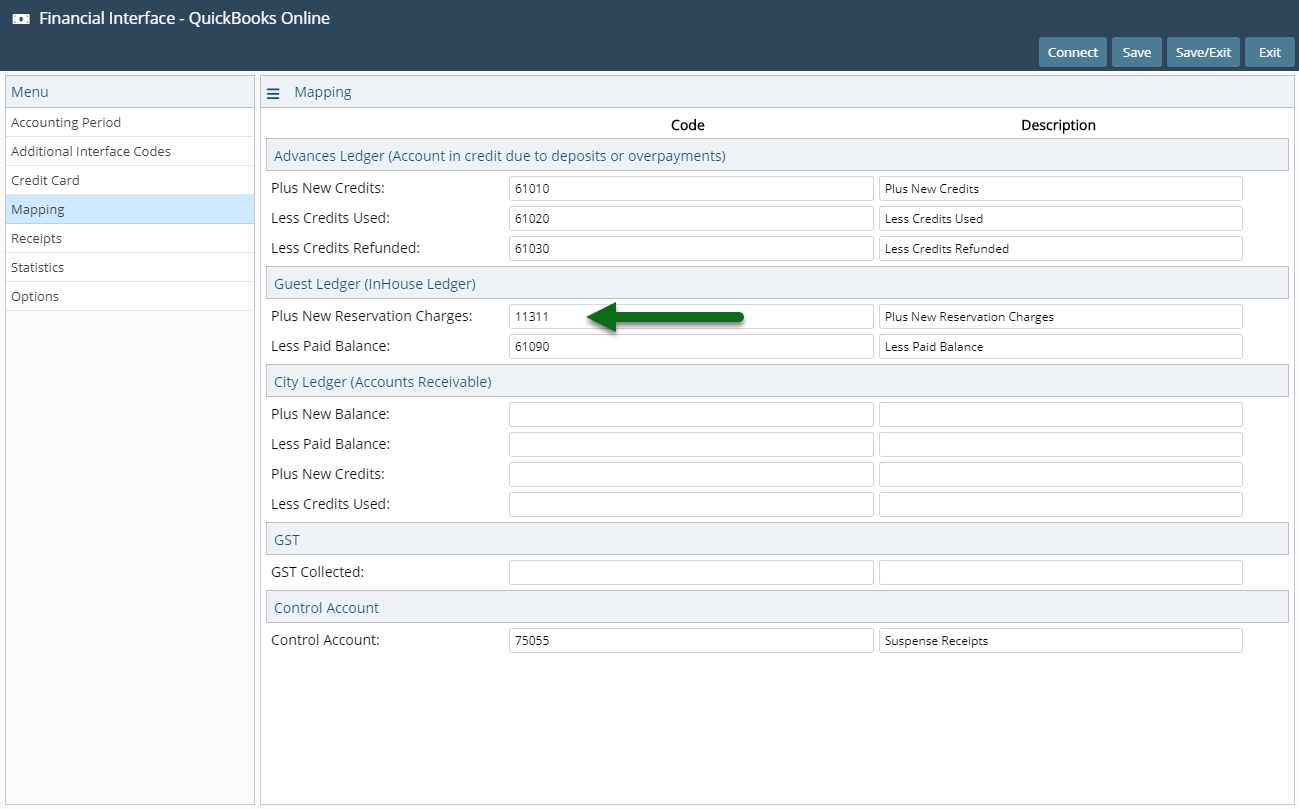
- Enter the GL Account Codes & Descriptions in the Guest Ledger section.
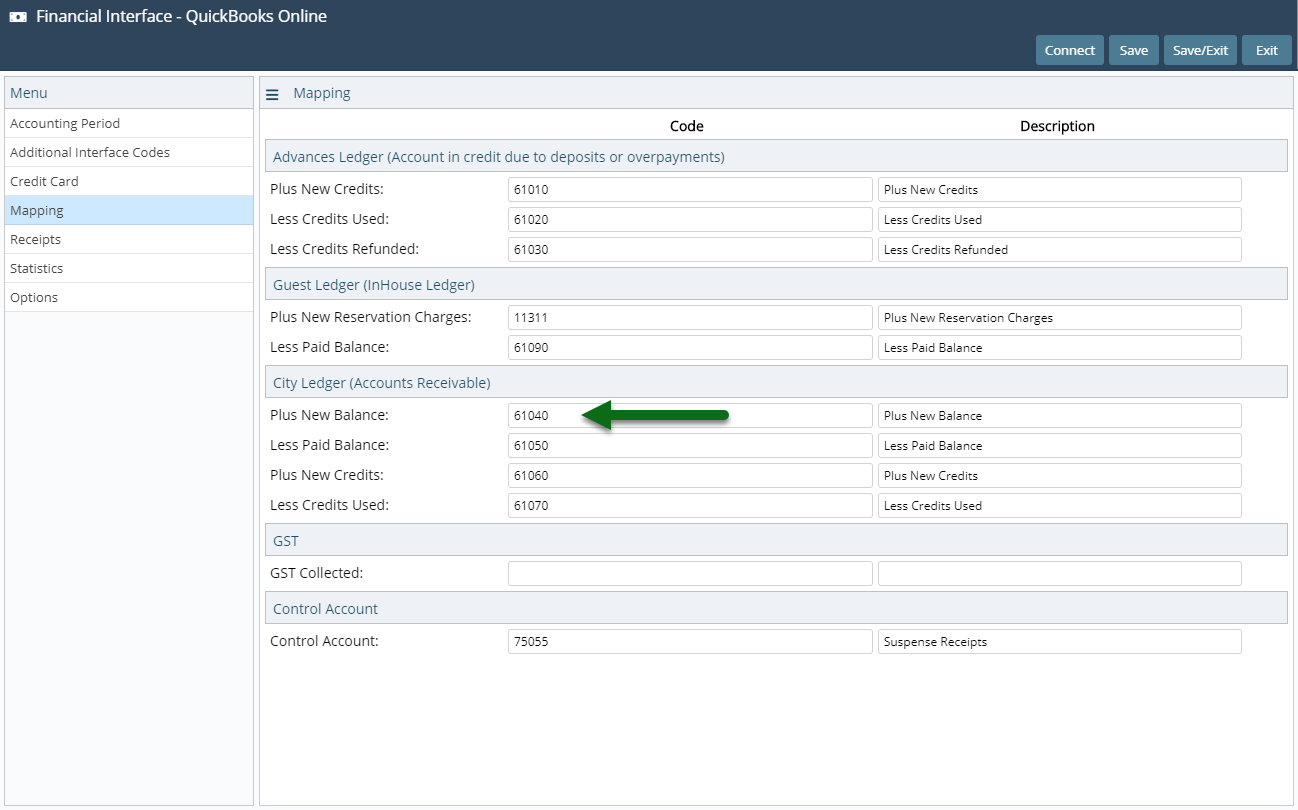
- Enter the GL Account Codes & Descriptions in the City Ledger section.
-
Accrual Accounting Only:
- Select 'Save' and navigate to the 'Receipts' tab.
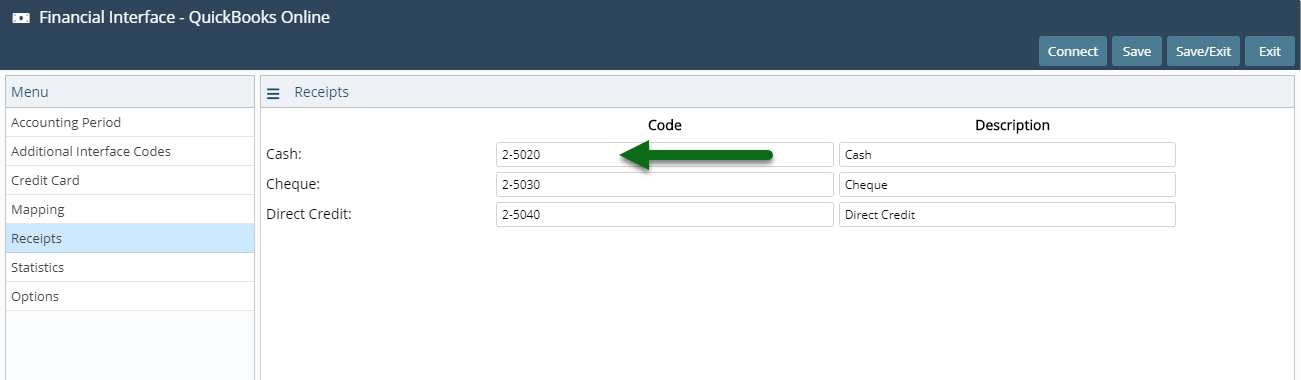
- Enter the GL Account Codes & Descriptions for the Receipt Types.
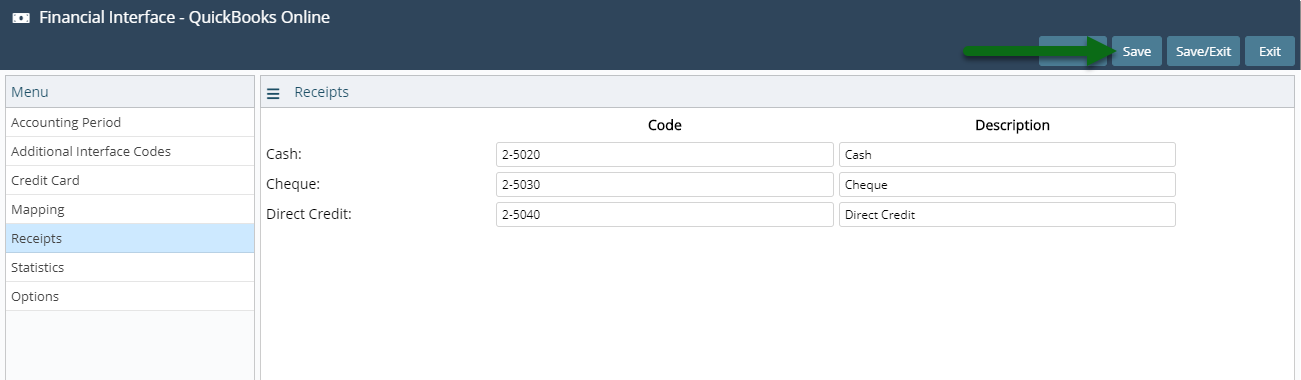
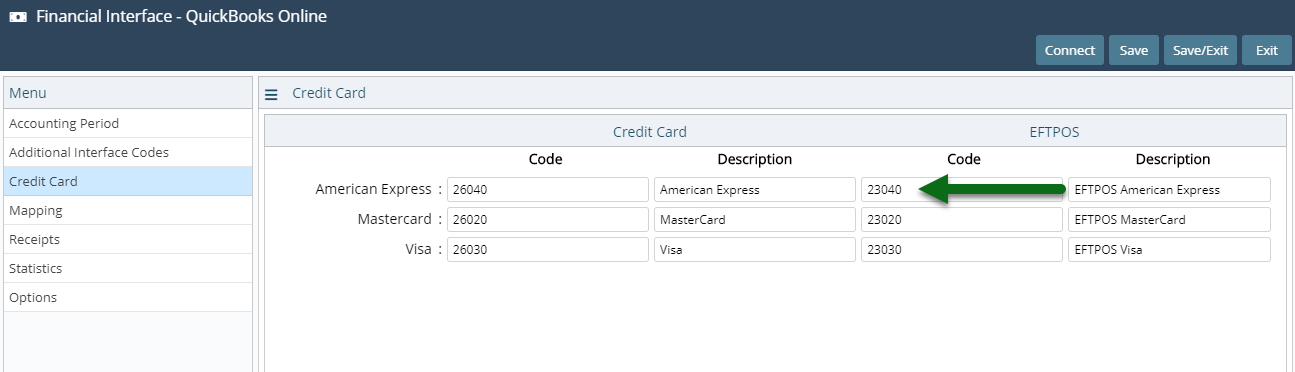
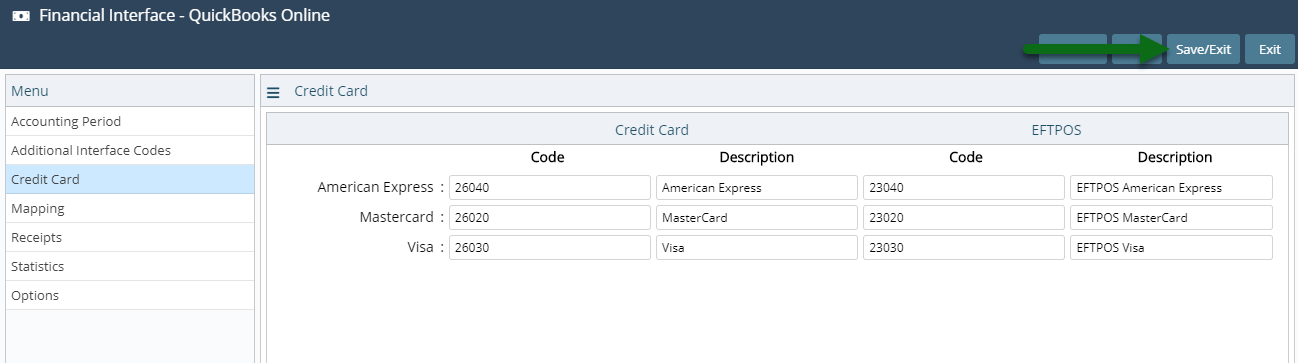
- Select 'Save' and navigate to the 'Credit Cards' tab.
- Enter the GL Account Codes & Descriptions for the Card Types.
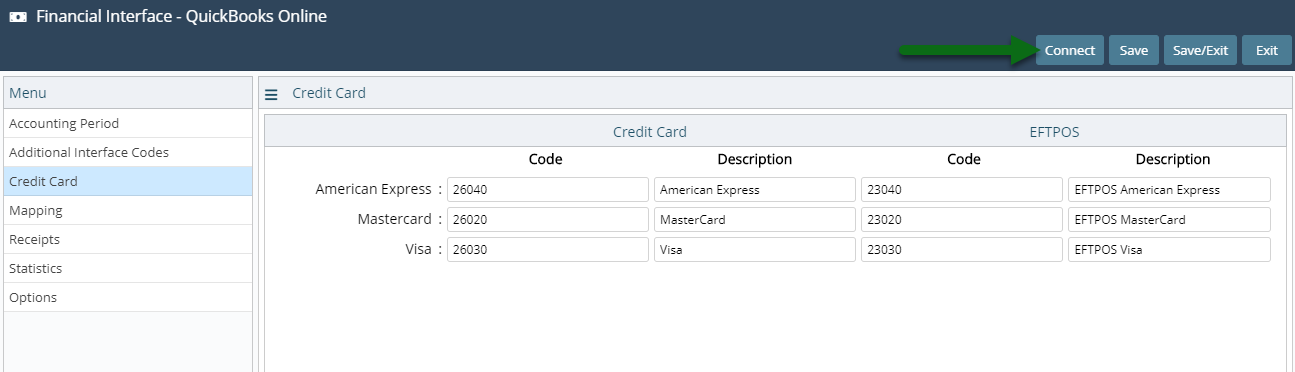
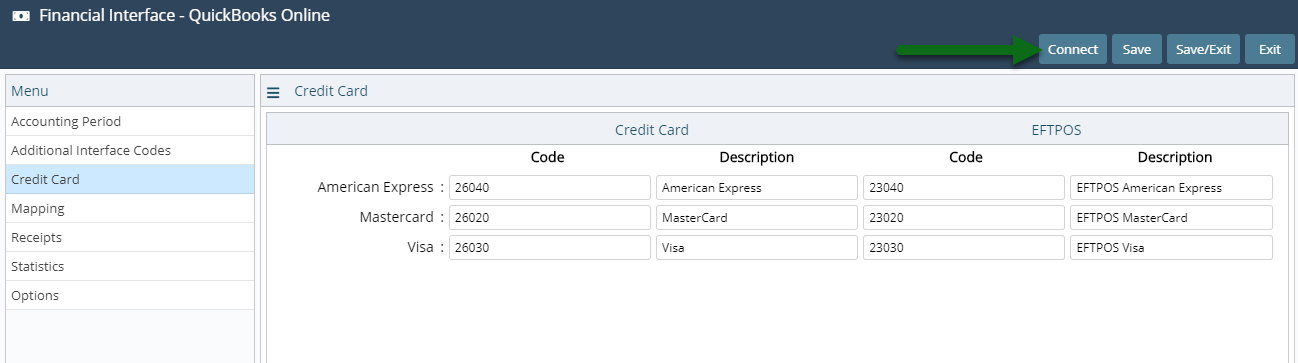
- Save.
- Select 'Connect'.
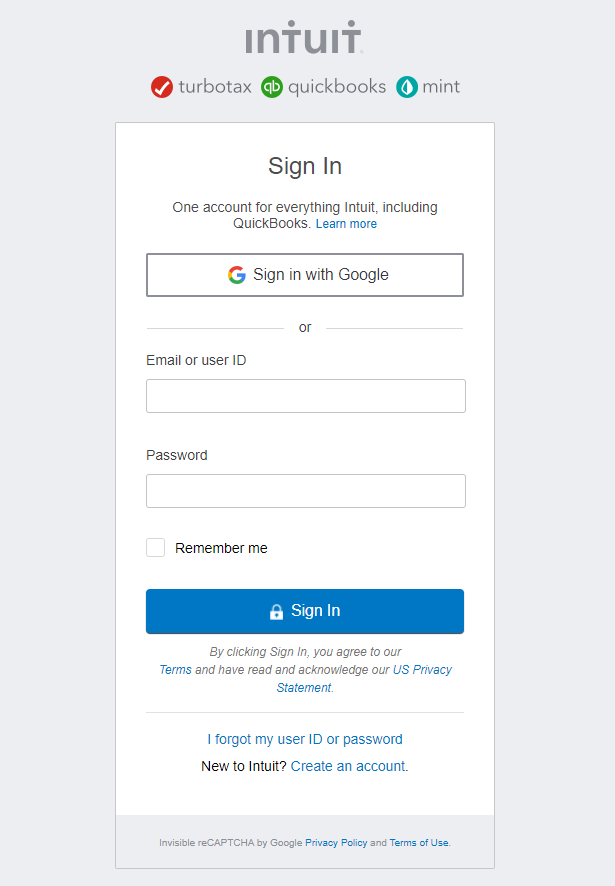
- Log into the Property's Quickbook Online account.
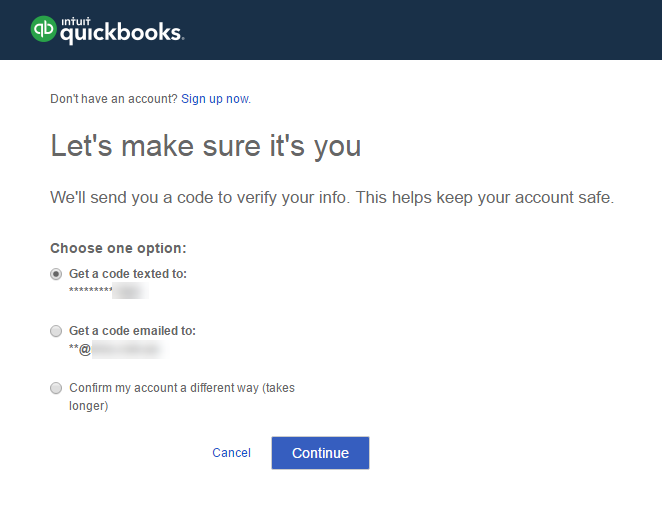
- Select the Security Verification method.
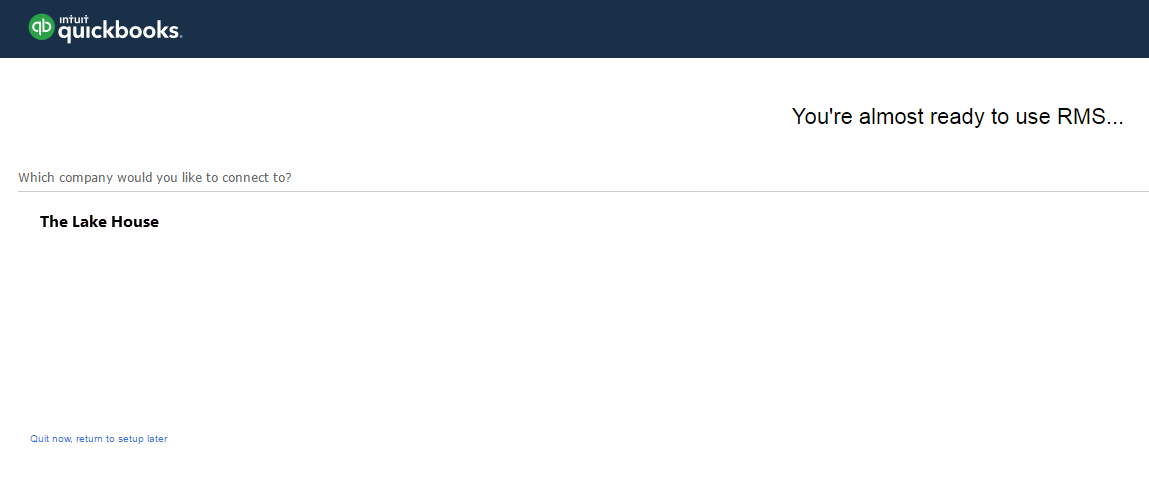
- Select the Company (Property) to connect to.
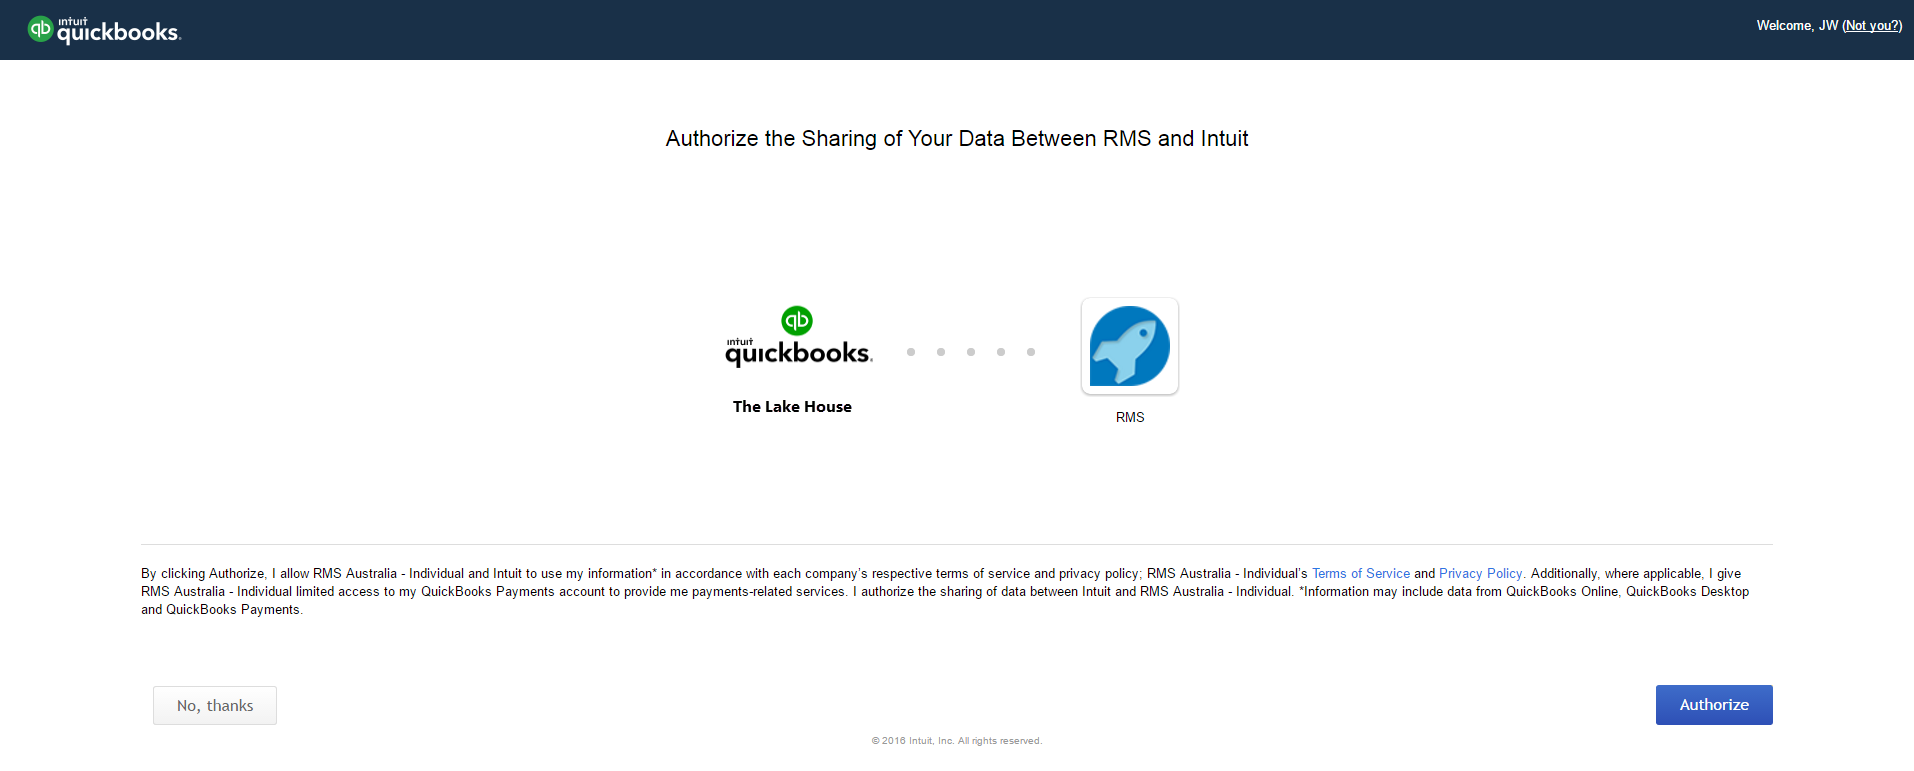
- Select 'Authorise'.
- Select 'Ok'.
- Save/Exit.
- Optional: Setup Quickbooks Class Tracking.
-
Guide
-
Use
- Add Button
Guide
Log a Service Request for the financial interface to be set to 'Quickbooks Online'.
Go to Setup > Accounting > Financial Interface in RMS.
Navigate to the 'Mapping' tab.
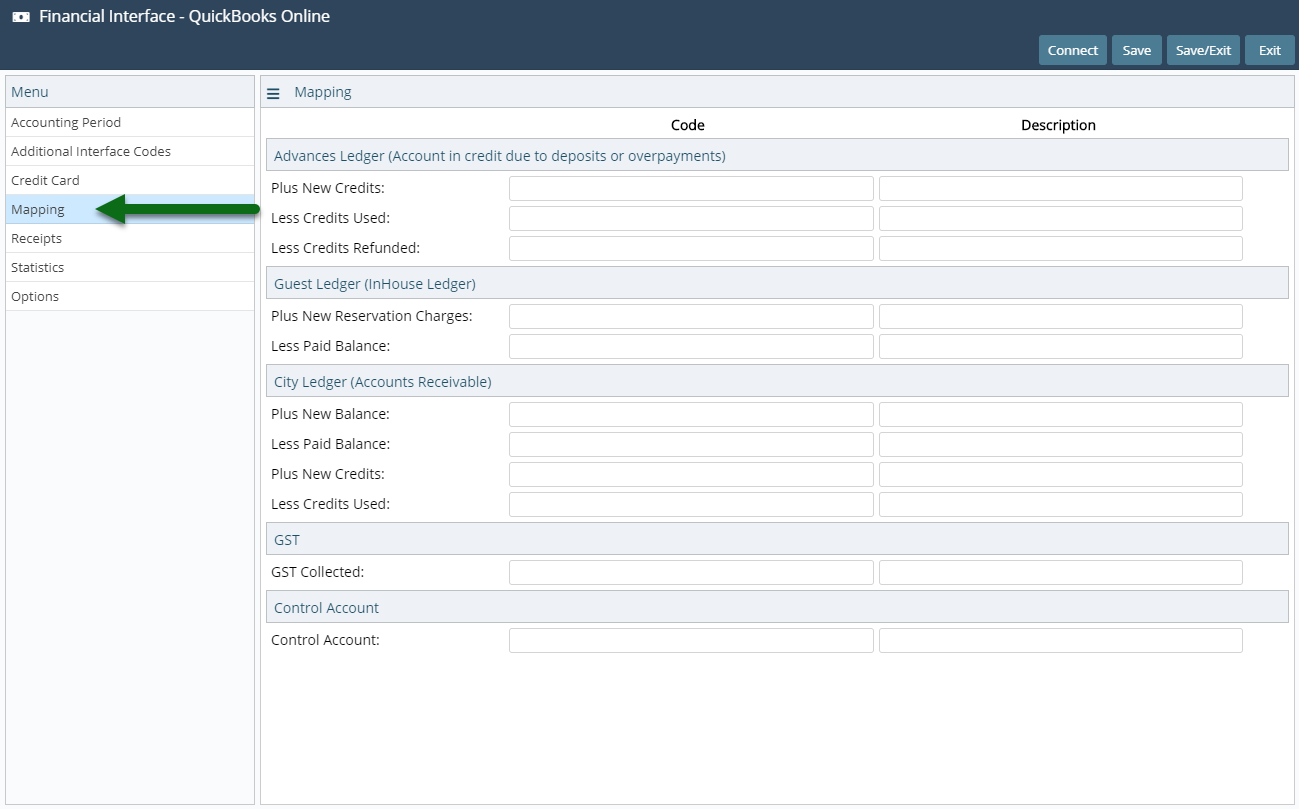
Enter the Offset GL Account Code in the 'Control Account' section.
Accrual Accounting Only: Enter the GL Account Codes & Descriptions in the Advances Ledger section.
Accrual Accounting Only: Enter the GL Account Codes & Descriptions in the Guest Ledger section.
Accrual Accounting Only: Enter the GL Account Codes & Descriptions in the City Ledger section.
Select 'Save' and navigate to the 'Receipts' tab.
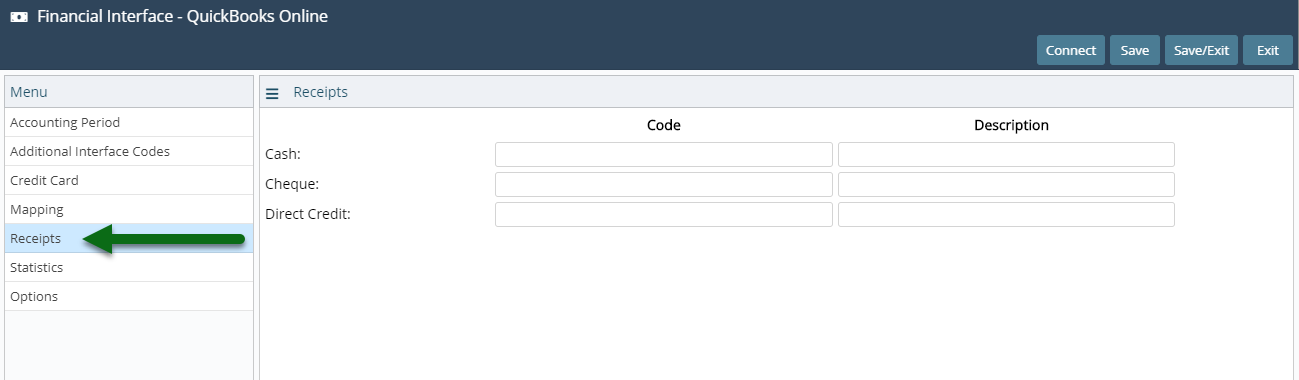
Enter the GL Account Codes & Descriptions for the Receipt Types.
Select 'Save' and navigate to the 'Credit Cards' tab.
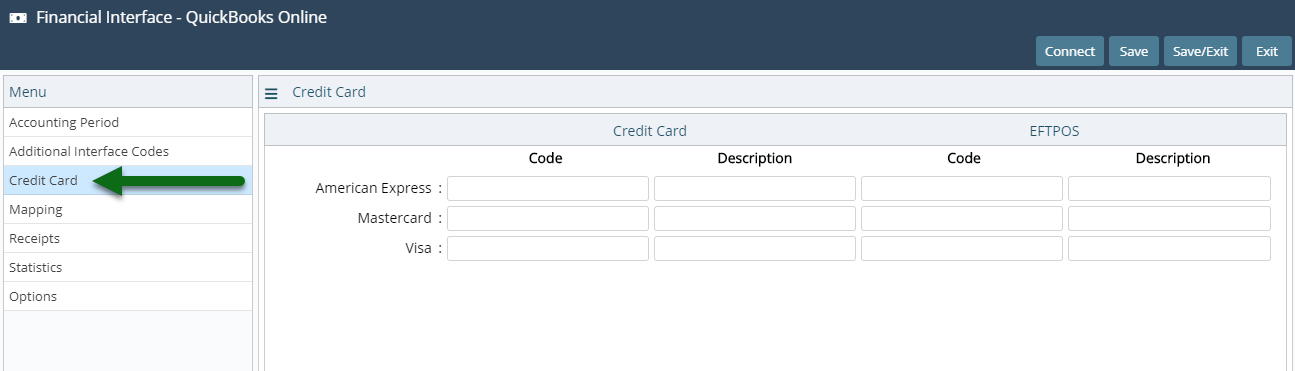
Enter the GL Account Codes & Descriptions for the Card Types.
Select 'Save' to store the changes made.
Select 'Connect'.
Log into the Property's Quickbook Online account.
Select the Security Verification method.
Select the Company (Property) to connect to.
Select 'Authorise'.
Select 'Ok'.

Select 'Save/Exit' to store the changes made.
The connection from RMS to Quickbooks Online will now be authorised which allows RMS to send generated financial exports directly to the property's Quickbooks Online account.
Optional: Setup Quickbooks Class Tracking.
-
Use
- Add Button
Use
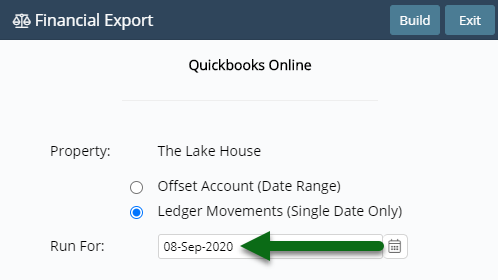
- Go to Utilities > Financial Interface in RMS.
- Select the Export Option.
- Select the Date.
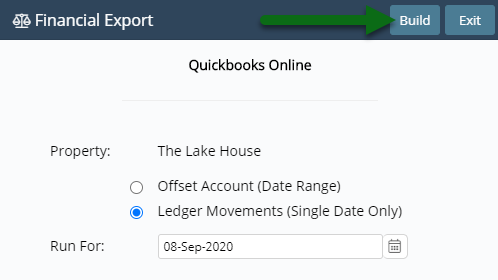
- Build.
-
Guide
- Add Button
Guide
Go to Utilities > Financial Interface in RMS.

Select the Export Option.

Select the Date.
Select 'Build' to generate the export file and send to Quickbooks Online.
Use
- Go to Utilities > Financial Interface in RMS.
- Select the Export Option.
- Select the Date.
- Build.
-
Guide
- Add Button
Guide
Go to Utilities > Financial Interface in RMS.
Select the Export Option.
Select the Date.
Select 'Build' to generate the export file and send to Quickbooks Online.
Use
- Go to Utilities > Financial Interface in RMS.
- Select the Export Option.
- Select the Date.
- Build.
-
Guide
- Add Button
Guide
Go to Utilities > Financial Interface in RMS.
Select the Export Option.
Select the Date.
Select 'Build' to generate the export file and send to Quickbooks Online.
Quickbooks Desktop
Quickbooks Desktop is the self-hosted Quickbooks application available for interface with RMS.
Quickbooks offers optional Class Tracking to segment and track account balances by department, business office or location which can be setup in RMS to be included in the generated financial exports.
-
Setup
-
Use
- Add Button
Setup
Have your System Administrator complete the following.
- Log a Service Request for the financial interface to be set to 'Quickbooks Desktop'.
- Go to Setup > Accounting > Financial Interface in RMS.
- Navigate to the 'Mapping' tab.
- Enter the Offset GL Account Code in the 'Control Account' section.
-
Accrual Accounting Only:
- Enter the GL Account Codes & Descriptions in the Advances Ledger section.
- Enter the GL Account Codes & Descriptions in the Guest Ledger section.
- Enter the GL Account Codes & Descriptions in the City Ledger section.
-
Accrual Accounting Only:
- Select 'Save' and navigate to the 'Receipts' tab.
- Enter the GL Account Codes & Descriptions for the Receipt Types.
- Select 'Save' and navigate to the 'Credit Cards' tab.
- Enter the GL Account Codes & Descriptions for the Card Types.
- Save/Exit.
- Optional: Setup Quickbooks Class Tracking.
-
Guide
-
Use
- Add Button
Guide
Log a Service Request for the financial interface to be set to 'Quickbooks Desktop'.
Go to Setup > Accounting > Financial Interface in RMS.
Navigate to the 'Mapping' tab.
Enter the Offset GL Account Code in the 'Control Account' section.
Accrual Accounting Only: Enter the GL Account Codes & Descriptions in the Advances Ledger section.
Accrual Accounting Only: Enter the GL Account Codes & Descriptions in the Guest Ledger section.
Accrual Accounting Only: Enter the GL Account Codes & Descriptions in the City Ledger section.
Select 'Save' and navigate to the 'Receipts' tab.
Enter the GL Account Codes & Descriptions for the Receipt Types.
Select 'Save' and navigate to the 'Credit Cards' tab.
Enter the GL Account Codes & Descriptions for the Card Types.
Select 'Save/Exit' to store the changes made.
Optional: Setup Quickbooks Class Tracking.
-
Use
- Add Button
Use
- Go to Utilities > Financial Interface in RMS.
- Select the Export Option.
- Select the Date.
- Build.
-
Guide
- Add Button
Guide
Go to Utilities > Financial Interface in RMS.
Select the Export Option.
Select the Date.
Select 'Build' to generate the financial export file using the selected option.
RMS will generate the financial export file that can be imported into the Quickbooks Desktop application.
Quickbooks Online
Quickbooks Online is the cloud-based application available for interface with RMS.
Quickbooks Online Plus offers optional Class Tracking to segment and track account balances by department, business office or location which can be setup in RMS to be included in the generated financial exports.
-
Setup
-
Use
- Add Button
Setup
Have your System Administrator complete the following.
- Log a Service Request for the financial interface to be set to 'Quickbooks Online'.
- Go to Setup > Accounting > Financial Interface in RMS.
- Navigate to the 'Mapping' tab.
- Enter the Offset GL Account Code in the 'Control Account' section.
-
Accrual Accounting Only:
- Enter the GL Account Codes & Descriptions in the Advances Ledger section.
- Enter the GL Account Codes & Descriptions in the Guest Ledger section.
- Enter the GL Account Codes & Descriptions in the City Ledger section.
-
Accrual Accounting Only:
- Select 'Save' and navigate to the 'Receipts' tab.
- Enter the GL Account Codes & Descriptions for the Receipt Types.
- Select 'Save' and navigate to the 'Credit Cards' tab.
- Enter the GL Account Codes & Descriptions for the Card Types.
- Save.
- Select 'Connect'.
- Log into the Property's Quickbook Online account.
- Select the Security Verification method.
- Select the Company (Property) to connect to.
- Select 'Authorise'.
- Select 'Ok'.
- Save/Exit.
- Optional: Setup Quickbooks Class Tracking.
-
Guide
-
Use
- Add Button
Guide
Log a Service Request for the financial interface to be set to 'Quickbooks Online'.
Go to Setup > Accounting > Financial Interface in RMS.
Navigate to the 'Mapping' tab.
Enter the Offset GL Account Code in the 'Control Account' section.
Accrual Accounting Only: Enter the GL Account Codes & Descriptions in the Advances Ledger section.
Accrual Accounting Only: Enter the GL Account Codes & Descriptions in the Guest Ledger section.
Accrual Accounting Only: Enter the GL Account Codes & Descriptions in the City Ledger section.
Select 'Save' and navigate to the 'Receipts' tab.
Enter the GL Account Codes & Descriptions for the Receipt Types.
Select 'Save' and navigate to the 'Credit Cards' tab.
Enter the GL Account Codes & Descriptions for the Card Types.
Select 'Save' to store the changes made.
Select 'Connect'.
Log into the Property's Quickbook Online account.
Select the Security Verification method.
Select the Company (Property) to connect to.
Select 'Authorise'.
Select 'Ok'.
Select 'Save/Exit' to store the changes made.
The connection from RMS to Quickbooks Online will now be authorised which allows RMS to send generated financial exports directly to the property's Quickbooks Online account.
Optional: Setup Quickbooks Class Tracking.
-
Use
- Add Button
Use
- Go to Utilities > Financial Interface in RMS.
- Select the Export Option.
- Select the Date.
- Build.
-
Guide
- Add Button
Guide
Go to Utilities > Financial Interface in RMS.
Select the Export Option.
Select the Date.
Select 'Build' to generate the export file and send to Quickbooks Online.
Use
- Go to Utilities > Financial Interface in RMS.
- Select the Export Option.
- Select the Date.
- Build.
-
Guide
- Add Button
Guide
Go to Utilities > Financial Interface in RMS.
Select the Export Option.
Select the Date.
Select 'Build' to generate the export file and send to Quickbooks Online.
Use
- Go to Utilities > Financial Interface in RMS.
- Select the Export Option.
- Select the Date.
- Build.
-
Guide
- Add Button
Guide
Go to Utilities > Financial Interface in RMS.
Select the Export Option.
Select the Date.
Select 'Build' to generate the export file and send to Quickbooks Online.