General Information Reservation Options
Setup the rules and features available for Reservations in RMS.
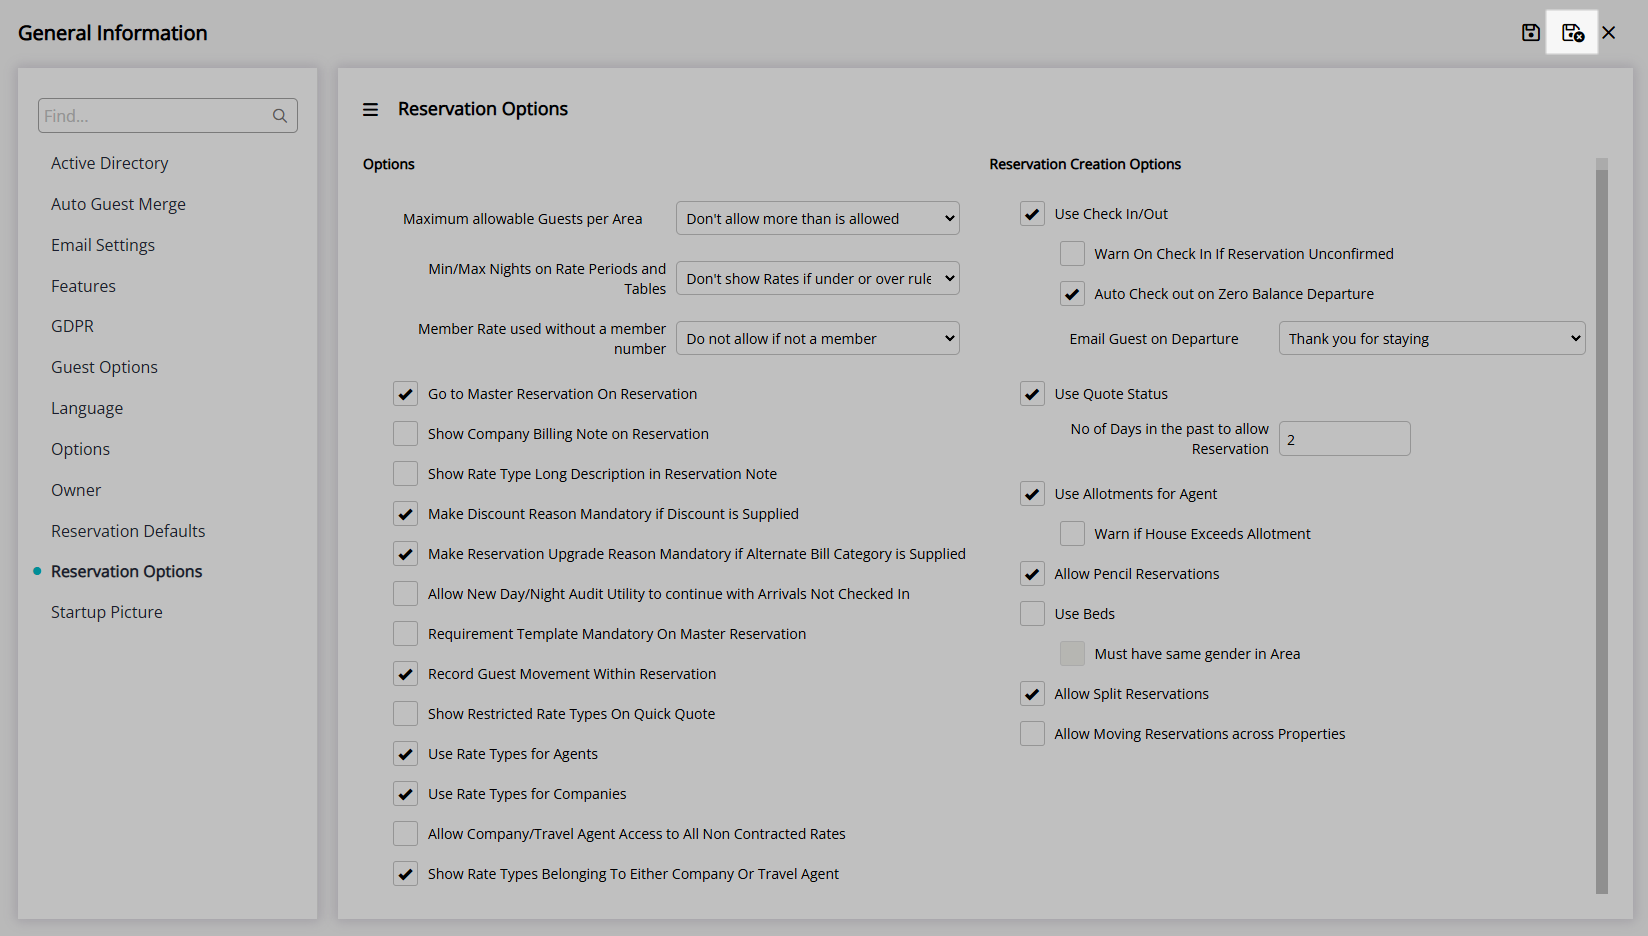
The General Information Reservation Options determine the rules and features available for Reservations.
-
Information
-
Setup
- Add Button
Information
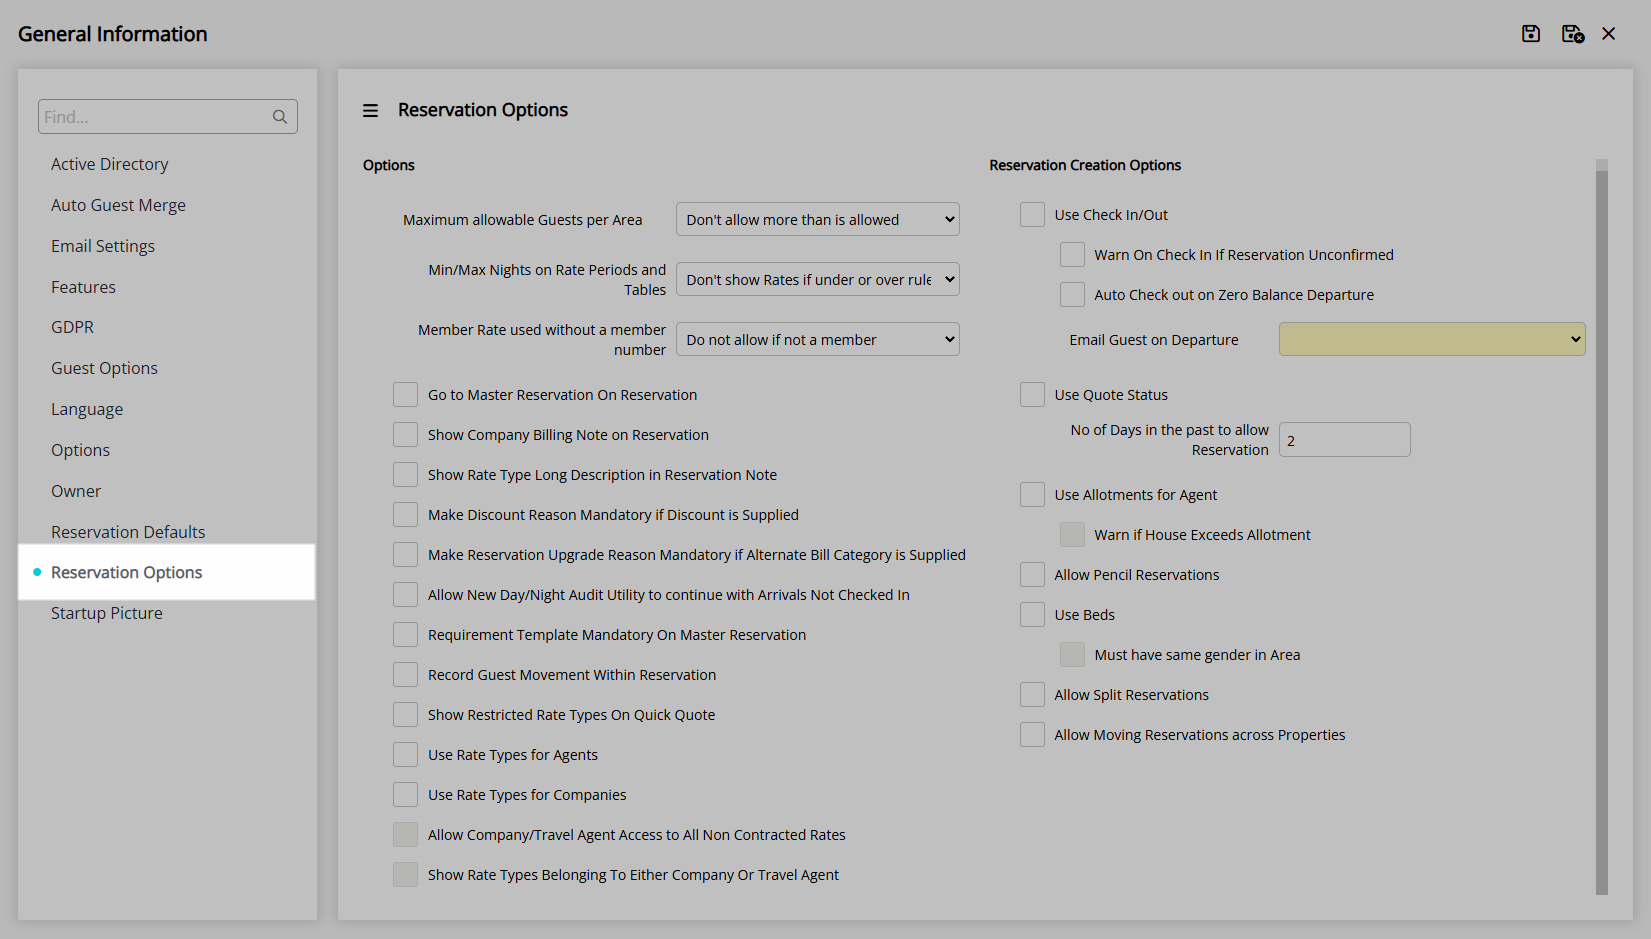
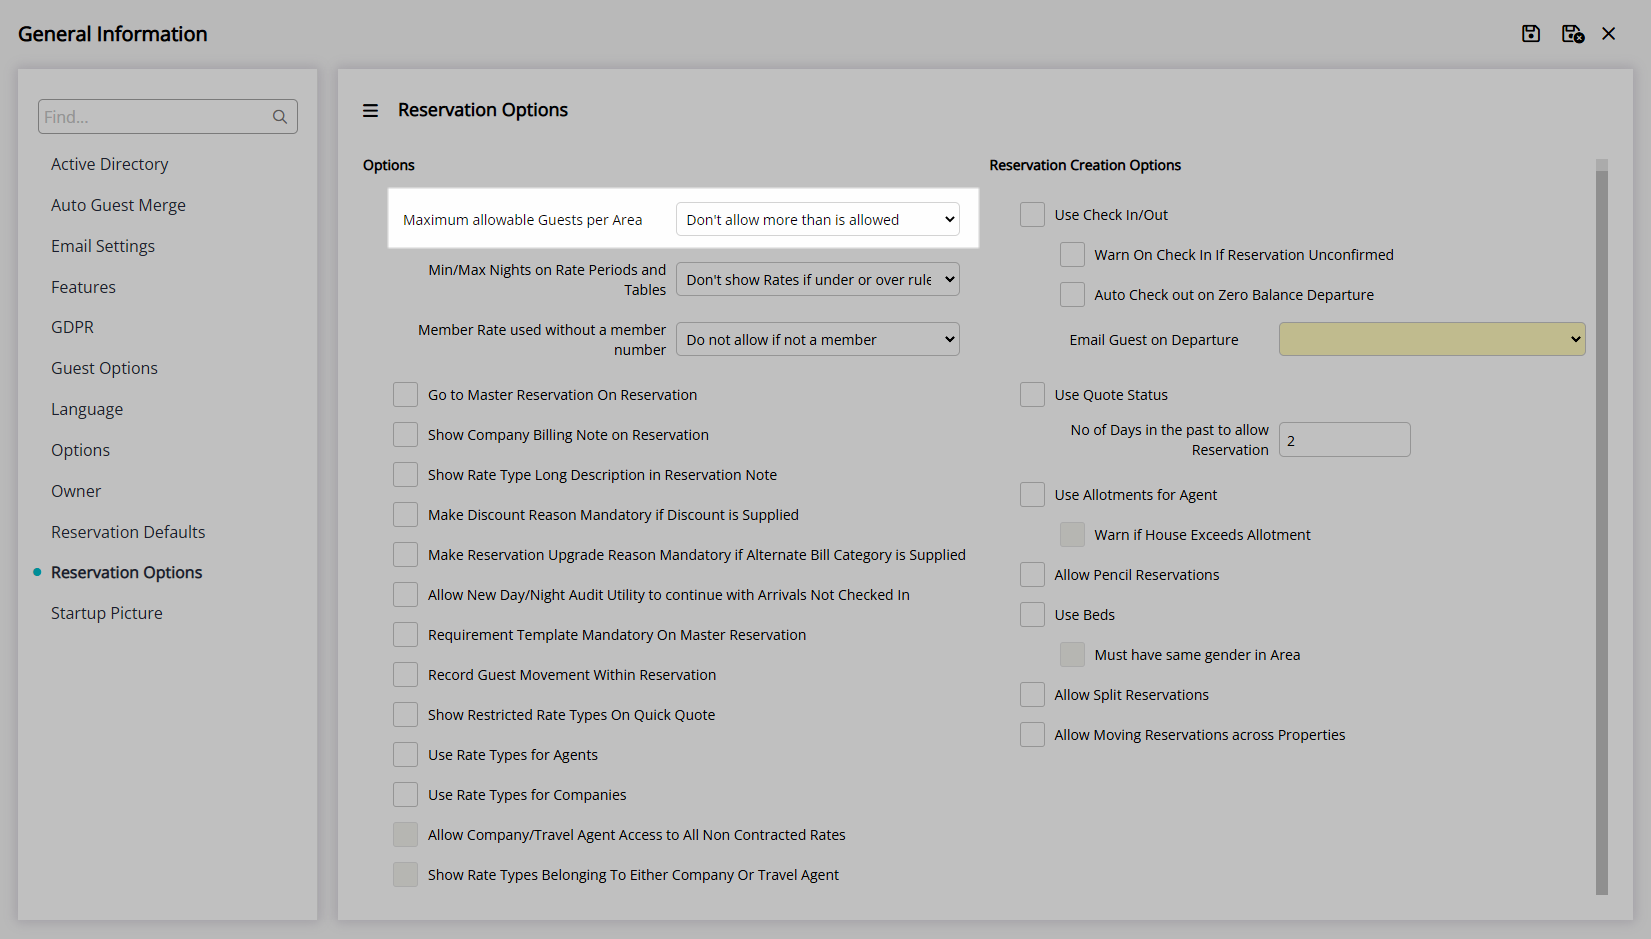
The General Information Reservation Options determine the rules and features available for Reservations.
Options selected in General Information apply to all Properties for Enterprise customers.
The following Reservation Options are available in General Information.
| Option | Description |
|---|---|
| Options | |
| Maximum Allowable Guests Per Area | Select to ignore, warn or not allow the Number of Guests on a Reservation to exceed the Maximum Occupants set on the Category or Area. |
| Min/Max Nights on Rate Periods and Rate Tables | Select to warn or not display a Rate if the length of stay on the Reservation does not meet the criteria set on the Rate Type, Rate Period or Rate Table. |
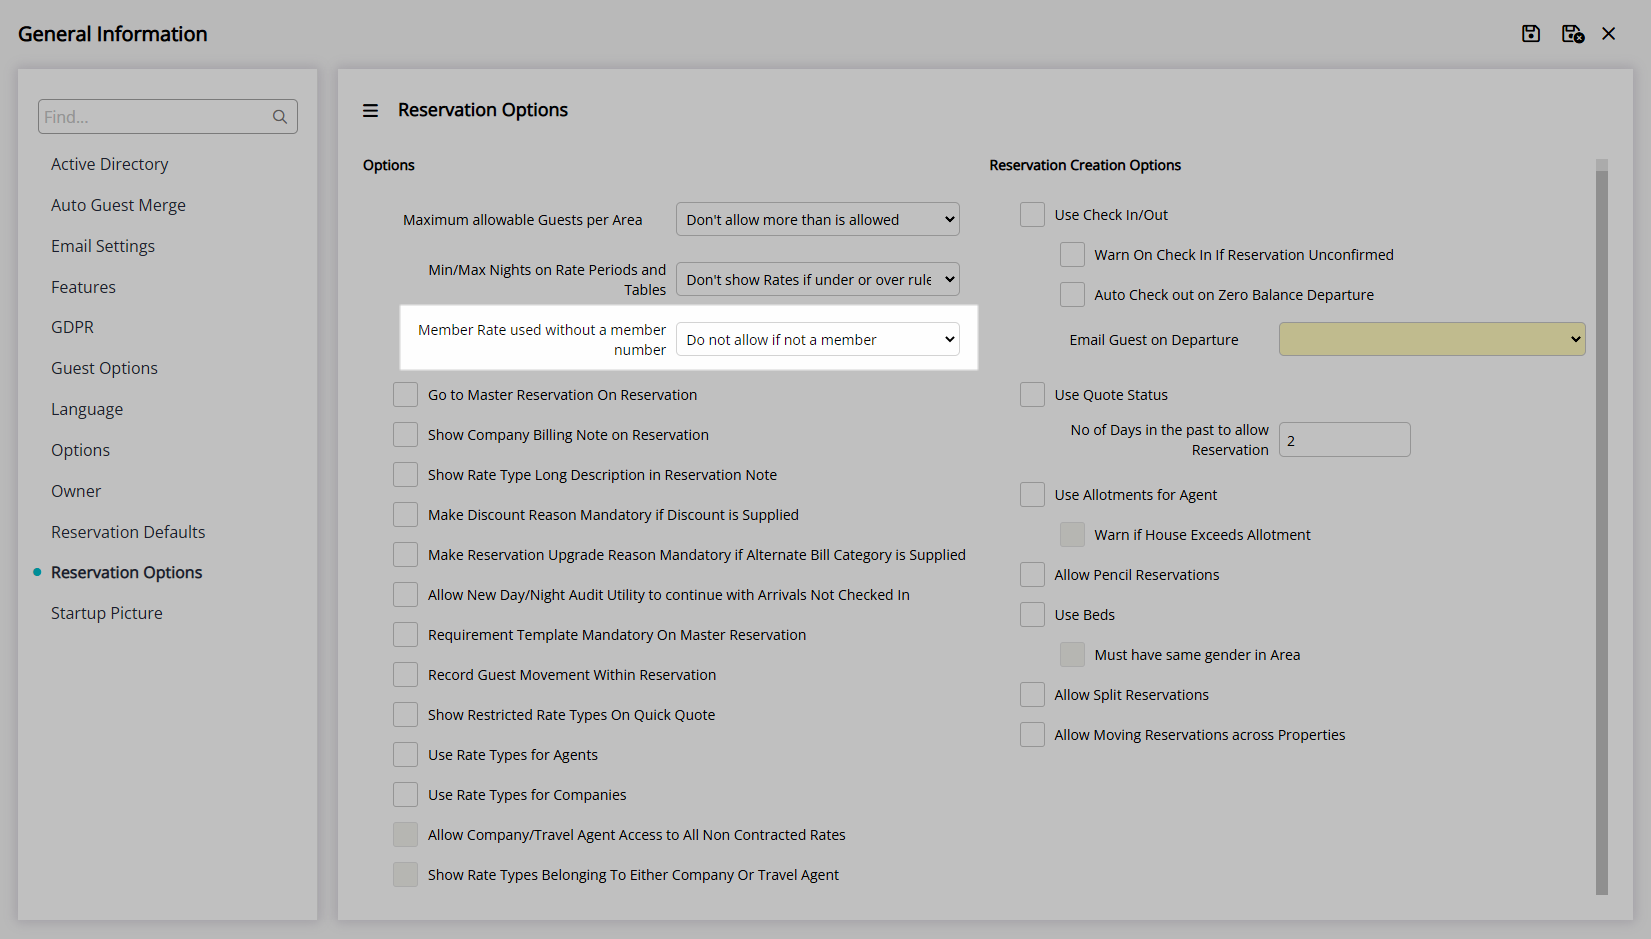
| Member Rate Used without a Member Number | Select to ignore, warn or not allow a Members Only Rate Type to be selected on the Reservation if a valid Membership Number has not been entered on the Guest Profile. |
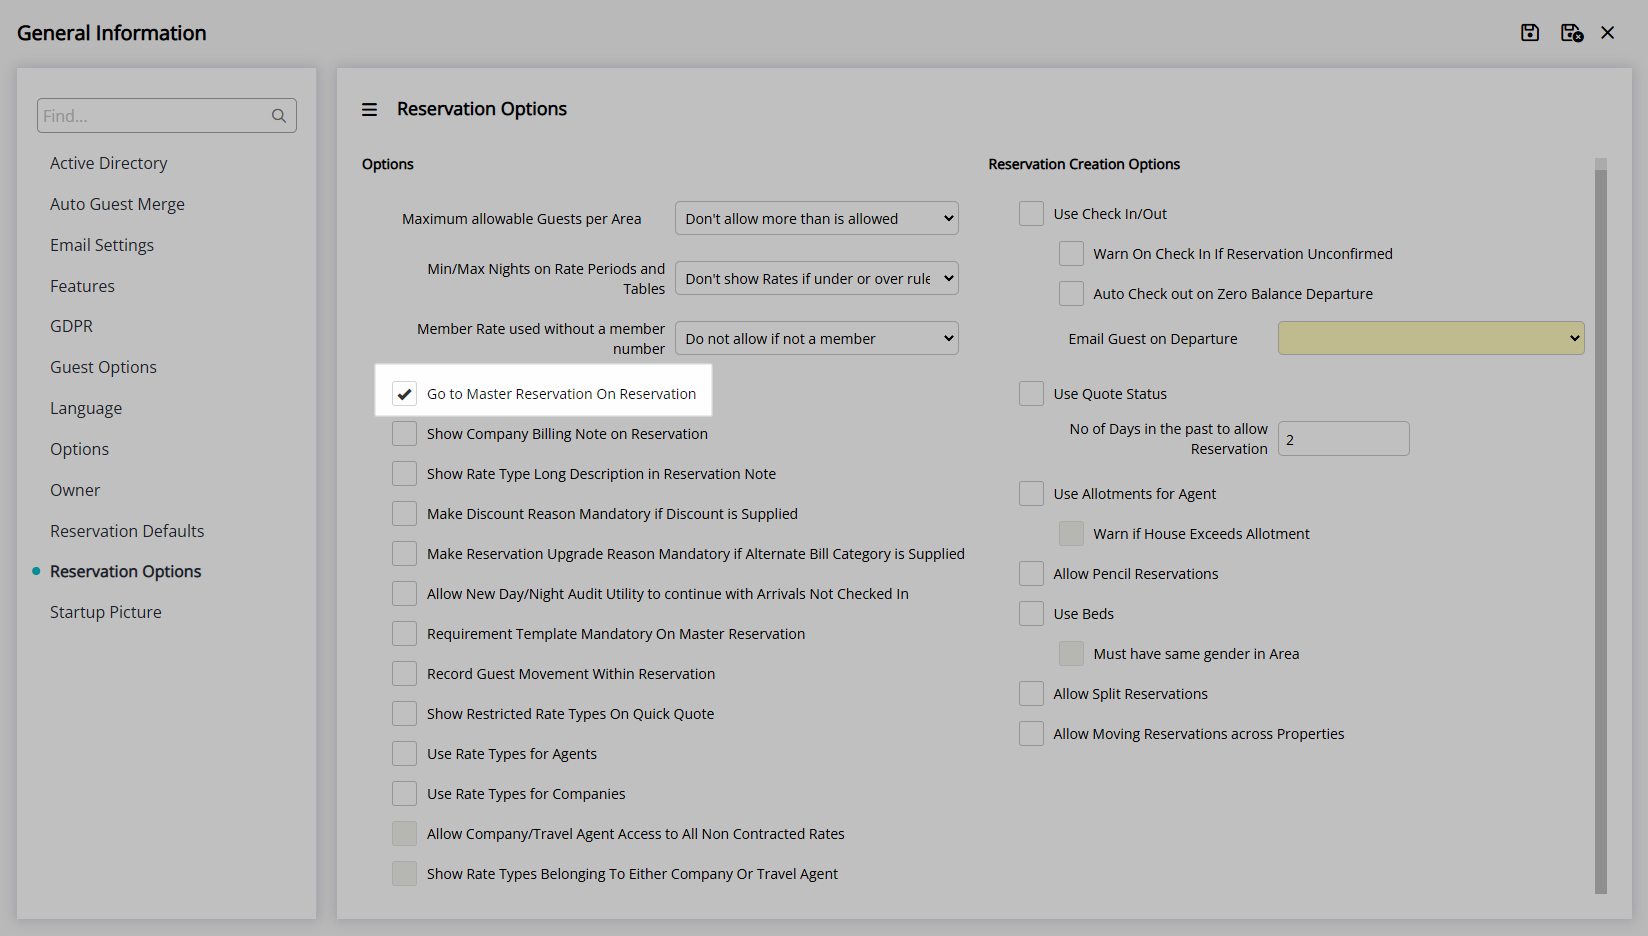
| Go to Master Reservation on Reservation | Will always open on the (Master) for a Master Reservation even when opening via a Sibling Reservation. |
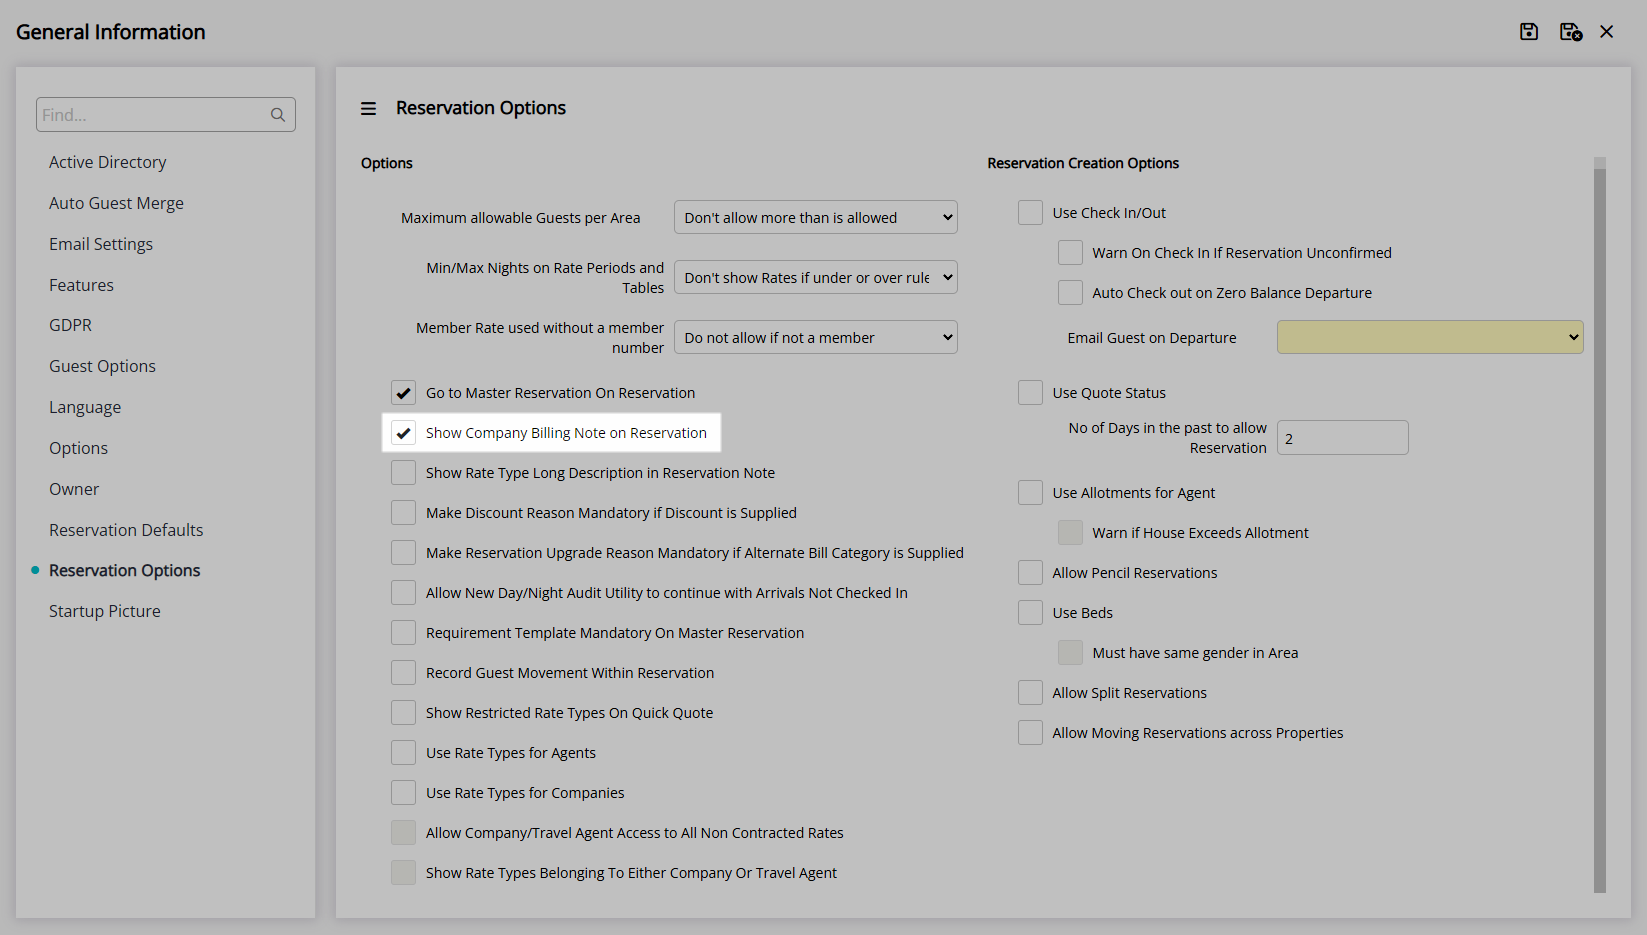
| Show Company Billing Note on Reservation | Populates any Company Billing Notes in the Reservation Notes. |
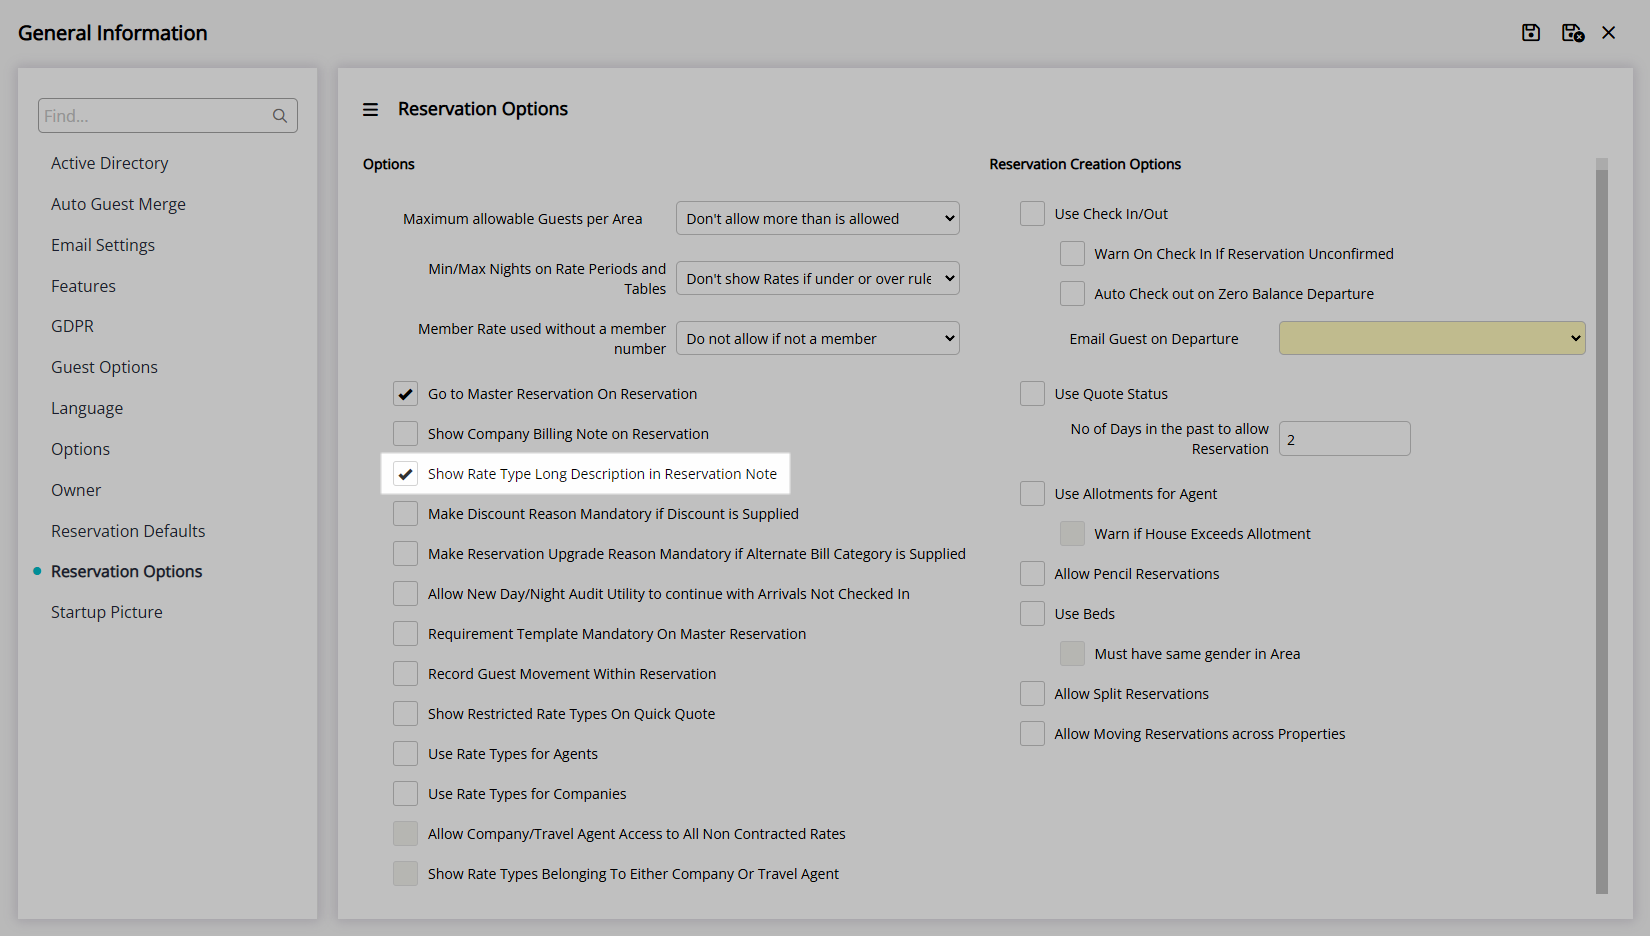
| Show Rate Type Long Description in Reservation Note | Populates the Rate Type Long Description in the Reservation Notes. |
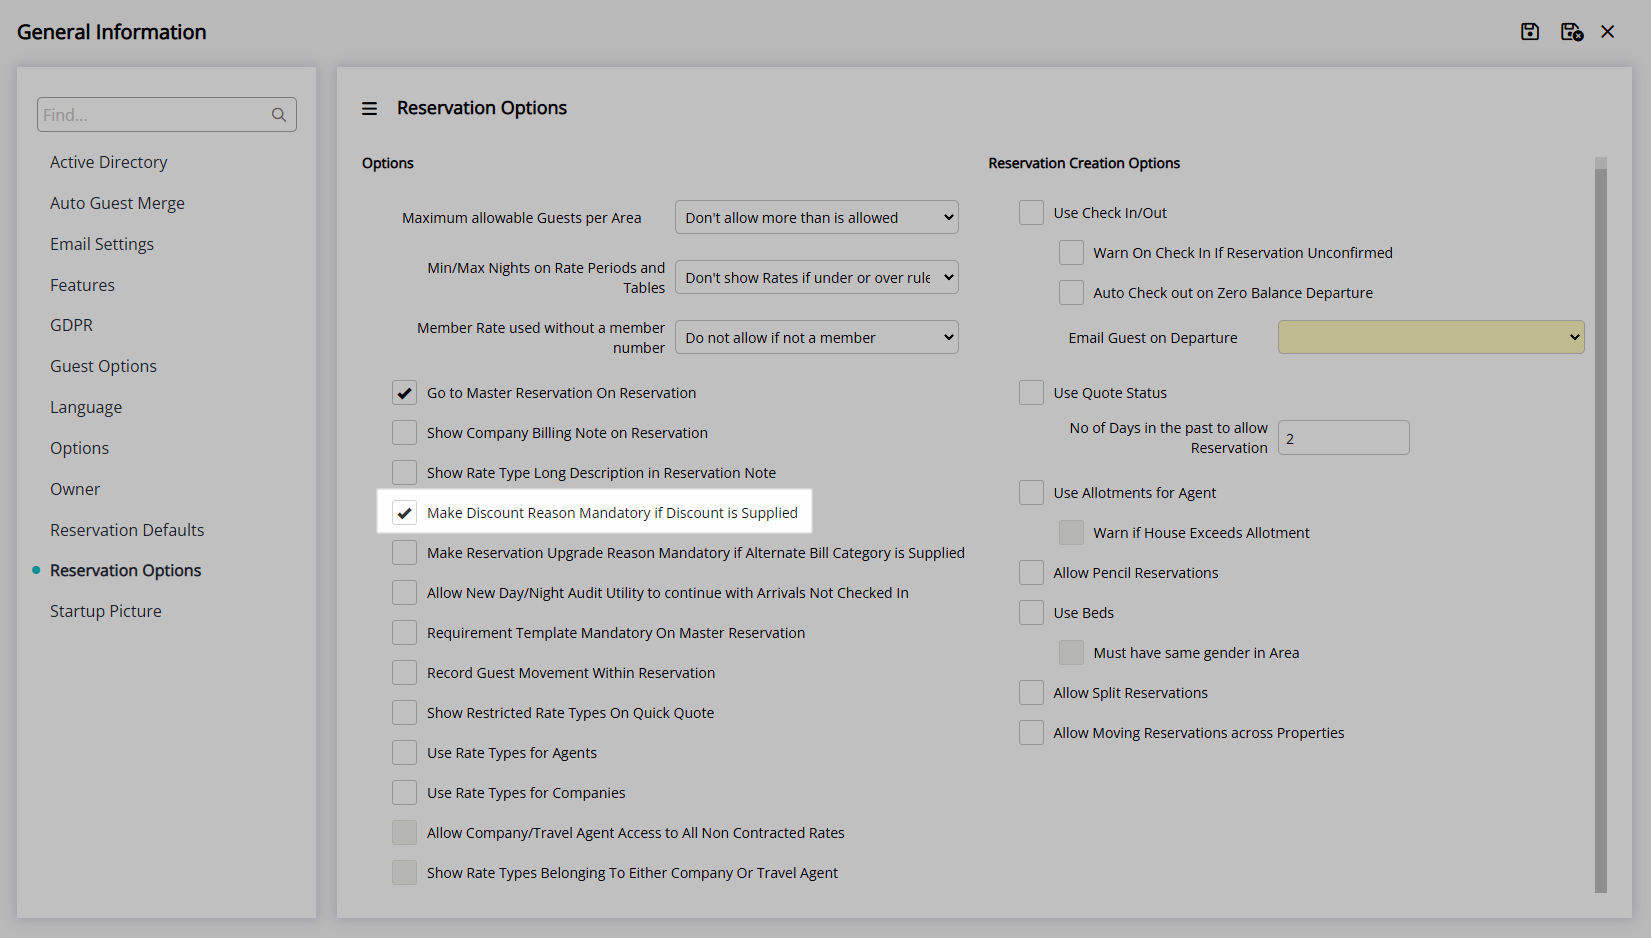
| Make Discount Reason Mandatory if Discount Supplied | The Discount Reason field will be mandatory to save the Reservation if a Discount has been selected. |
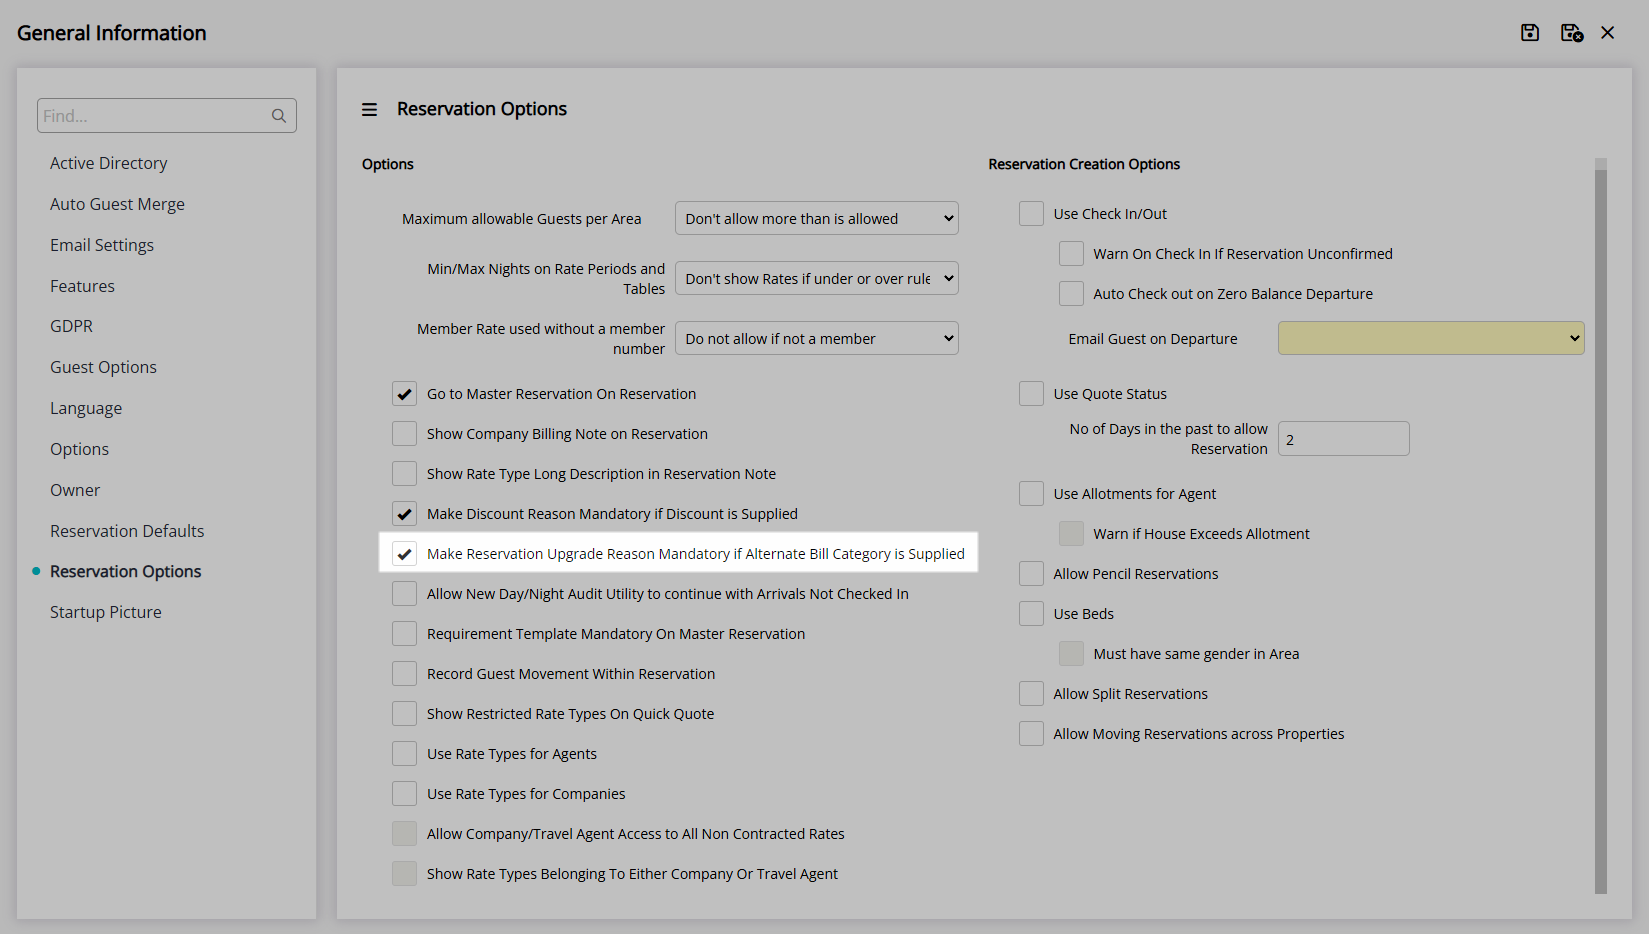
| Make Reservation Upgrade Reason Mandatory if Alternate Bill Category is Supplied | The Upgrade Reason field will be mandatory to save the Reservation if a Bill Category has been selected. |
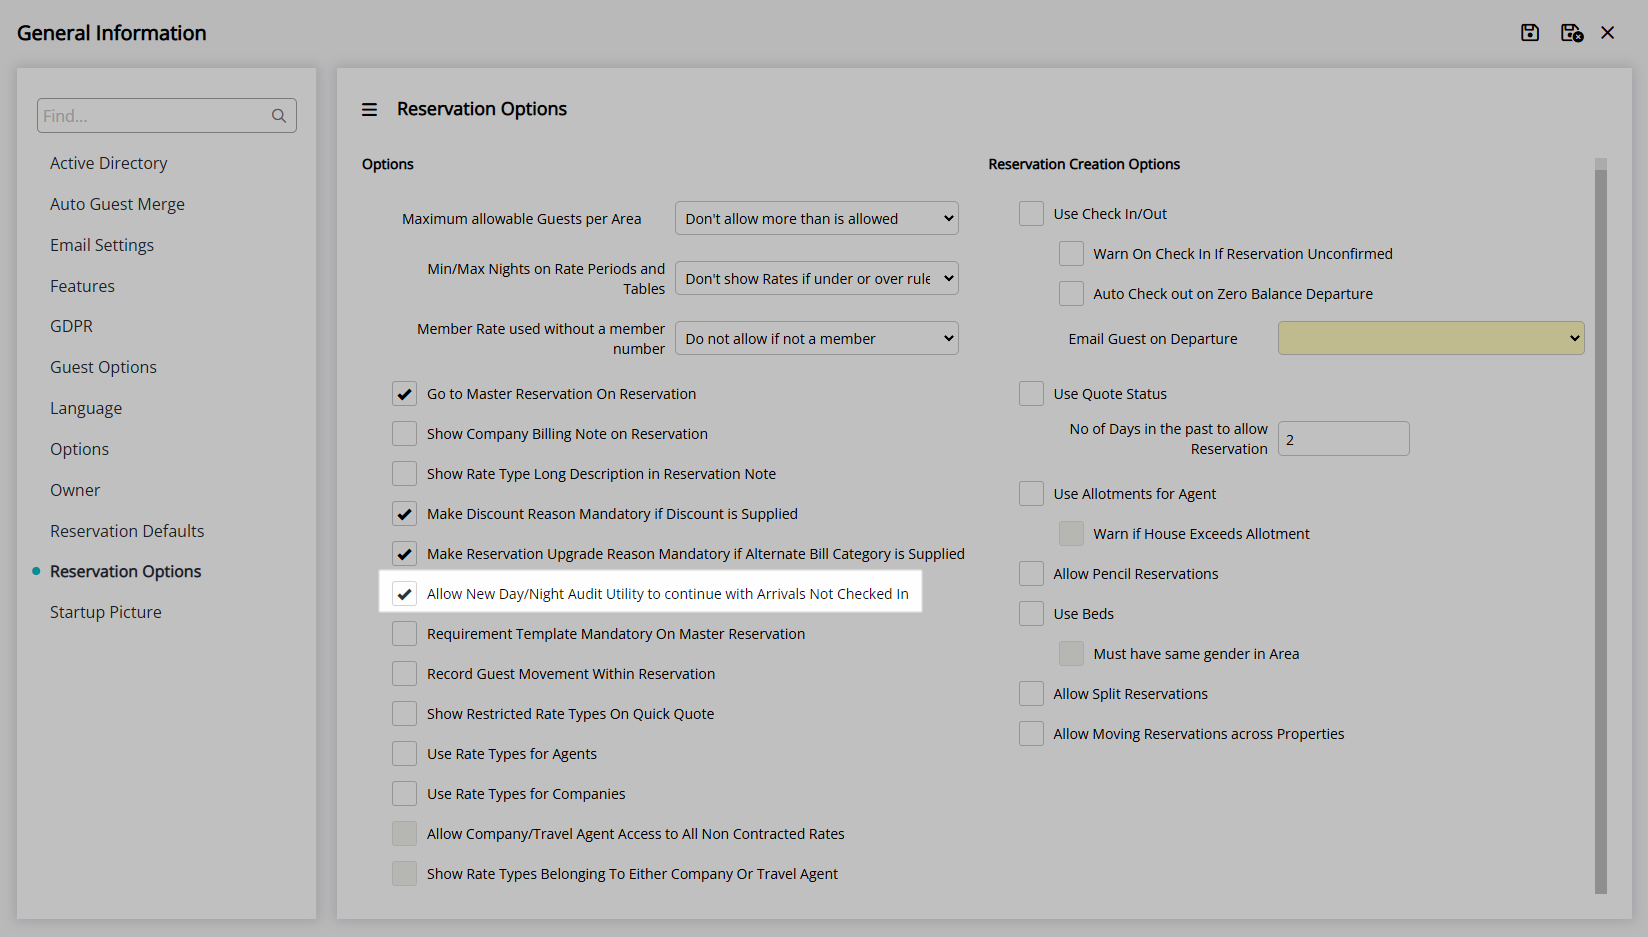
| Allow New Day/Night Audit Utility to continue with Arrivals Not Checked In | The New Day/Night Audit utility will ignore any Reservations with an Arrive Date for the current Accounting Date that are not in 'Arrived' status and are still expected arrivals. Must be using Manual End of Day. |
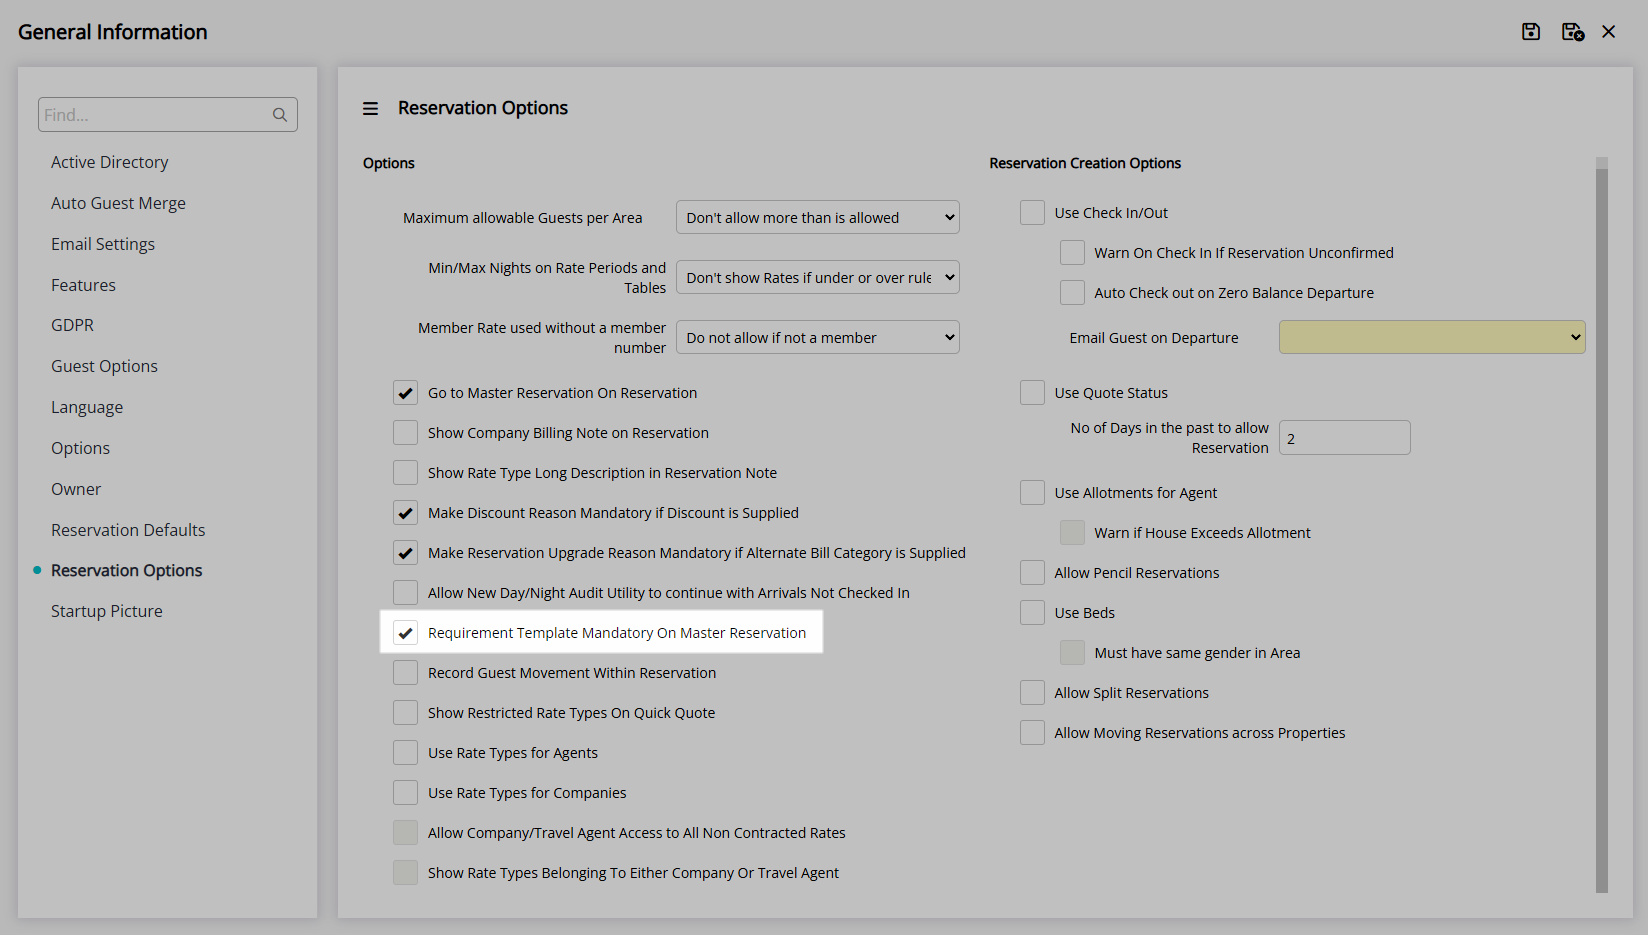
| Requirement Template Mandatory on Master Reservation | A Requirement Template will be required to save a Master Reservation. |
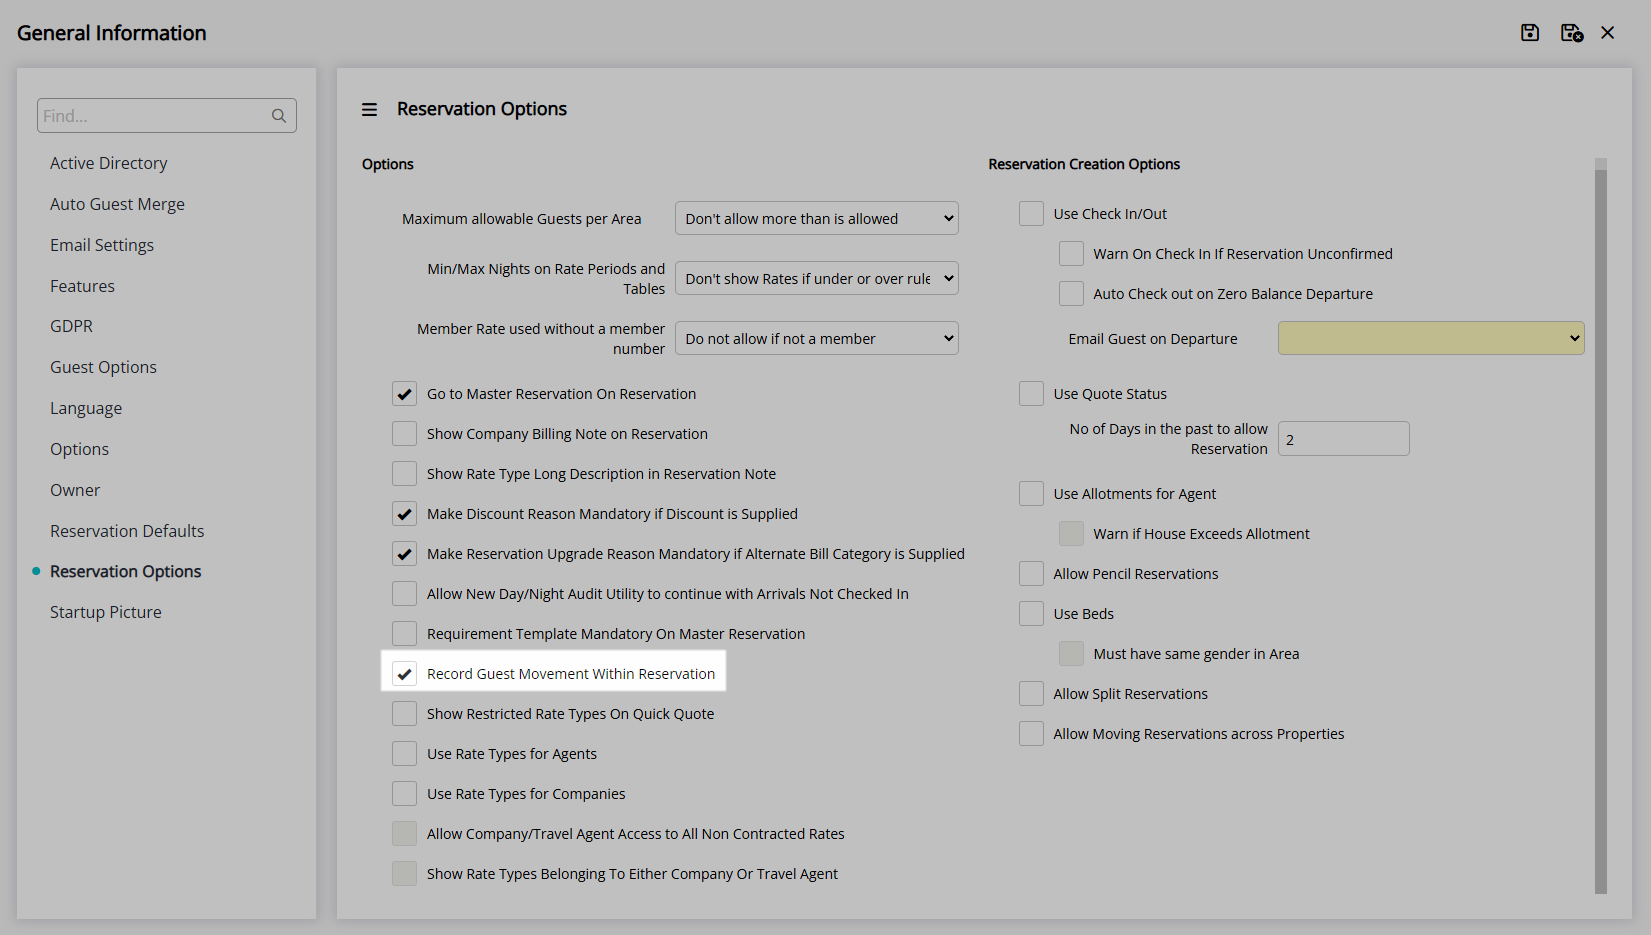
| Record Guest Movement Within Reservation | Each Guest Profile on the Reservation can have their individual Arrive and Depart Date recorded in addition to the Reservation Arrive Date and Depart Date. |
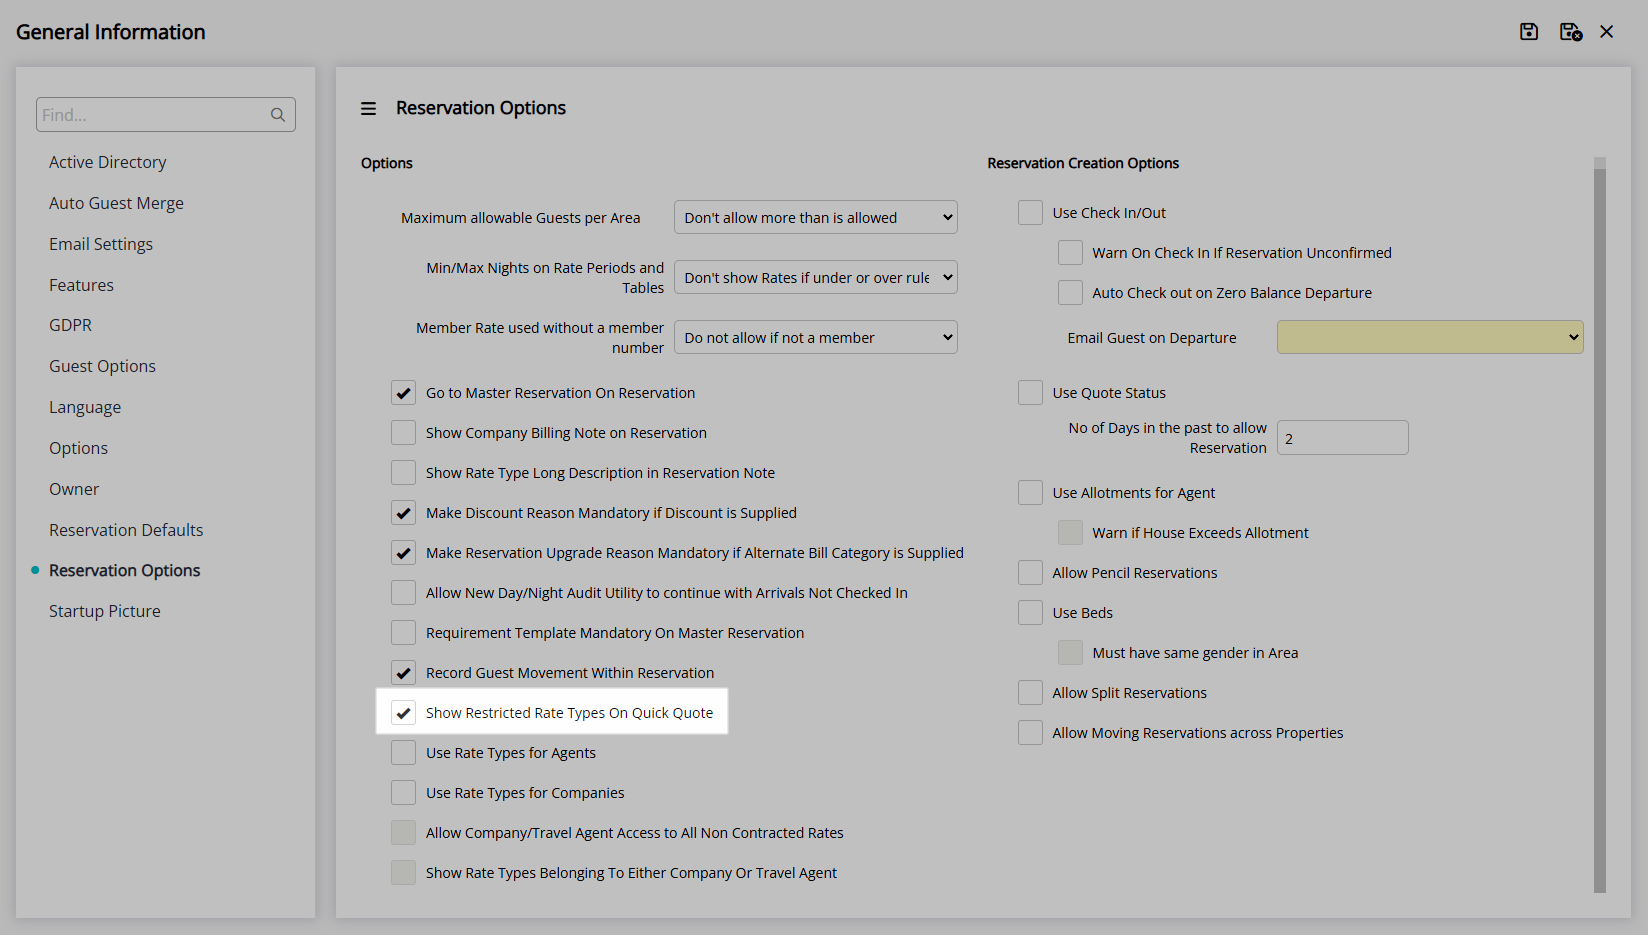
| Show Restricted Rate Types on Quick Quote | Will show all Rate Types on Quick Quote including Company Rates, Travel Agent Rates and Members Only Rates. |
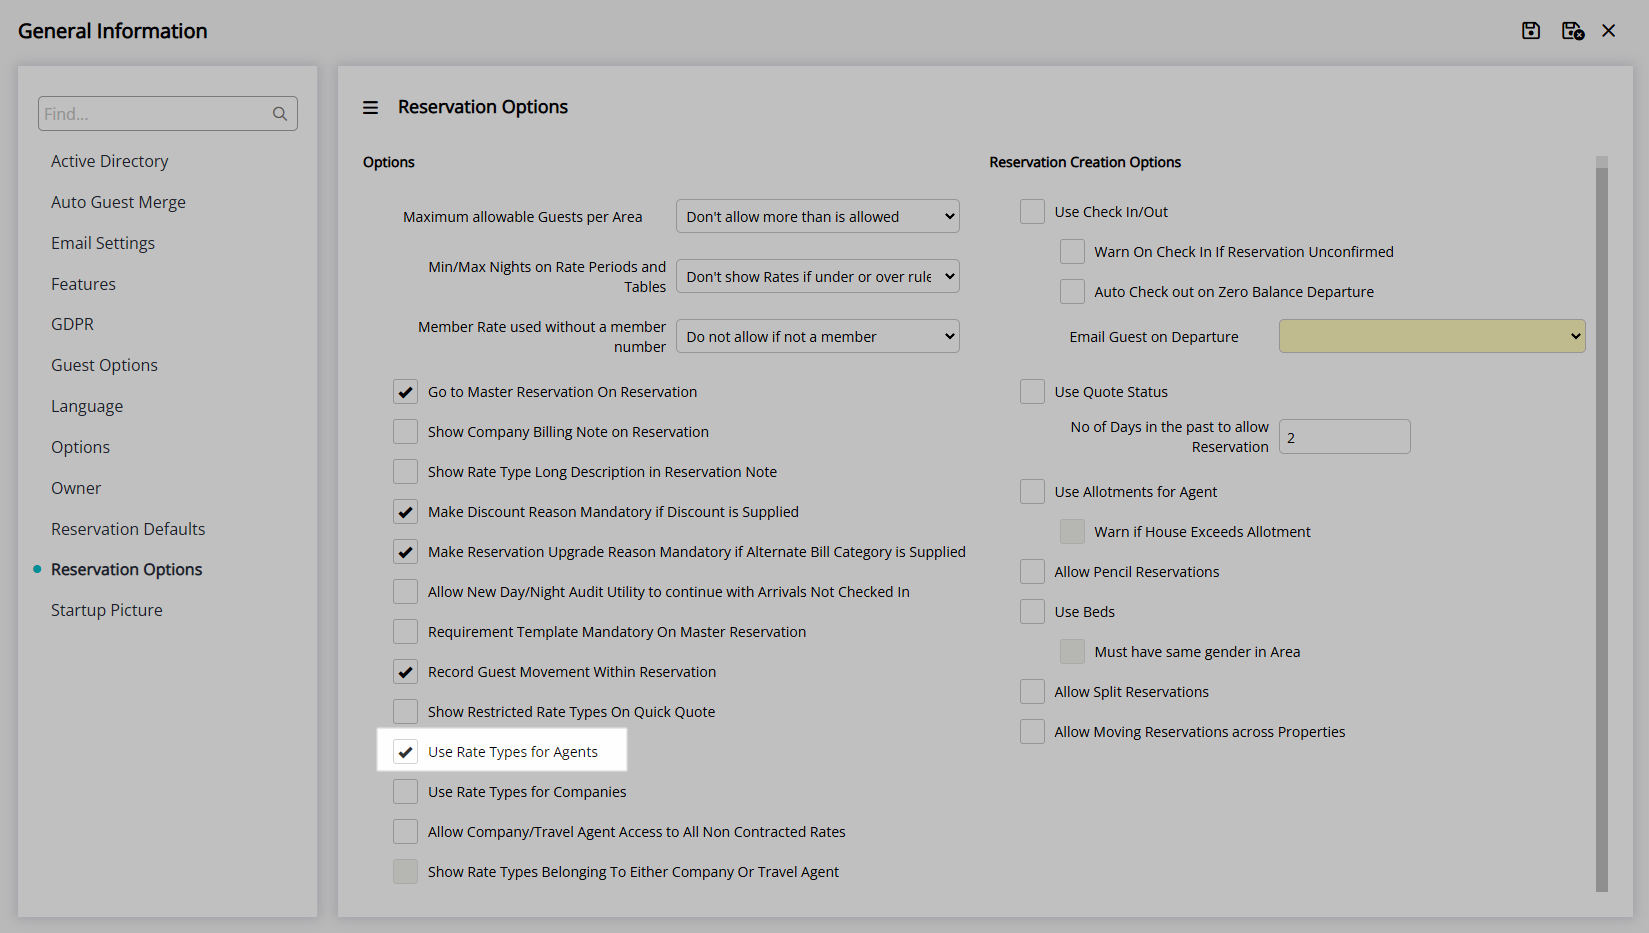
| Use Rate Types for Agents | Determines the Rate Type access for a Travel Agent or Wholesaler. See Also: Company & Travel Agent Rates. |
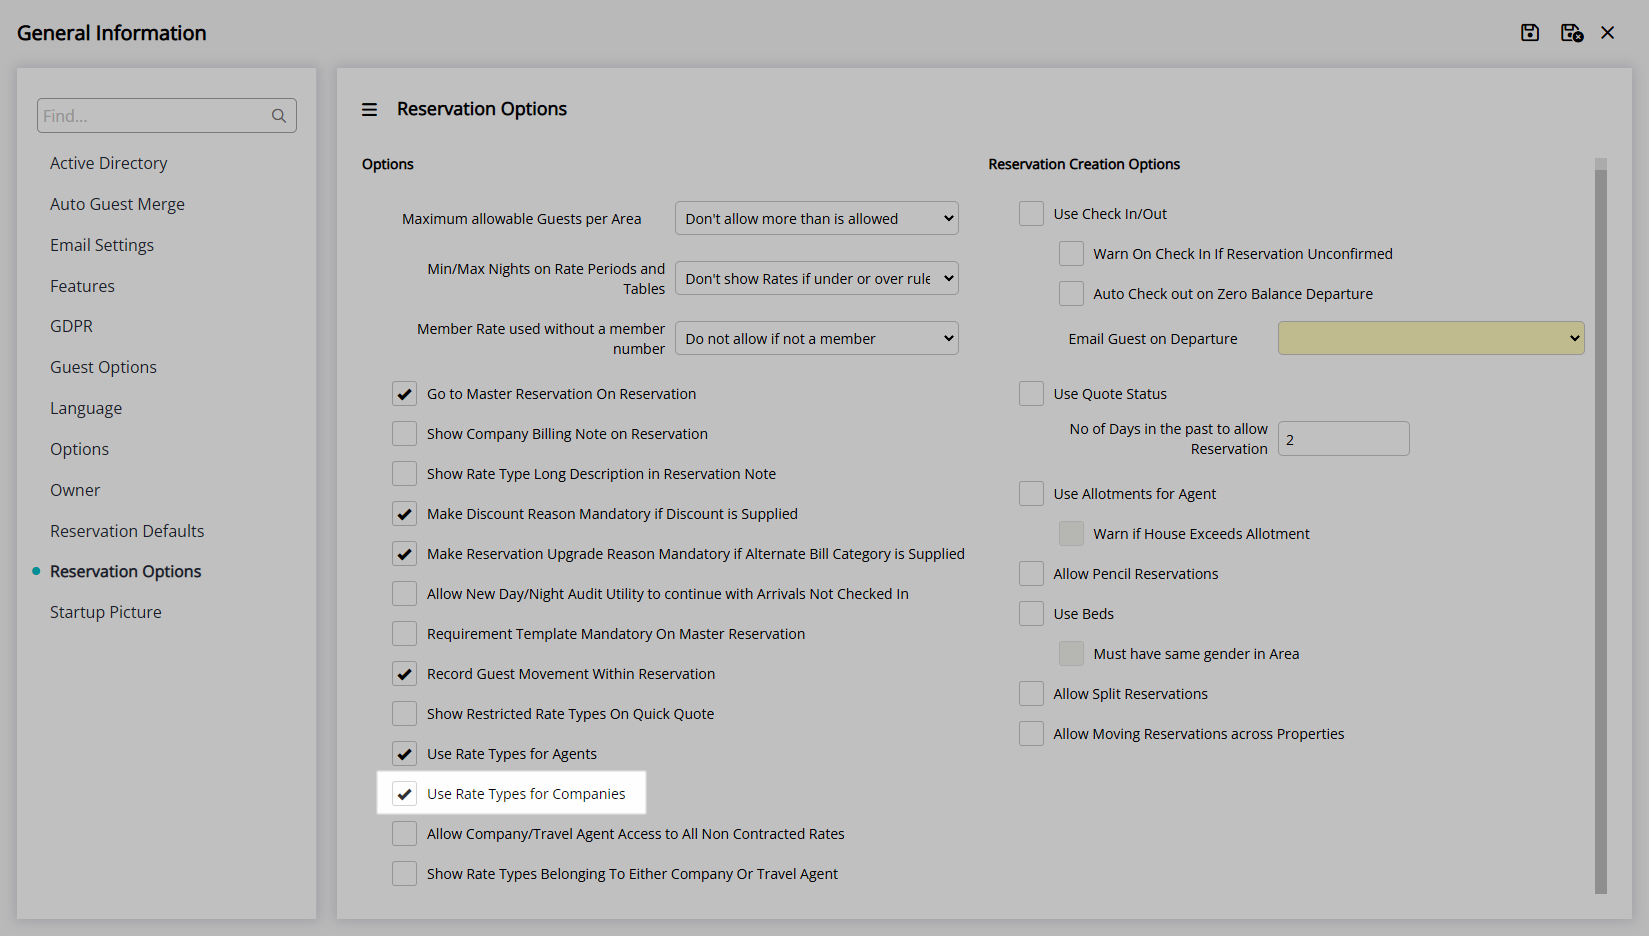
| Use Rate Types for Companies | Determines the Rate Type access for a Company. See Also: Company & Travel Agent Rates. |
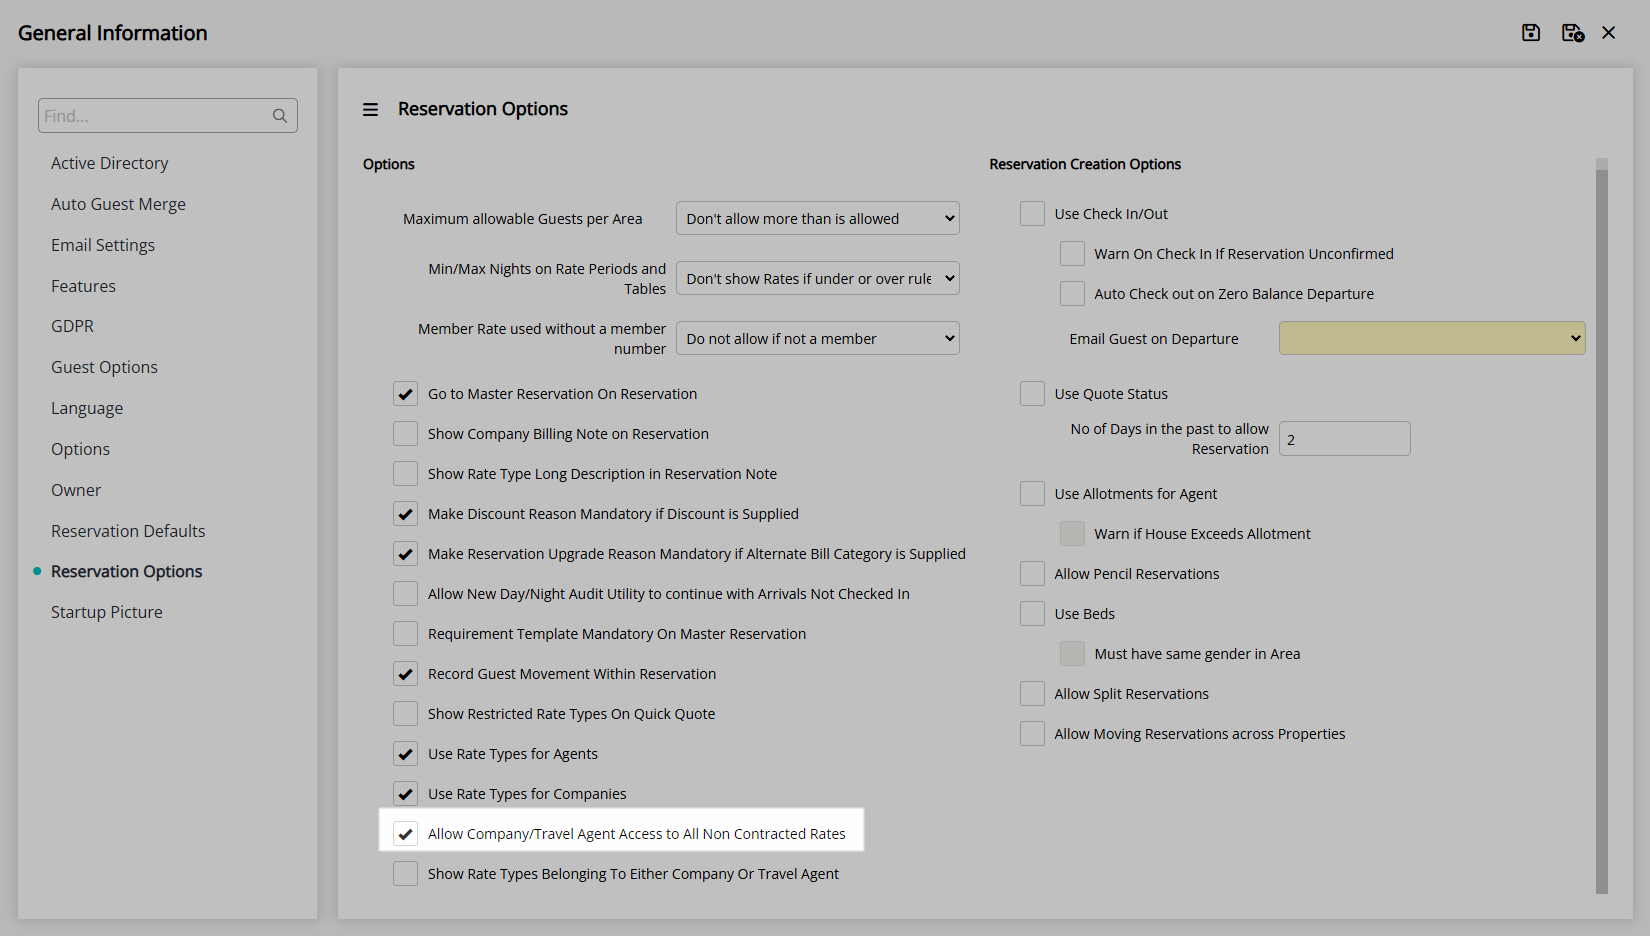
| Allow Company/Travel Agent Access to All Non Contracted Rates | Determines the Rate Type access for a Company and Travel Agent. See Also: Company & Travel Agent Rates. |
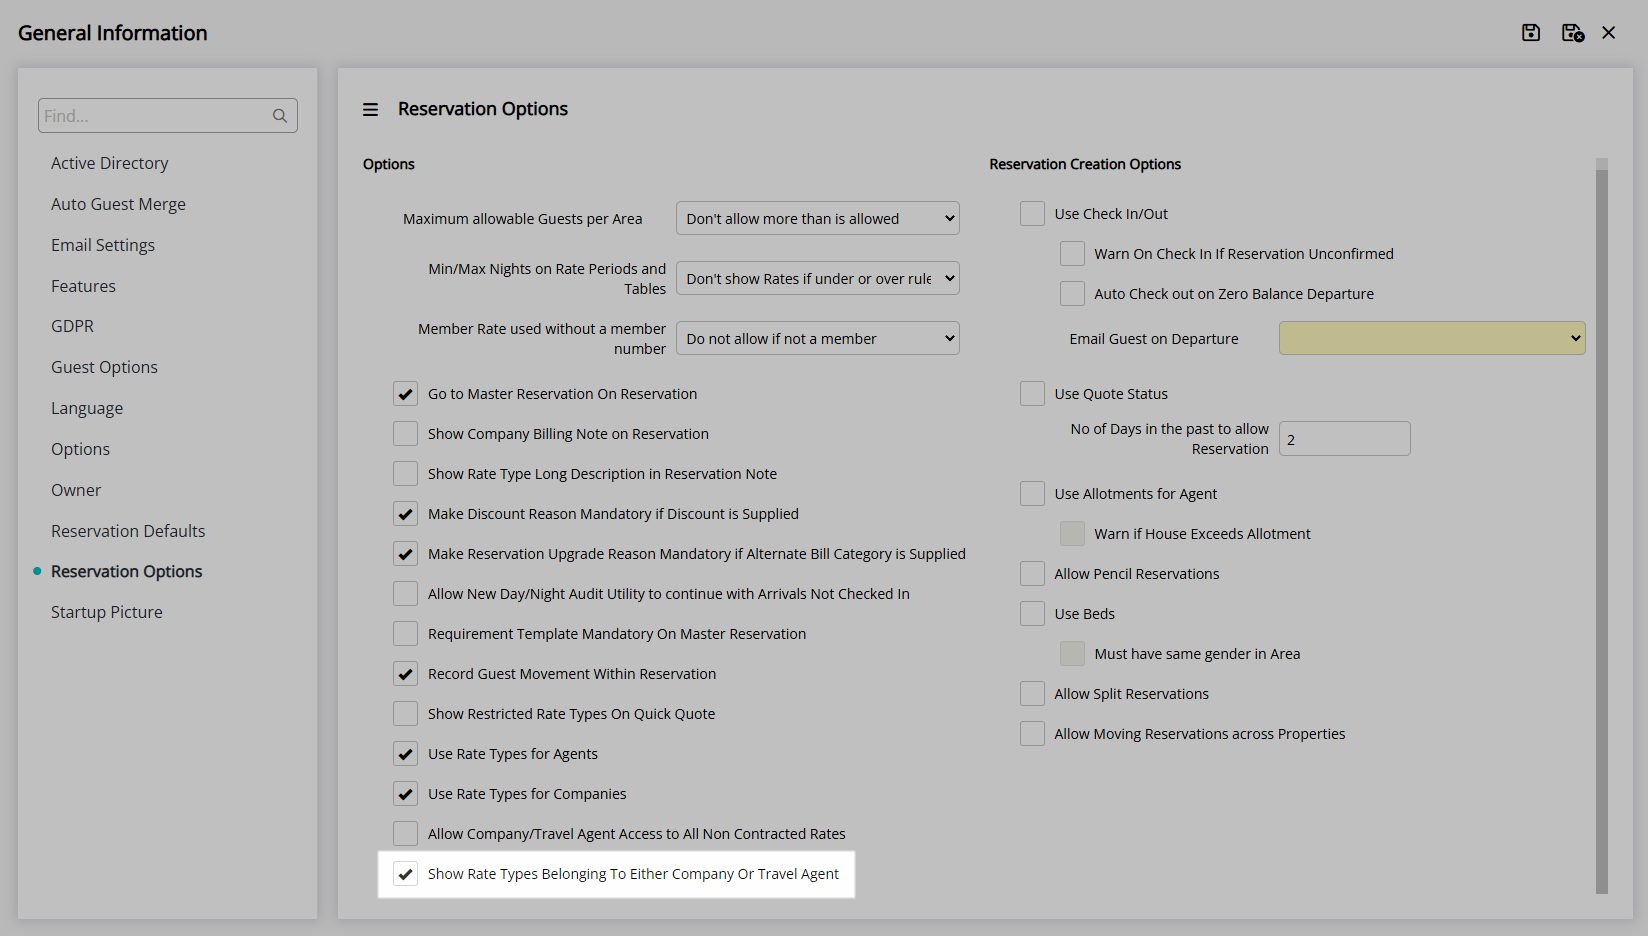
| Show Rate Types Belonging to Either Company or Travel Agent | Determines the Rate Type access for a Company or Travel Agent. See Also: Company & Travel Agent Rates. |
| Reservation Creation Options | |
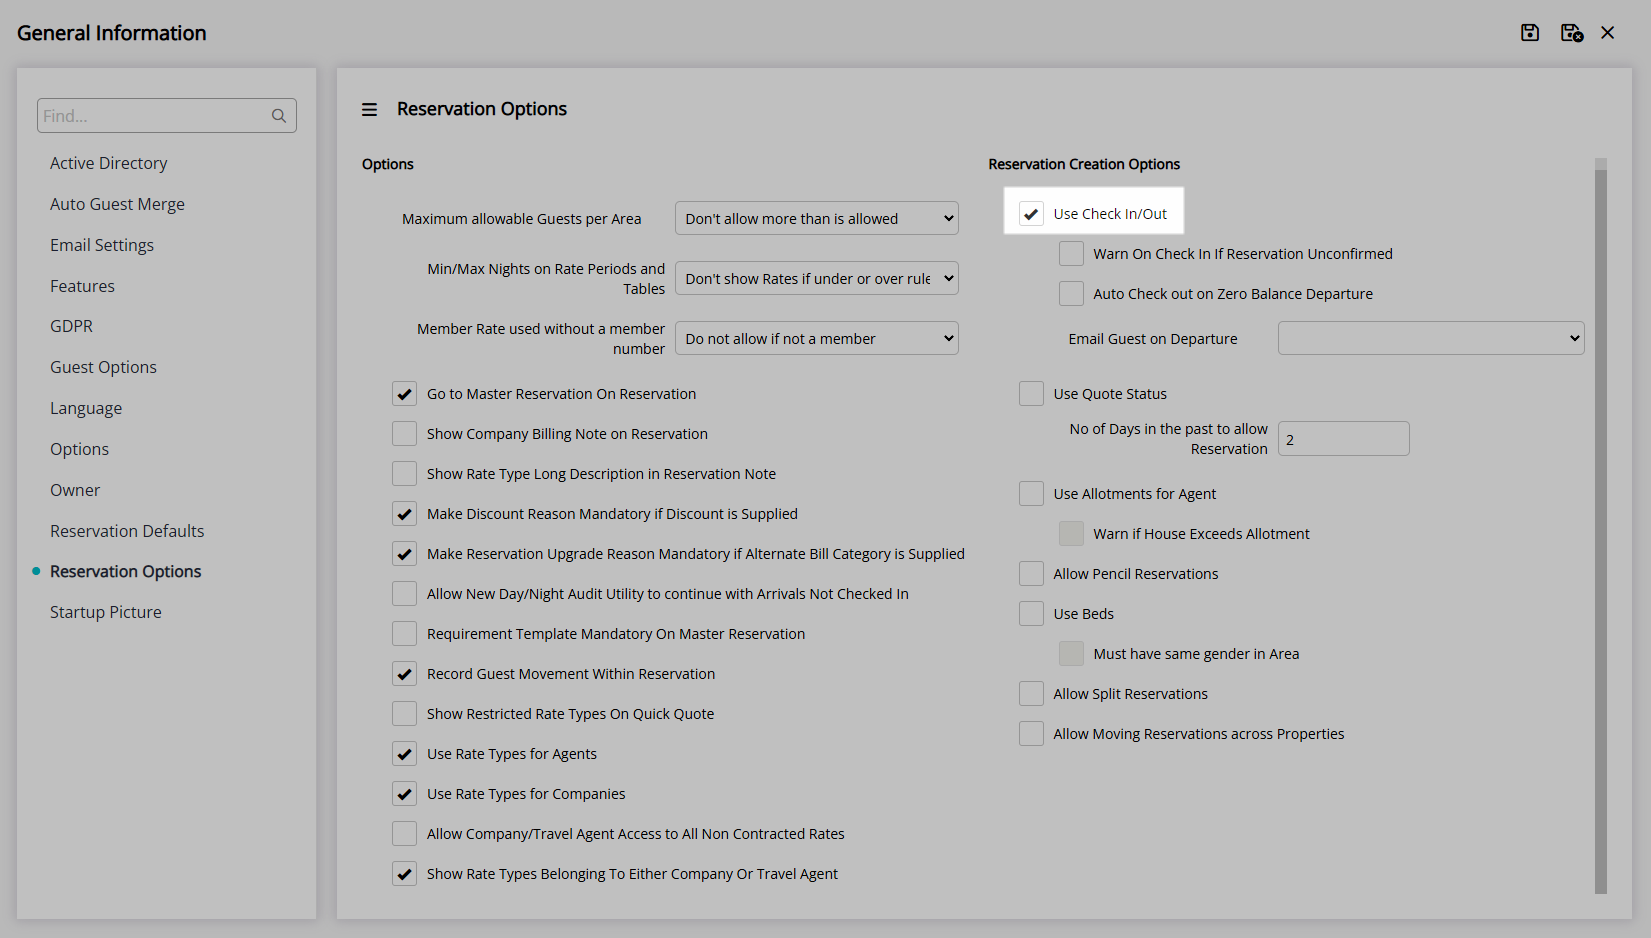
| Use Check-in/Check-out | Enables recording the arrival and departure of a Guest with 'Arrived' and 'Departed' Reservation Statuses. See Also: Check-in/Check-out |
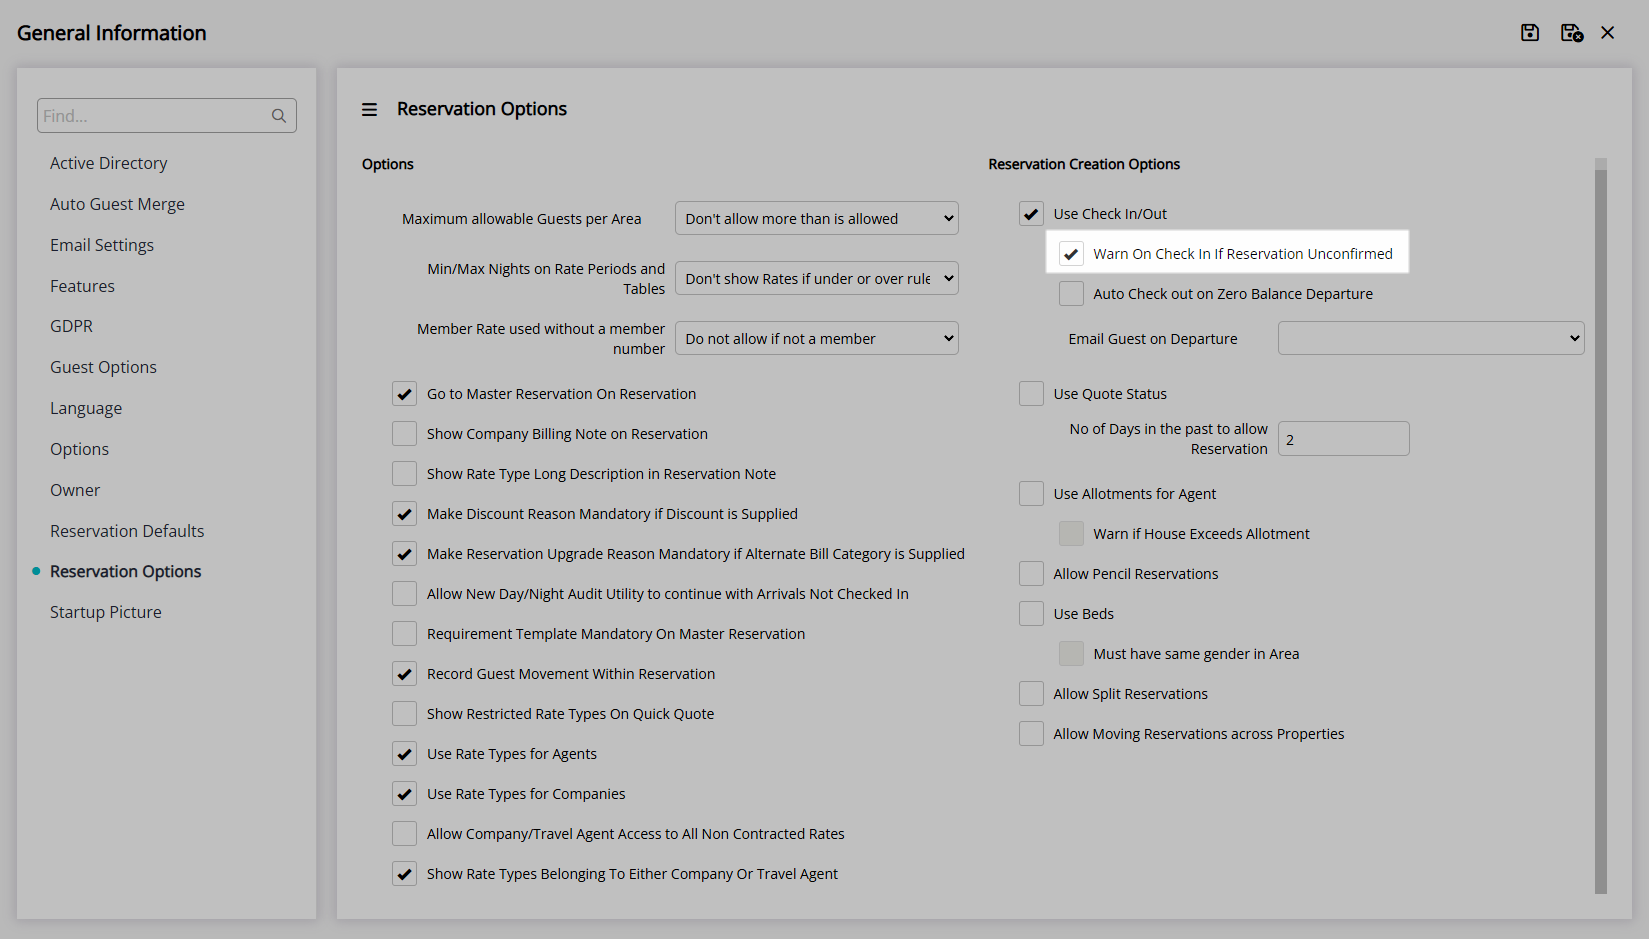
| Warn on Check-In If Reservation Unconfirmed | Prompts the User when selecting 'Check-in' on a Reservation if the Reservation is not in 'Confirmed' status. Must be using Check-in/Check-out. |
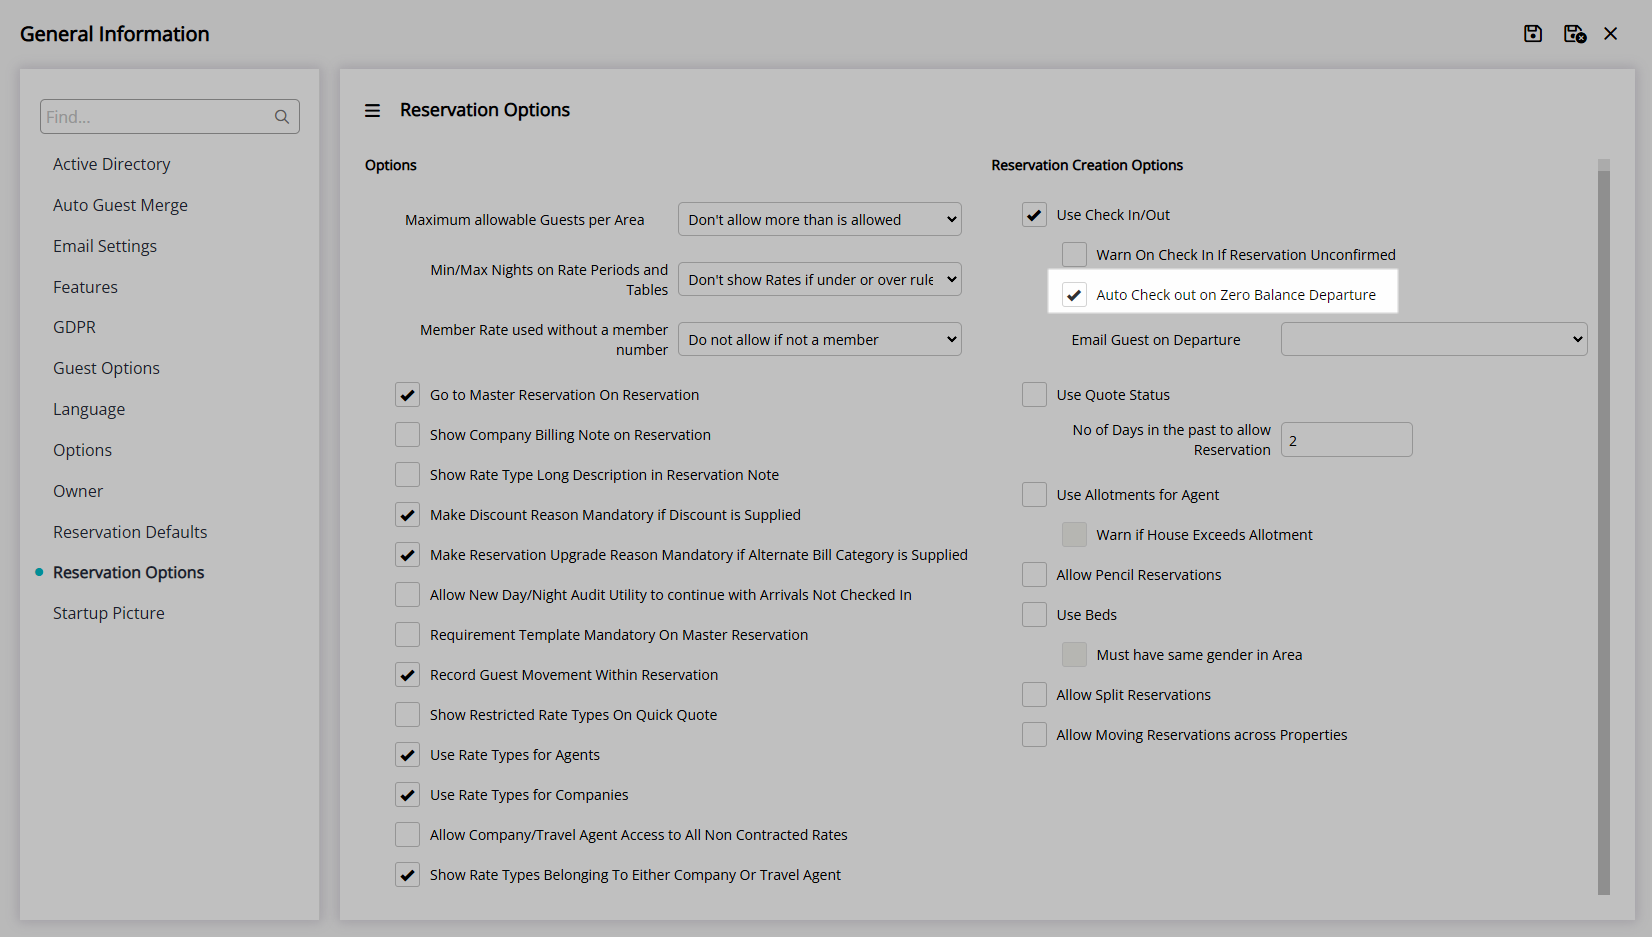
| Auto Check-out on Zero Balance Departure |
Reservations with a Depart Date of today and no outstanding balance will be automatically changed to 'Departed' status when exiting the Reservation Account. Must be using Check-in/Check-out. |
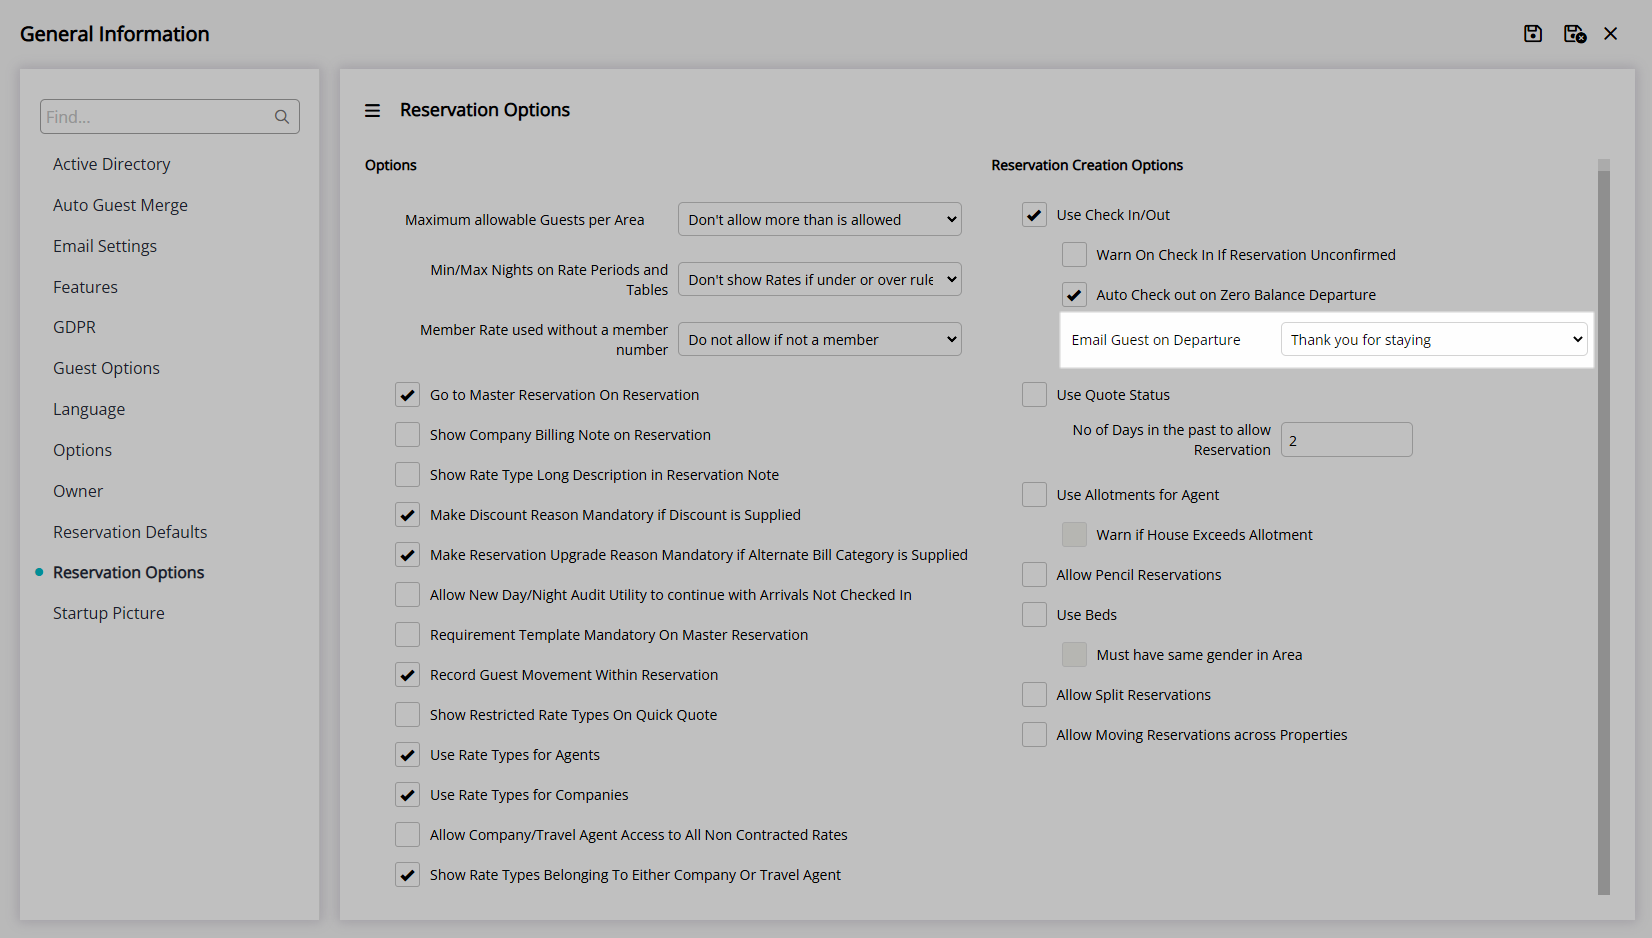
| Email Guest on Departure | Sends the selected Form Letter to the Primary Guest on the Reservation when the Reservation Status is automatically changed to 'Departed' on zero balance. Must be using 'Auto Check-out on Zero Balance Departure'. |
| Use Quote Status | Enables 'Quote' as a Reservation Status for manual creation of Quote Reservations. |
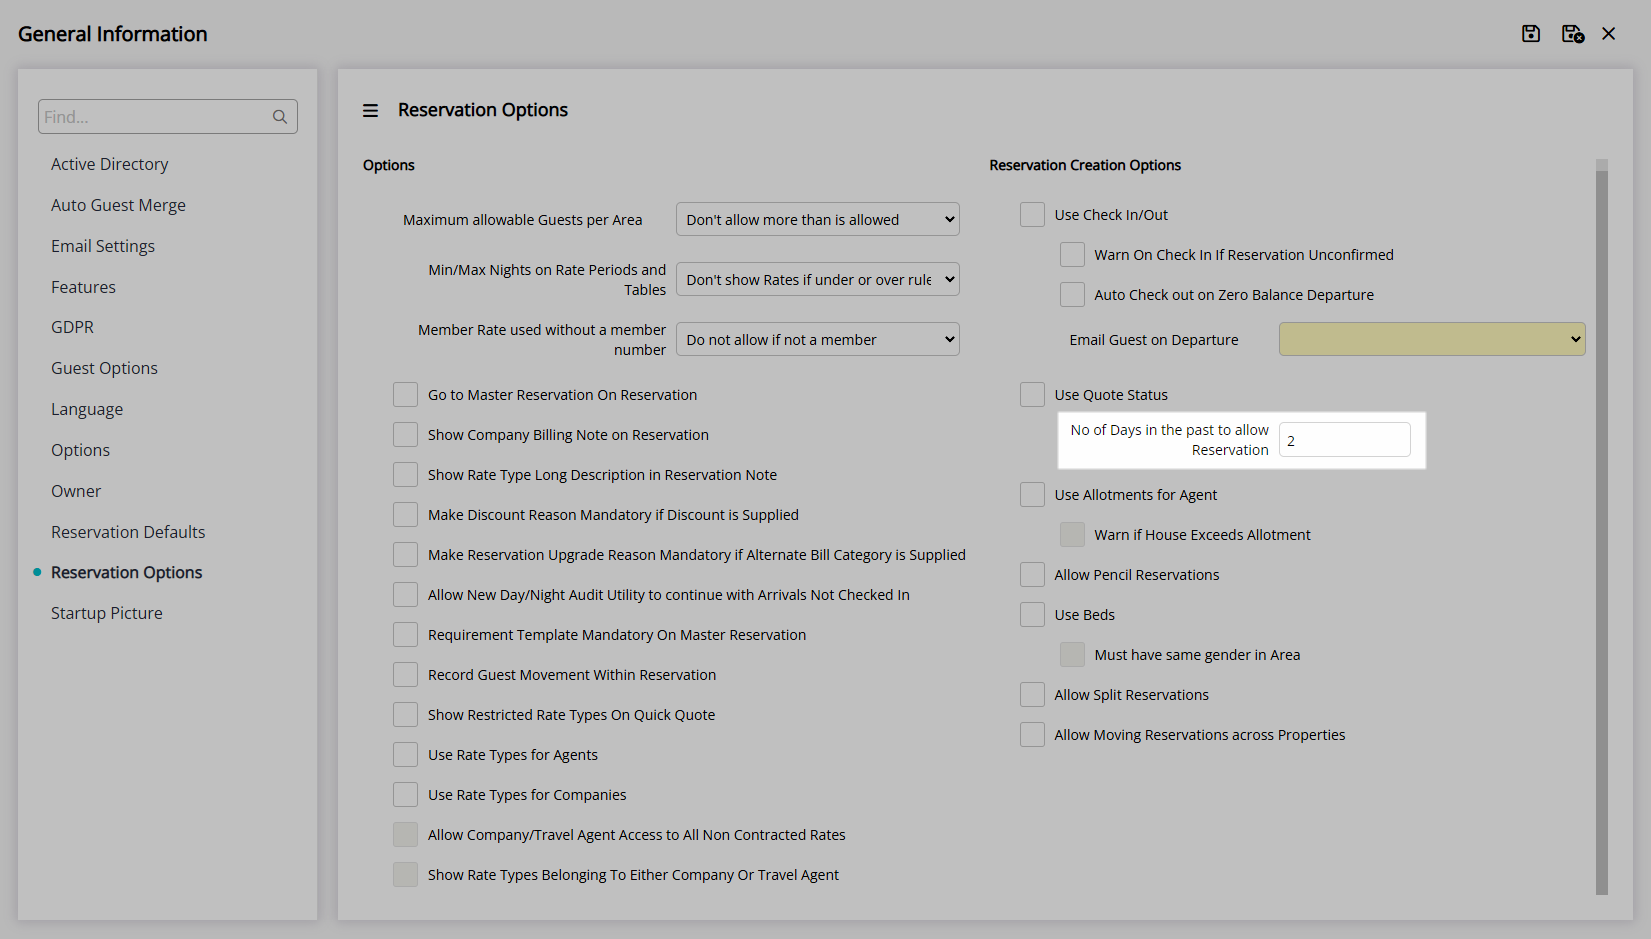
| Number of Days in the past to allow Reservation | Defines the period of time in the past the Arrive Date can be set to for a new Reservation. |
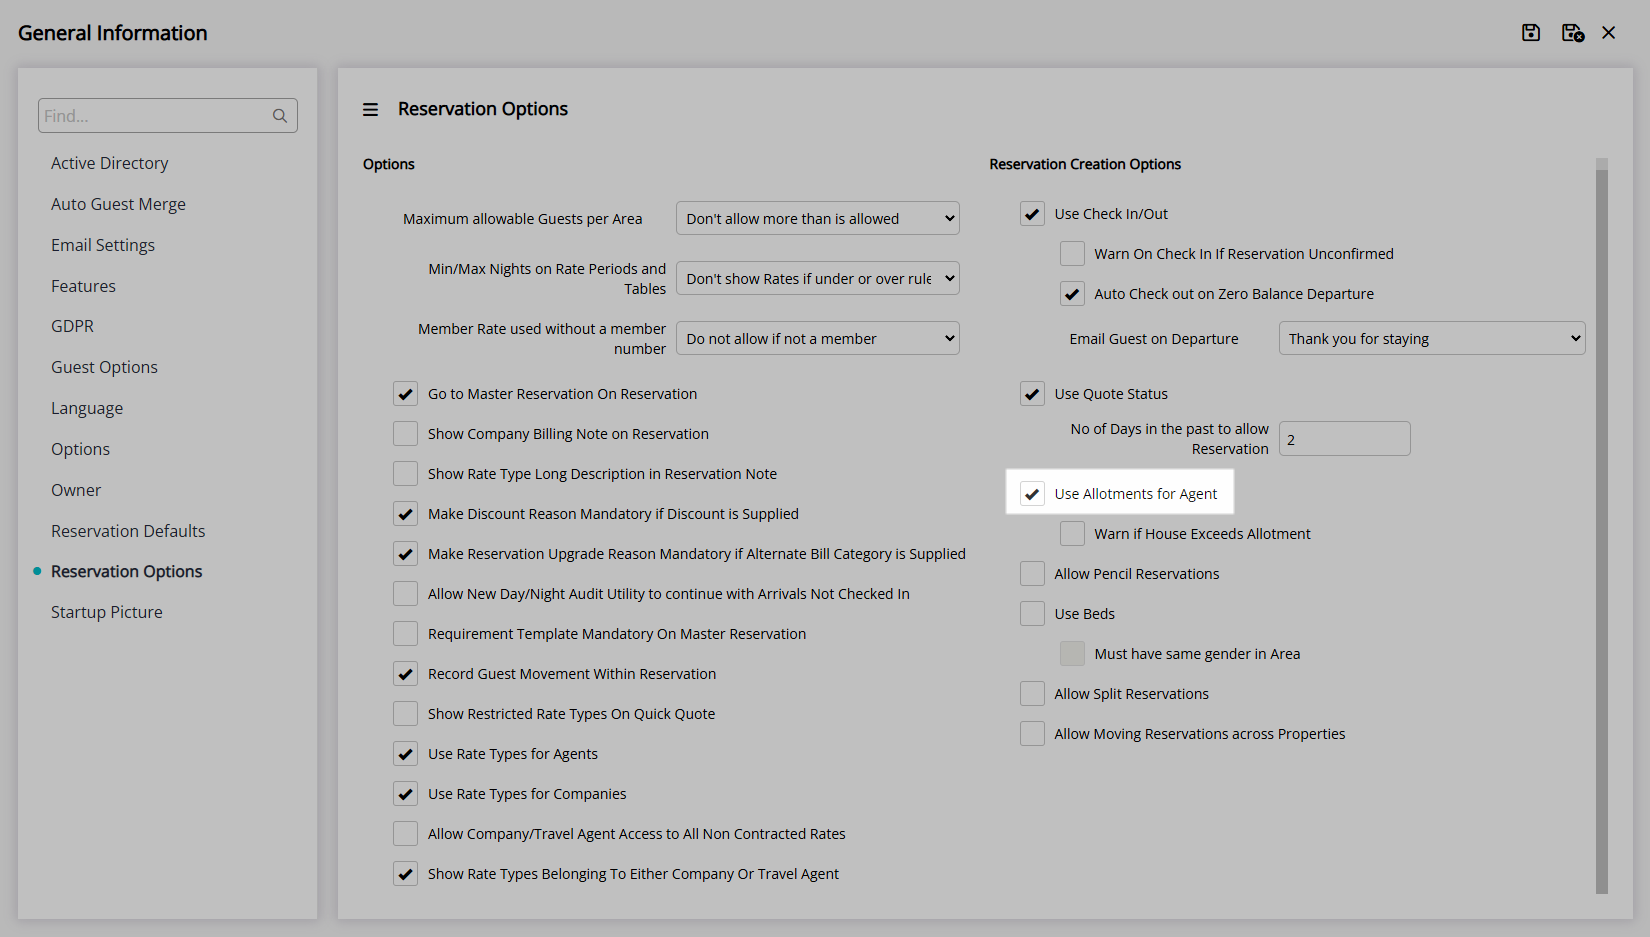
| Use Allotments for Agent | Enables Travel Agent Allotments to reserve inventory for use by a particular . |
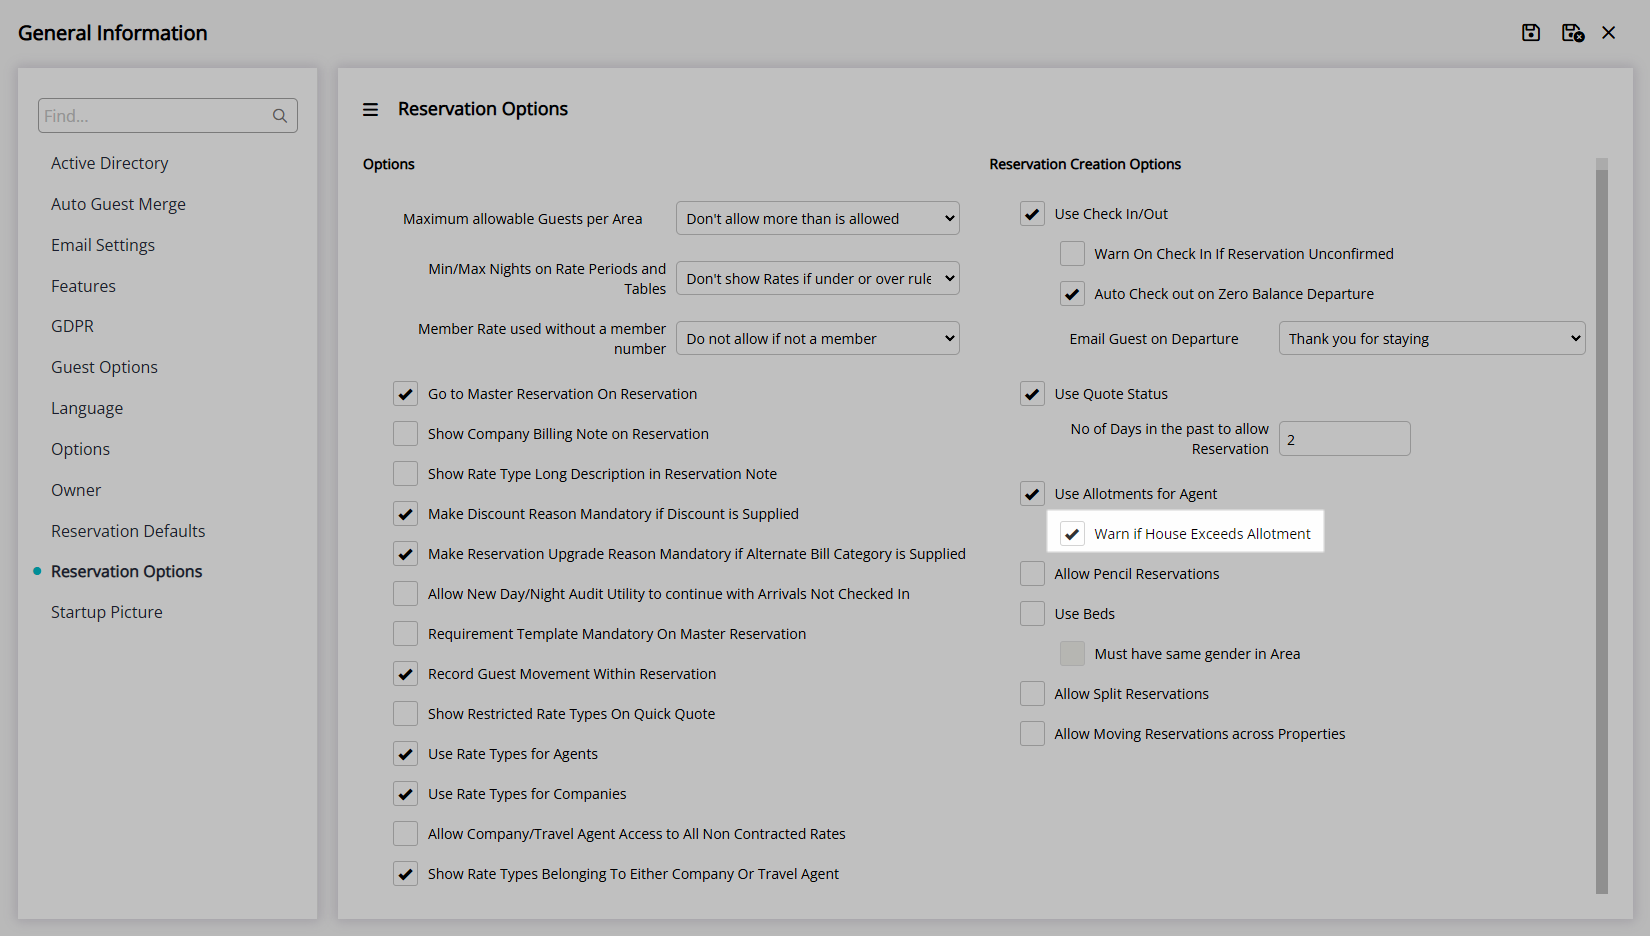
| Warn if House Exceeds Allotment | Will prompt a User when creating a new Reservation if the House Use Allotment has been reached. Must be using Allotment for Agent. |
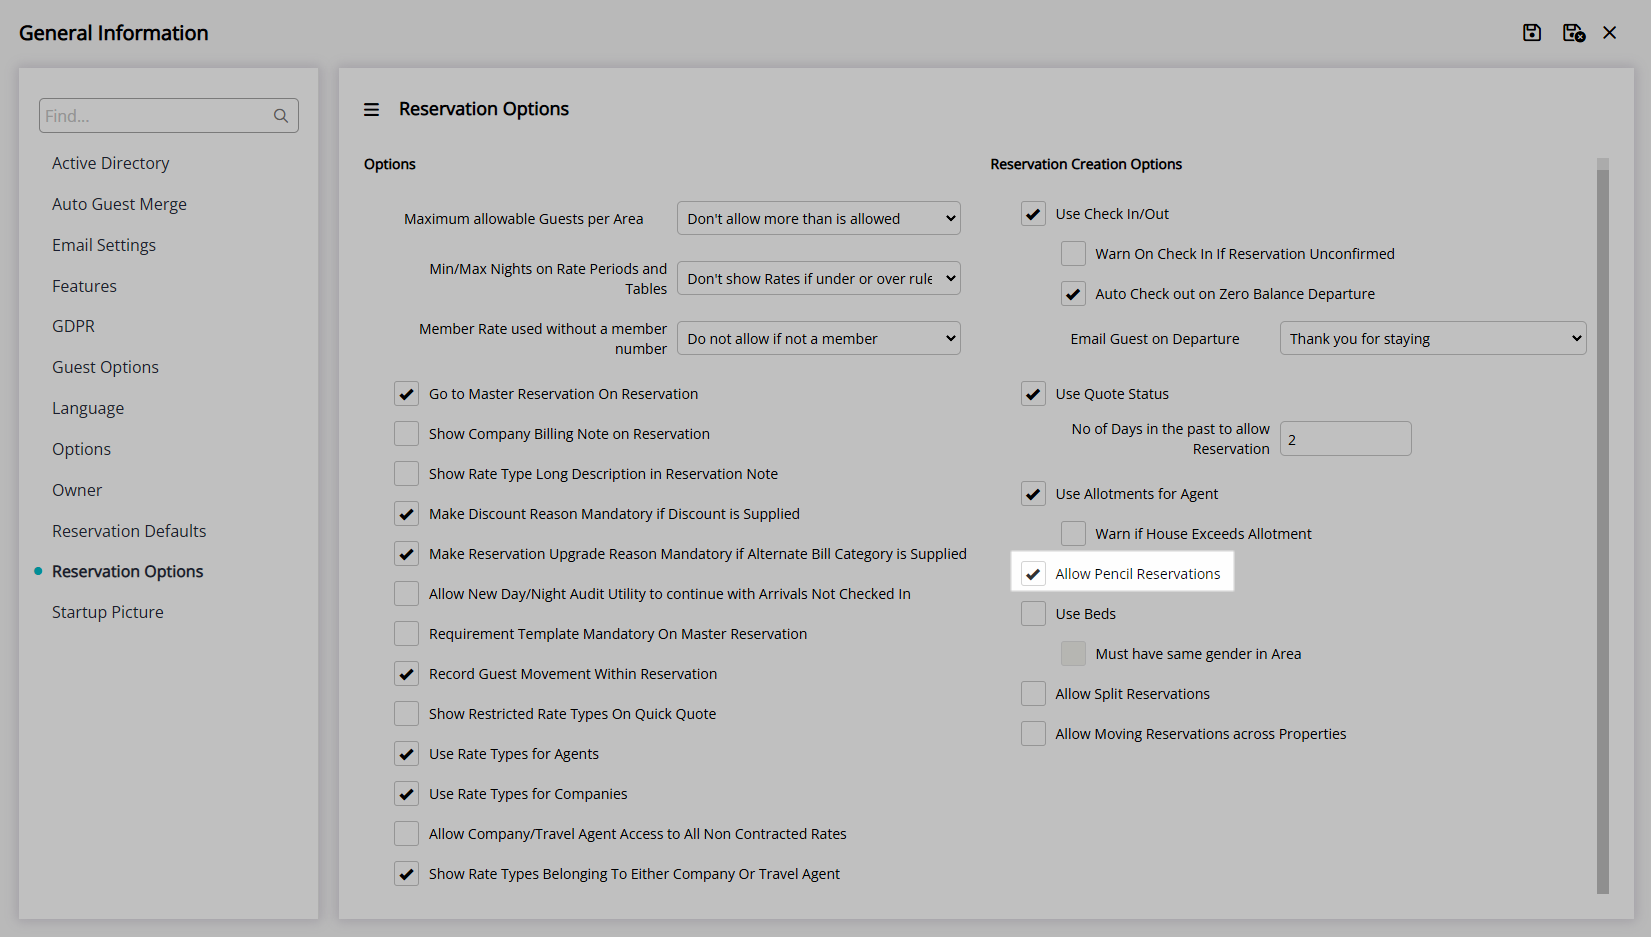
| Allow Pencil Reservations | Enables creating Pencil Reservations to place a temporary hold on availability with minimal Guest details that includes an automatic expiry. See Also: Pencil Reservations |
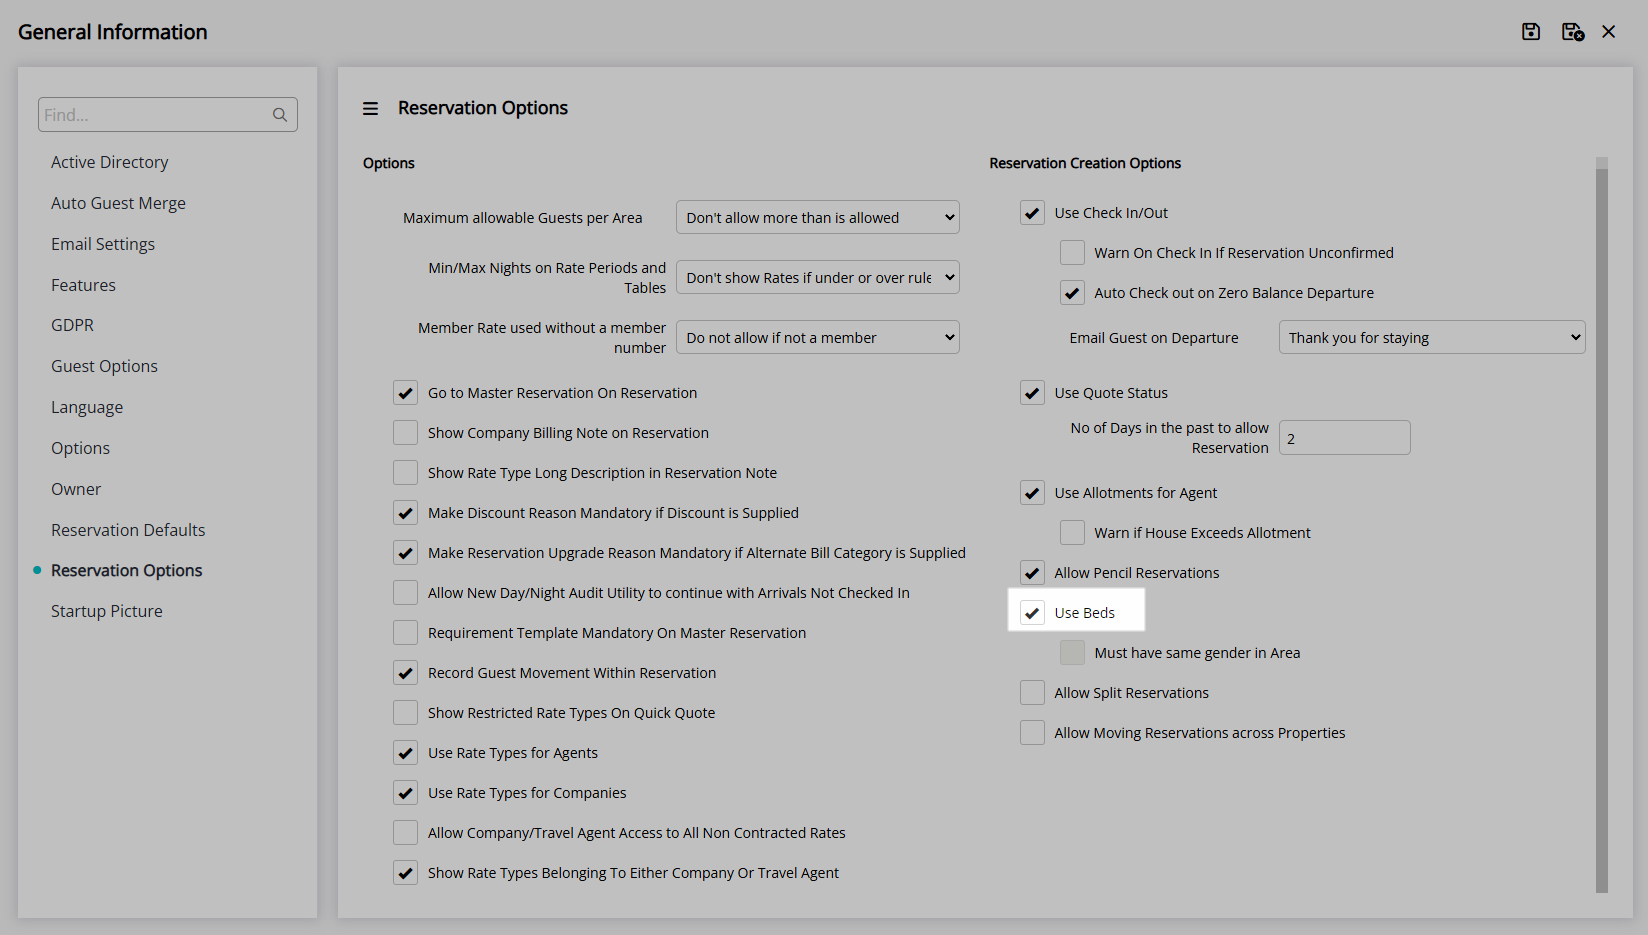
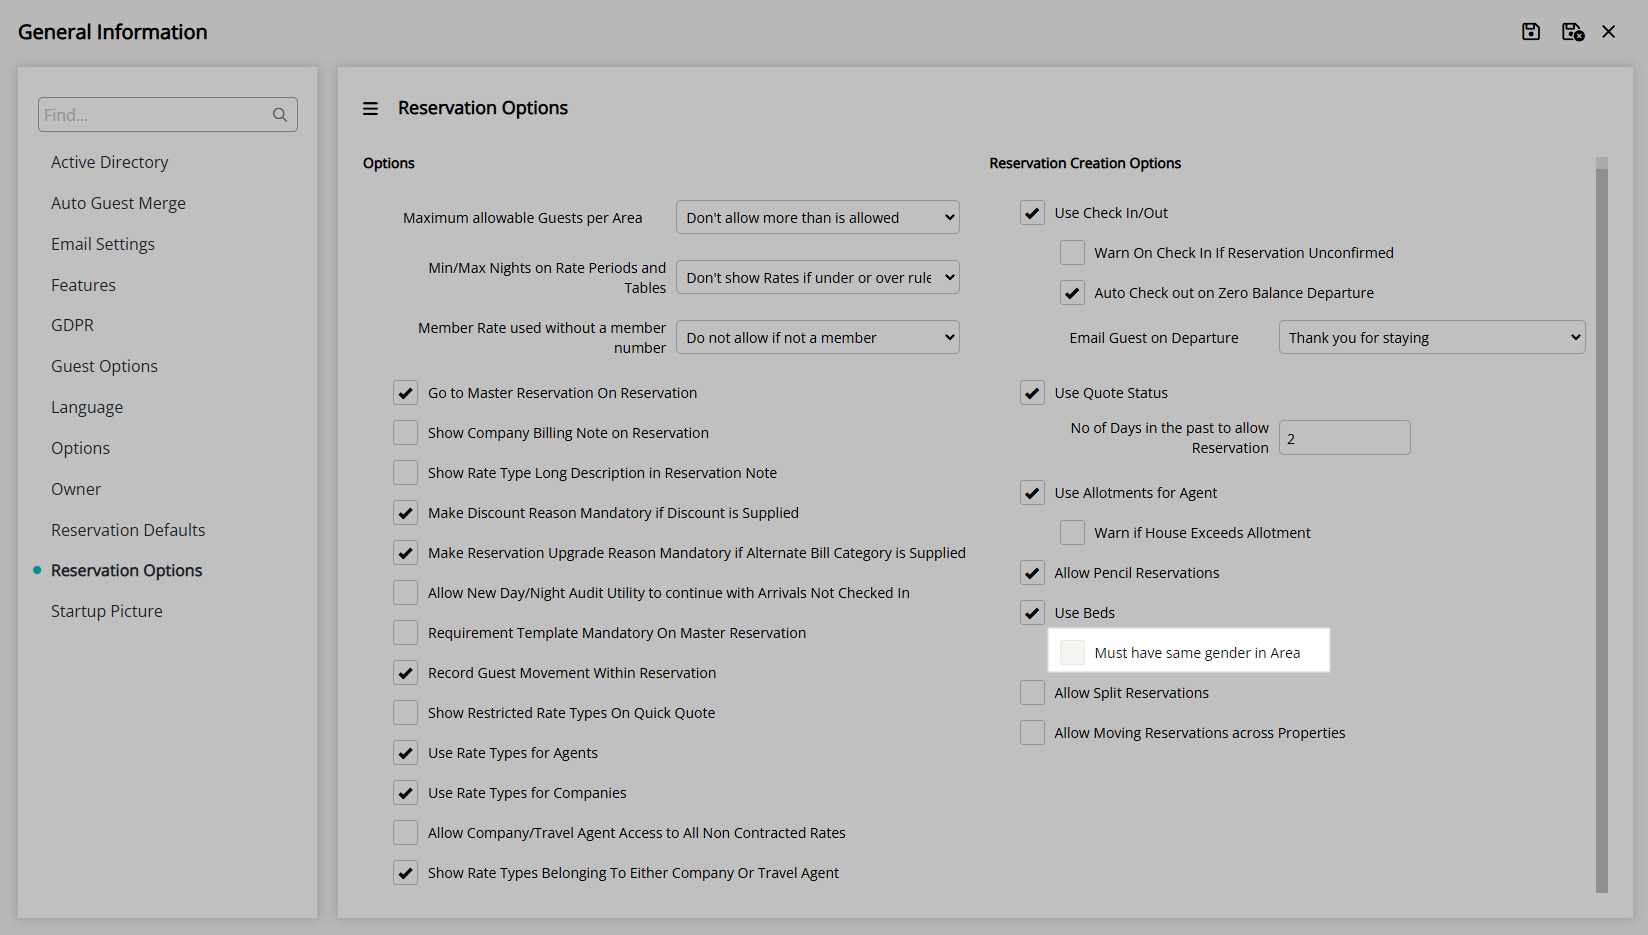
| Use Beds | Enables dorm-style accommodation setup for Areas. |
| Must have same gender in Area | Limits additional Bed Reservations to match the gender of Guests for existing Bed Reservations in the Area on those dates. Must be using Beds. |
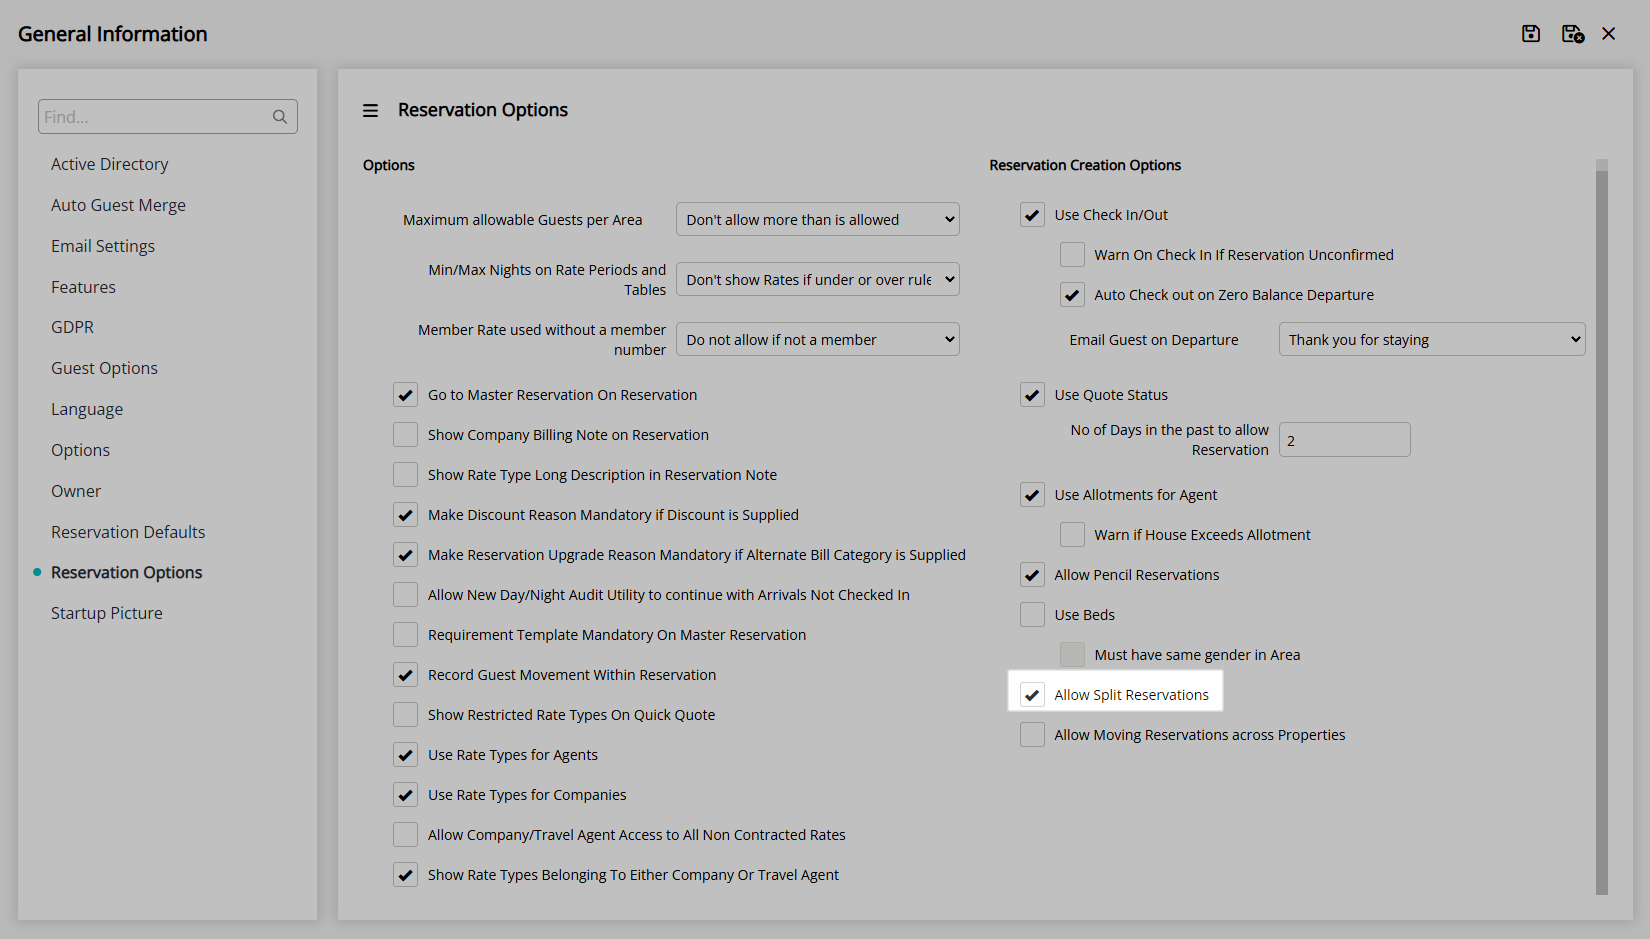
| Allow Split Reservations | Enables accurate recording of a Guest's movement between Areas during their stay. See Also: Split Reservations |
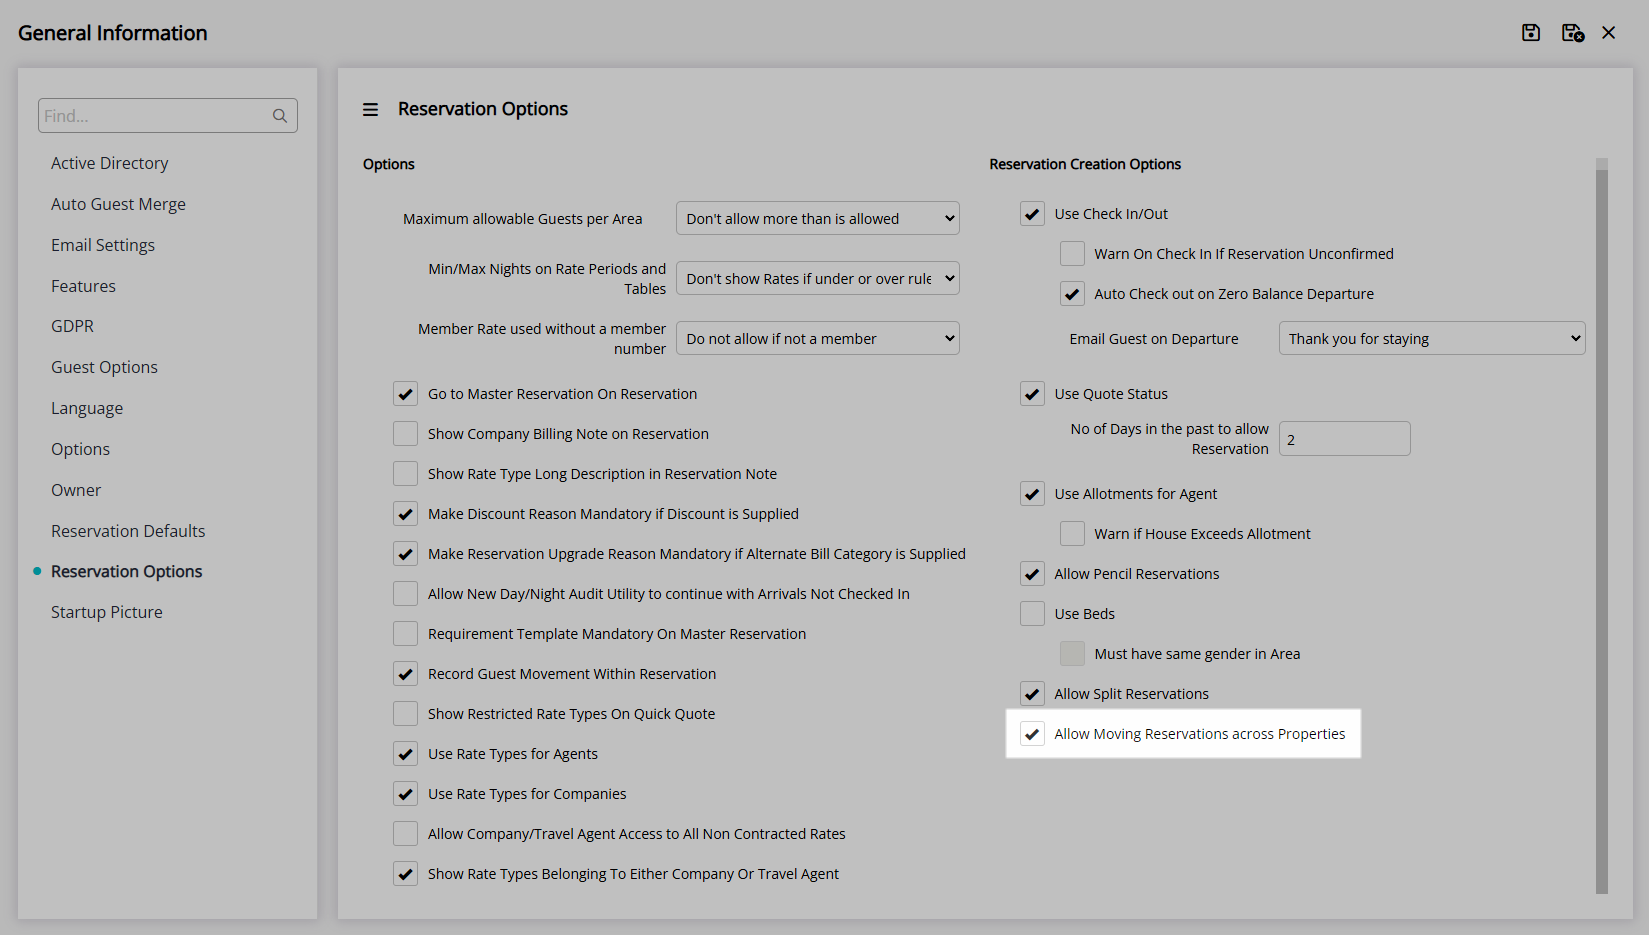
| Allow Moving Reservations Across Properties | Enables moving a Reservation from one Property to another for Enterprise customers. See Also: Allow Moving Reservations Across Properties |

Category, Area, Arrive, Depart, Company, Travel Agent, Wholesaler, Reservation, Guest and Rate are default System Labels that can be customised.

System Administrators will require Security Profile access to setup this feature.
-
Setup
- Add Button
Setup
Have your System Administrator complete the following.
- Go to Setup > Property Options > General Information in the Side Menu of RMS.
- Navigate to the 'Reservation Options' tab.
- Select a Maximum Allowable Guests Per Area option.
- Select a Min/Max Nights on Rate Periods and Tables option.
- Select a Member Rate Used Without a Member Number option.
- Enter the Number of Days in the Past to Allow New Reservations.
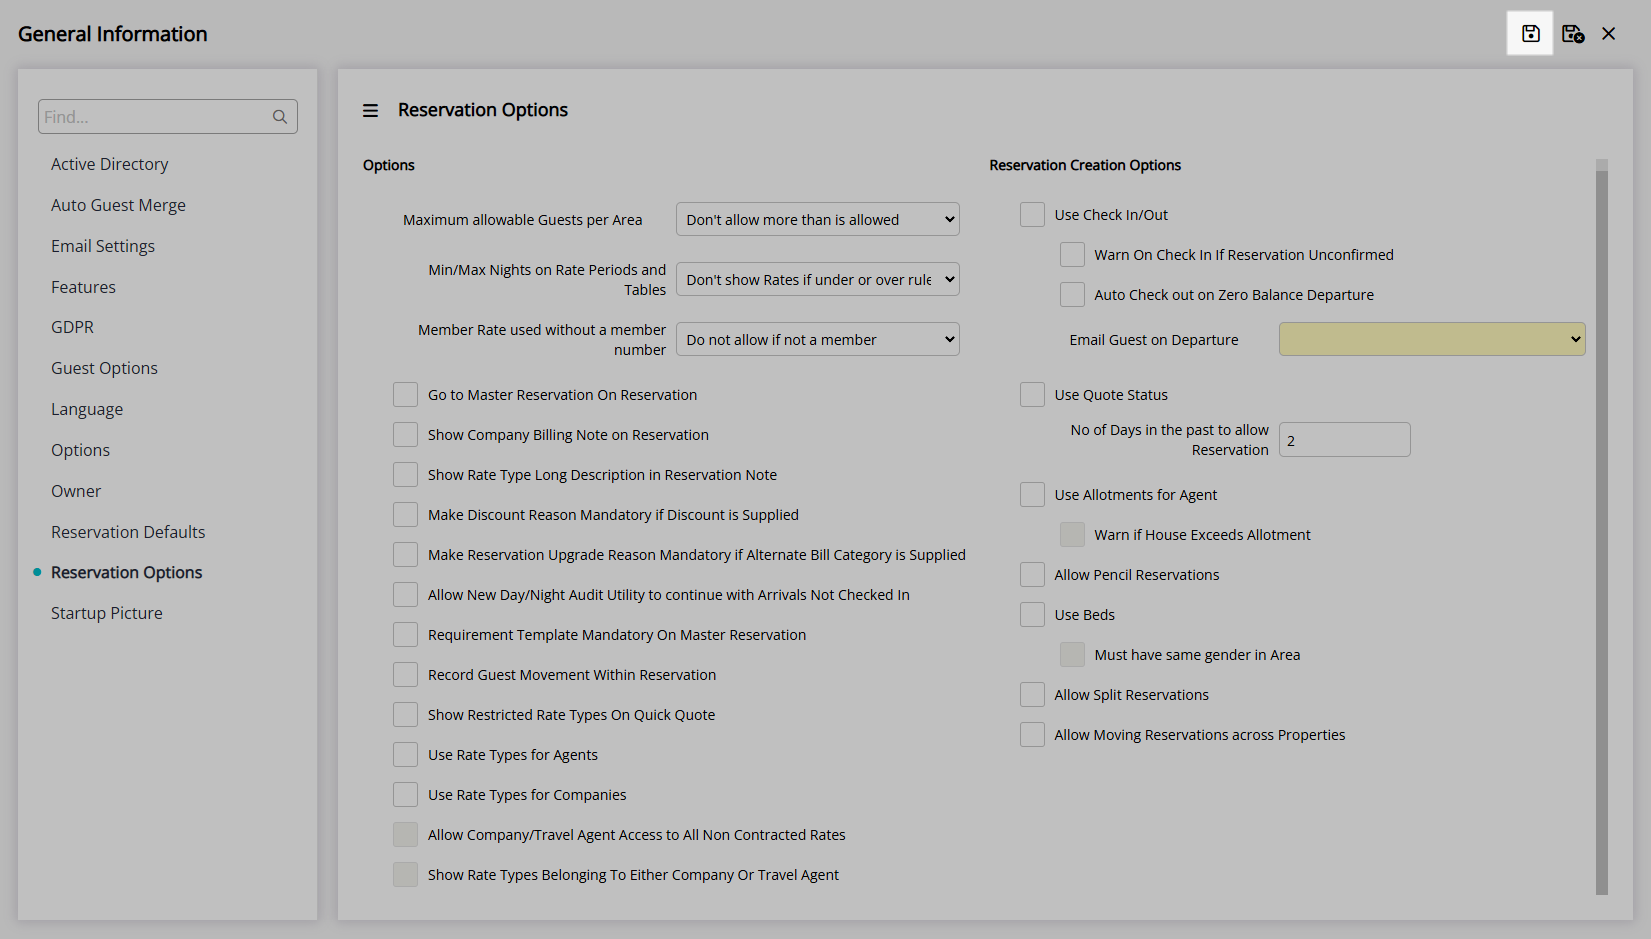
- Save.
-
Optional Setup:
- Optional: Select the checkbox 'Go to Master Reservation on Reservation'.
- Optional: Select the checkbox 'Show Company Billing Notes on Reservation'.
- Optional: Select the checkbox 'Show Rate Type Long Description in Reservation Note'.
- Optional: Select the checkbox 'Make Discount Reason Mandatory if Discount is Supplied'.
- Optional: Select the checkbox 'Make Reservation Upgrade Reason Mandatory if Alternate Bill Category is Supplied'.
- Optional: Select the checkbox 'Allow New Day/Night Audit to continue with Arrivals Not Checked In'.
- Optional: Select the checkbox 'Requirement Template Mandatory on Master Reservation'.
- Optional: Select the checkbox 'Record Guest Movement Within a Reservation'.
- Optional: Select the checkbox 'Show Restricted Rate Types on Quick Quote'.
- Optional: Select the checkbox 'Use Rate Types for Agents'.
- Optional: Select the checkbox 'Use Rate Types for Companies'.
- Optional: Select the checkbox 'Allow Company/Travel Agent Access to All Non Contracted Rates'.
- Optional: Select the checkbox 'Show Rate Types Belonging to Either Company or Travel Agent'.
-
Reservation Creation Options:
-
Optional: Select the checkbox 'Check-in/Check-out'.
- Optional: Select the checkbox 'Warn on Check-in if Reservation Unconfirmed'.
-
Optional: Select the checkbox 'Auto Check-out on Zero Balance Departure'.
- Optional: Select a Form Letter to Email Guest on Departure.
- Optional: Select the checkbox 'Use Quote Status'.
-
Optional: Select the checkbox 'Use Allotments for Agent'.
- Optional: Select the checkbox 'Warn if House Exceeds Allotment'.
- Optional: Select the checkbox 'Allow Pencil Reservations'.
-
Optional: Select the checkbox 'Use Beds'.
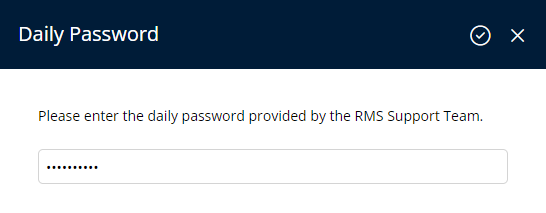
- Enter the Daily Password and select the
 'Apply/Exit' icon.
 - Optional: Select the checkbox 'Must have same gender in Area'.
- Enter the Daily Password and select the
- Optional: Select the checkbox 'Allow Split Reservations'.
- Optional: Select the checkbox 'Allow Moving Reservations Across Properties'.
-
Optional: Select the checkbox 'Check-in/Check-out'.
- Save/Exit.
- Log out of RMS.

See the 'Information' section of this article for more details on each of the available options.
-
Guide
- Add Button
Guide
Go to Setup > Property Options > General Information in the Side Menu of RMS.
Navigate to the 'Reservation Options' tab.
Select a Maximum Allowable Guests Per Area option.
Select a Min/Max Nights on Rate Periods and Tables option.
Select a Member Rate Used Without a Member Number option.
Enter the Number of Days in the Past to Allow New Reservations.
Select the  'Save' icon to store the changes made.
Optional Setup:
Optional: Select the checkbox 'Go to Master Reservation on Reservation'.
Optional: Select the checkbox 'Show Company Billing Notes on Reservation'.
Optional: Select the checkbox 'Show Rate Type Long Description in Reservation Note'.
Optional: Select the checkbox 'Make Discount Reason Mandatory if Discount is Supplied'.
Optional: Select the checkbox 'Make Reservation Upgrade Reason Mandatory if Alternate Bill Category is Supplied'.
Optional: Select the checkbox 'Allow New Day/Night Audit to continue with Arrivals Not Checked In'.
Optional: Select the checkbox 'Requirement Template Mandatory on Master Reservation'.
Optional: Select the checkbox 'Record Guest Movement Within a Reservation'.
Optional: Select the checkbox 'Show Restricted Rate Types on Quick Quote'.
Optional: Select the checkbox 'Use Rate Types for Agents'.
Optional: Select the checkbox 'Use Rate Types for Companies'.
Optional: Select the checkbox 'Allow Company/Travel Agent Access to All Non Contracted Rates'.
Optional: Select the checkbox 'Show Rate Types Belonging to Either Company or Travel Agent'.
Reservation Creation Options:
Optional: Select the checkbox 'Check-in/Check-out'.
Optional: Select the checkbox 'Warn on Check-in if Reservation Unconfirmed'.
Optional: Select the checkbox 'Auto Check-out on Zero Balance Departure'.
Optional: Select a Form Letter to Email Guest on Departure.
Optional: Select the checkbox 'Use Quote Status'.

Optional: Select the checkbox 'Use Allotments for Agent'.
Optional: Select the checkbox 'Warn if House Exceeds Allotment'.
Optional: Select the checkbox 'Allow Pencil Reservations'.
Optional: Select the checkbox 'Use Beds'.
Enter the Daily Password and select the  'Apply/Exit' icon.
Optional: Select the checkbox 'Must have same gender in Area'.
Optional: Select the checkbox 'Allow Split Reservations'.
Optional: Select the checkbox 'Allow Moving Reservations Across Properties'.
Select the  'Save/Exit' icon to store the changes made and leave the setup.
Log out of RMS to allow the database to update with the changes made.

The options selected will be used for Reservations at all Properties.
Setup
Have your System Administrator complete the following.
- Go to Setup > Property Options > General Information in the Side Menu of RMS.
- Navigate to the 'Reservation Options' tab.
- Select a Maximum Allowable Guests Per Area option.
- Select a Min/Max Nights on Rate Periods and Tables option.
- Select a Member Rate Used Without a Member Number option.
- Enter the Number of Days in the Past to Allow New Reservations.
- Save.
-
Optional Setup:
- Optional: Select the checkbox 'Go to Master Reservation on Reservation'.
- Optional: Select the checkbox 'Show Company Billing Notes on Reservation'.
- Optional: Select the checkbox 'Show Rate Type Long Description in Reservation Note'.
- Optional: Select the checkbox 'Make Discount Reason Mandatory if Discount is Supplied'.
- Optional: Select the checkbox 'Make Reservation Upgrade Reason Mandatory if Alternate Bill Category is Supplied'.
- Optional: Select the checkbox 'Allow New Day/Night Audit to continue with Arrivals Not Checked In'.
- Optional: Select the checkbox 'Requirement Template Mandatory on Master Reservation'.
- Optional: Select the checkbox 'Record Guest Movement Within a Reservation'.
- Optional: Select the checkbox 'Show Restricted Rate Types on Quick Quote'.
- Optional: Select the checkbox 'Use Rate Types for Agents'.
- Optional: Select the checkbox 'Use Rate Types for Companies'.
- Optional: Select the checkbox 'Allow Company/Travel Agent Access to All Non Contracted Rates'.
- Optional: Select the checkbox 'Show Rate Types Belonging to Either Company or Travel Agent'.
-
Reservation Creation Options:
-
Optional: Select the checkbox 'Check-in/Check-out'.
- Optional: Select the checkbox 'Warn on Check-in if Reservation Unconfirmed'.
-
Optional: Select the checkbox 'Auto Check-out on Zero Balance Departure'.
- Optional: Select a Form Letter to Email Guest on Departure.
- Optional: Select the checkbox 'Use Quote Status'.
-
Optional: Select the checkbox 'Use Allotments for Agent'.
- Optional: Select the checkbox 'Warn if House Exceeds Allotment'.
- Optional: Select the checkbox 'Allow Pencil Reservations'.
-
Optional: Select the checkbox 'Use Beds'.
- Enter the Daily Password and select the 'Apply/Exit' icon.
- Optional: Select the checkbox 'Must have same gender in Area'.
- Enter the Daily Password and select the
- Optional: Select the checkbox 'Allow Split Reservations'.
- Optional: Select the checkbox 'Allow Moving Reservations Across Properties'.
-
Optional: Select the checkbox 'Check-in/Check-out'.
- Save/Exit.
- Log out of RMS.
See the 'Information' section of this article for more details on each of the available options.
-
Guide
- Add Button
Guide
Go to Setup > Property Options > General Information in the Side Menu of RMS.
Navigate to the 'Reservation Options' tab.
Select a Maximum Allowable Guests Per Area option.
Select a Min/Max Nights on Rate Periods and Tables option.
Select a Member Rate Used Without a Member Number option.
Enter the Number of Days in the Past to Allow New Reservations.
Select the 'Save' icon to store the changes made.
Optional Setup:
Optional: Select the checkbox 'Go to Master Reservation on Reservation'.
Optional: Select the checkbox 'Show Company Billing Notes on Reservation'.
Optional: Select the checkbox 'Show Rate Type Long Description in Reservation Note'.
Optional: Select the checkbox 'Make Discount Reason Mandatory if Discount is Supplied'.
Optional: Select the checkbox 'Make Reservation Upgrade Reason Mandatory if Alternate Bill Category is Supplied'.
Optional: Select the checkbox 'Allow New Day/Night Audit to continue with Arrivals Not Checked In'.
Optional: Select the checkbox 'Requirement Template Mandatory on Master Reservation'.
Optional: Select the checkbox 'Record Guest Movement Within a Reservation'.
Optional: Select the checkbox 'Show Restricted Rate Types on Quick Quote'.
Optional: Select the checkbox 'Use Rate Types for Agents'.
Optional: Select the checkbox 'Use Rate Types for Companies'.
Optional: Select the checkbox 'Allow Company/Travel Agent Access to All Non Contracted Rates'.
Optional: Select the checkbox 'Show Rate Types Belonging to Either Company or Travel Agent'.
Reservation Creation Options:
Optional: Select the checkbox 'Check-in/Check-out'.
Optional: Select the checkbox 'Warn on Check-in if Reservation Unconfirmed'.
Optional: Select the checkbox 'Auto Check-out on Zero Balance Departure'.
Optional: Select a Form Letter to Email Guest on Departure.
Optional: Select the checkbox 'Use Quote Status'.
Optional: Select the checkbox 'Use Allotments for Agent'.
Optional: Select the checkbox 'Warn if House Exceeds Allotment'.
Optional: Select the checkbox 'Allow Pencil Reservations'.
Optional: Select the checkbox 'Use Beds'.
Enter the Daily Password and select the 'Apply/Exit' icon.
Optional: Select the checkbox 'Must have same gender in Area'.
Optional: Select the checkbox 'Allow Split Reservations'.
Optional: Select the checkbox 'Allow Moving Reservations Across Properties'.
Select the 'Save/Exit' icon to store the changes made and leave the setup.
Log out of RMS to allow the database to update with the changes made.
The options selected will be used for Reservations at all Properties.